Optimize Your Vue App with Suspense and Webpack


When creating a web application, we want to have a faster loading experience as a few seconds in loading can be a deal-breaker for most people. This tutorial will look at how we can solve this and improve Vue.js site performance with lazy loading.
Overview
In this tutorial, we will use the lazy loading component to speed up loading time. We will dive deep into asynchronous component loading in Vue. We will also look at how to use webpack magic components in naming our chunks.
We will have a brief look at how webpack works and how bundling helps in reducing component size, then we look at how to dynamically import components and use Suspense to lazy split components.
How webpack works?
To be a good Vue developer, you need to understand how webpack works. The pride of webpack is its ability to reduce the size of bundles in your code. For your site to load faster, there has to be a smaller bundle to be downloaded by the client. The larger the bundle gets, the slower browsing the site becomes, which can become problematic for a business.
Webpack works as a build tool by bundling all of your files, including fonts, JavaScript, images, and CSS, into a node or file that you have assigned to be your entry point. The bundling forms what we call a "dependency graph". The graph looks like this:

Webpack uses the dependency graph to know which file/module should be added to the main output bundle. We now know a little about how bundling works and how the final size of our bundles can affect load time and site speed.
Lazy Loading Components
This section will examine which components should be lazy-loaded, reasons for lazy loading, and how lazy loading affects user experience. Generally, we want to lazy load components that aren't needed on a particular page, like a pop-up or modal in your site meant for another page. You don't want to include this kind of component in your main javascript bundle. If we take, for example, the flutterwave site, a payment site used for making and accepting international payments. When we visit the dev tools and press ctrl+shift+p and type coverage, then reload the page,
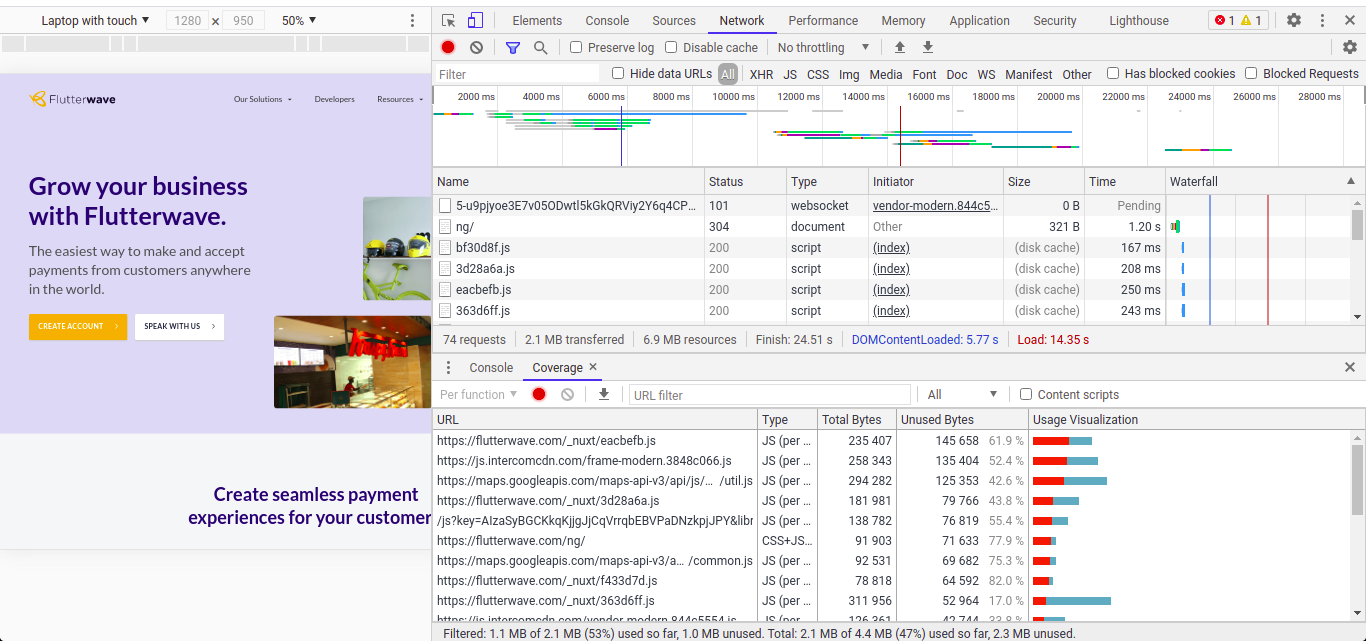
We can see the red and blue bars. The red part indicates the part of the site that can be lazy-loaded to improve the site's performance. The reason for lazy loading is evident as it boosts the site's performance and positively affects user engagement as a slight delay in load time of a site can lead to a business losing customers, as research has shown.
Proof of Concept
To demonstrate what I am about to explain in the rest of the tutorial, we will be using a simple Netflix clone I have created.

Above, we can see some tags like PopularMovies, TrendingMovies. Under each tag are components that are synchronously loaded, and we want to lazy-load. We would be looking at how to lazy load the movie components, use webpack magic comments and the experimental suspense API to optimize the site.
Synchronous component loading
The traditional way of loading our components is synchronous. We do this by just importing the component.
Components loaded with a static import statement like above will be added to the existing application bundle. If code-splitting isn't used, then the application bundle becomes larger, affecting the overall performance. What we want is a dynamically loaded component, and that is what we will do next.
Dynamically importing components
To dynamically import components, we have to import a new API called defineAsyncComponent from Vue. Then we define the component with defineAsyncComponent. In the case of this site, we will only dynamically load the PopularMovies component, so we can see the difference between the popular movie component and the rest of the components that are synchronously loaded.
We have given the component the name of PopularMoviesAsync and imported the component from wherever it is in the file project file structure.
To know if what we just did works, we need to open the console, go to the Network panel, and reload the page. In our network panel, we can see a file 0.js, which is our new chunk file of the component we imported.
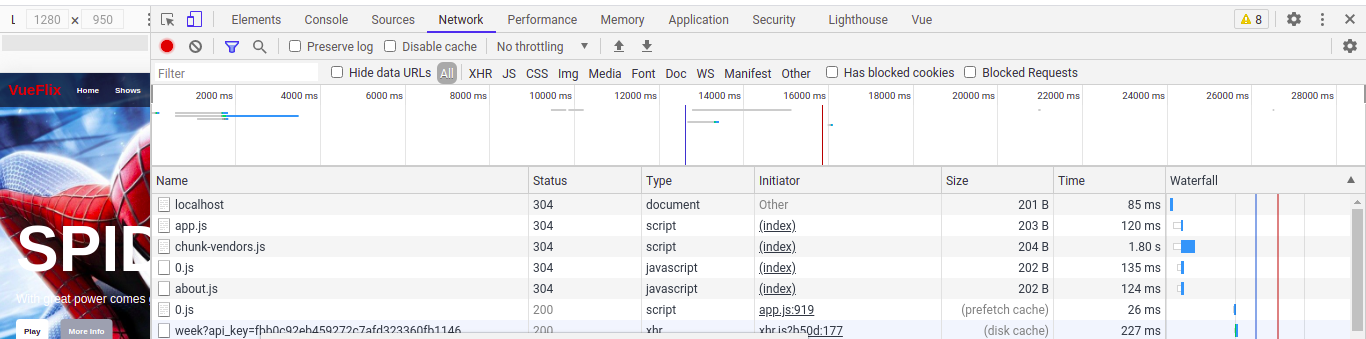
We can see from above under the preview the name of the component we are lazy loading.
Webpack Magic Comments
The Vue.js framework is built on the foundation of webpack. To be very good at Vue, we need to understand how webpack works behind the hood. In webpack, there are what we call "magic comments". Here we will use the magic comments from webpack to give the chunk created earlier a name, preferably something easier to understand instead of 0.js. Creating the magic comment is just like a regular javascript comment /* */.
We use webpackChunkName to tell webpack to give our chunk the name Popular. If we recheck the network panel and refresh, we will see Popular.js as our chunk name, which is more descriptive.
Now we can code split our application. Yayy!!. But we are not over yet, as I will show you how this API works in greater detail.
Using Suspense for custom loading
Sometimes, you may want to create a custom loading message for a component that may take time to load, such as a component that consumes moment.js, with all the locales loaded, or a component that shows different dates, times, and formatting. In this scenario, you may need to create a custom loading message for that, which we will look at in this section.
To do that, we will need to tell the asynchronous component to display its loading message and not bubble up to the suspense boundary.
In the code above, we can see that defineAsyncComponent accepts a callback that we can use to configure the custom loading message. The loader property we see is that callback. Then the loadingComponent will be Loading, a placeholder component we have created containing a custom message we want to display.
We set a delay of 200 as the time we need to exhaust before the loading component shows. We can also do other stuff like adding an error component that displays if there is an error. Also, a timeout of 2000 can be set, which is a default timeout that you use before showing the error component. If this asynchronous action has not been completed within the timeout, we show the error component. We set suspensible to false, which means not to oblige a parent suspense boundary.
Default and Fallback in Our Suspense
We can see in our suspense boundary above if the boundary wins, the fallback template is displayed with the loading message instead of the default template.
Testing what we did
So to properly see the result of what we have done, we have to slow the time, so we go to the console, and in our network tab, we set throttling to fast 3g so which is how the internet speed will be for medium to low-end devices. We keep the console running while in the process so that the throttling can take effect. Then we reload the page, and we can now see the loading message before the component is displayed.

Here is the github code for this project, under the lazy-load branch.
Conclusion
In this tutorial, we have learned how to use the lazy loading component to reduce loading time. We also looked at asynchronous components in Vue and how to use webpack magic comments in naming our chunks.
I hope you enjoyed the tutorial, and you can send a message on Twitter if you have any questions.