Building a SaaS Application with Next.js, Prisma, Auth0 and Stripe


Introduction
This article is about my experience building a SaaS application. And while this won't be a step-by-step guide on how to build a SaaS app, I will be providing you valuable insight on what the process was like for me as well as teaching you about the methods and technologies that I used.
Software as a Service (SaaS) is a business model whereby the user pays a subscription to access cloud-based services or an application. In my case, I wanted to build an educational course platform where users can purchase an individual course to own for life or pay a subscription to gain access to all premium courses.
Before building this application, I had only used Stripe Checkout to process one-off payments. I wanted to use this opportunity to go a little deeper - primarily learning how Stripe handles recurring payments. I plan to implement what I have learned throughout this process into my site, which will house my premium courses one day.
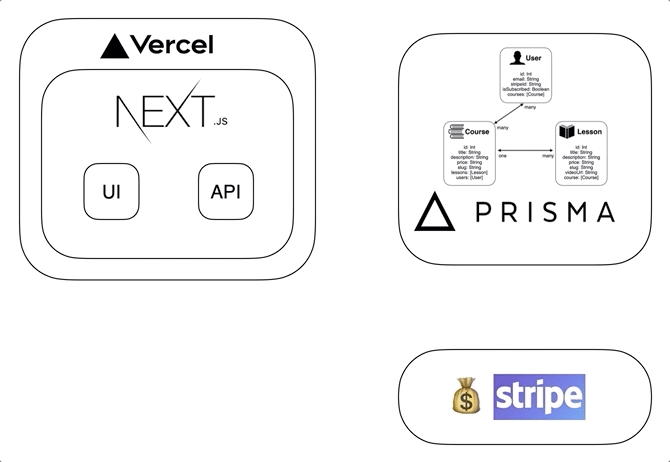
The final version of this SaaS project ended up with a few third-party services, each handling their own piece of the puzzle and using webhooks to keep them in sync. Below is an architecture diagram representing the relationships between those services.
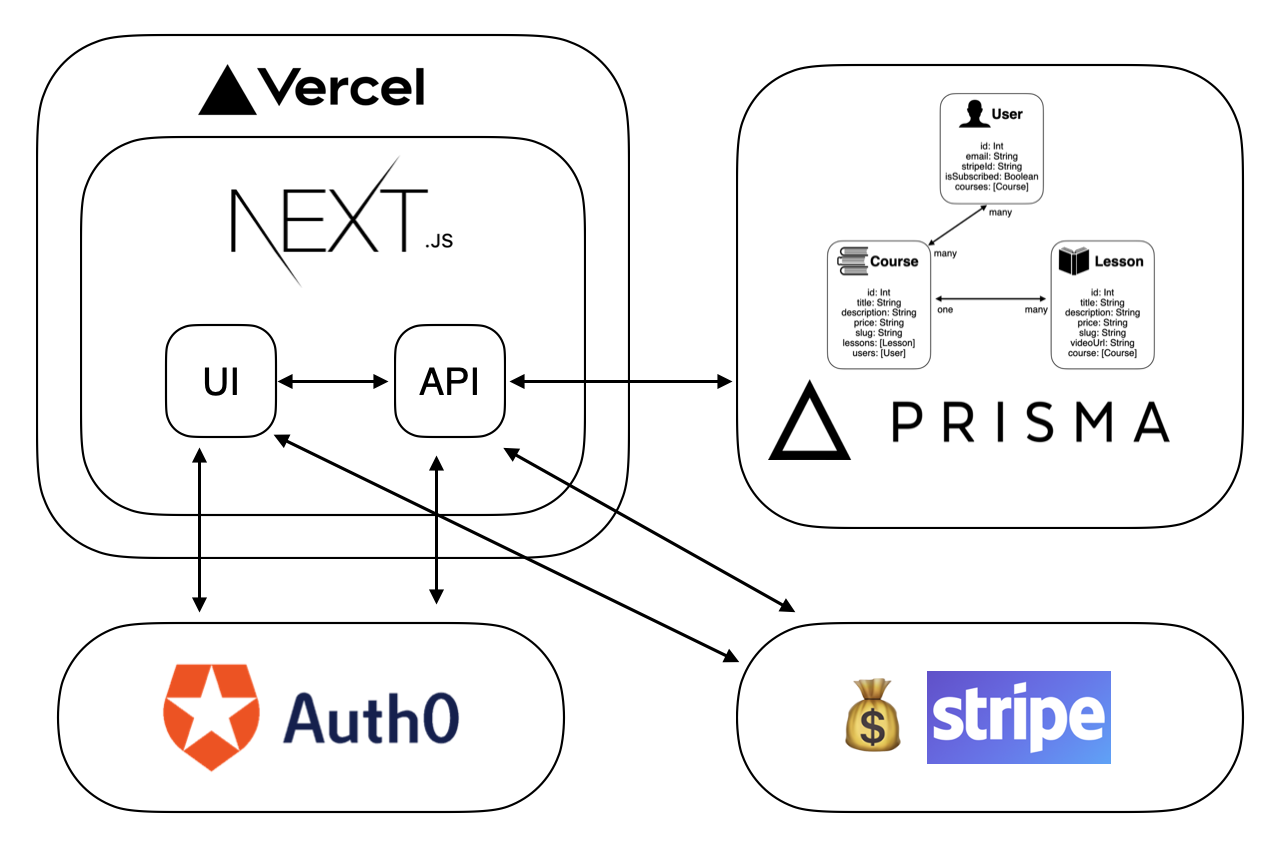
This article will focus on each chunk of the stack individually. I will talk through why I chose each technology and discuss any problems I ran into during the process.
Here is the project repo for those after the code and a live version of the final project named "Courses". FYI, payments are real! You have been warned, and thank you for your donation! 😆
What will be covered?
- High-level explanation of why certain technologies were chosen
- Biggest problems encountered throughout and how they were solved
- Next.js and the use cases for pregeneration vs serverside rendering
- Hosting, secrets, and automatic deploys with Vercel
- Prisma as an ORM, as well as the project's database schema and migrations
- Using Auth0 for authentication, GitHub as a social provider, and webhooks to keep things in sync
- Stripe for individual payments, subscriptions, and more webhooks!
What will not be covered?
- A step-by-step guide for building a SaaS project - I wrote a blog article each week as I was building the project, which goes into more granular detail.
Tech stack
- Next.js was used to build the UI, as well as the small chunks of server-side logic required for fetching gated content from Prisma, initiating authentication with Auth0, and payments with Stripe
- Vercel was used as a hosting platform for the application and its serverless functions
- Prisma provides a beautiful query-building language to abstract away those scary, complex SQL queries
- Supabase was used to host a Postgres database instance - it is capable of so much more around authentication and real-time database events, but we already had those pieces solved
- Auth0 was used to authenticate users with GitHub, manage sessions and protect both client and API routes in Next.js
- Stripe was used to process payments, subscriptions and host a customer portal for users to manage their subscription and payment information
The app
When considering different framework options to build the app, I had already decided that React would be the foundation - I have the most experience with it, and it makes me the most productive. I wanted to be able to pre-generate (build static pages) any un-gated/public content. This gave me a few options:
Handcrafted React and Node server
❌ Too much work!
Gatsby
✅ Awesome framework
✅ Static generation of pages at build time
Next.js
✅ Also an awesome framework
✅ Static generation of pages at build time
✅ Server-side rendered pages
✅ API routes (serverless functions)
I chose Next.js primarily because of its server-side rendering. Authentication would be a big part of this project, so I wanted to have an easily accessible server to handle all that secret stuff! While Gatsby spins up a server when building an application, that server does not exist when your users are using the app. Therefore, if I wanted to do secret stuff, I would have to manage another server! That sounds like too much work!
Additionally, with so many different technologies being used already, and one of the main outcomes of this project being a case study to share with people, I didn't want to throw in the mental overhead of GraphQL, which is somewhat unescapable with Gatsby - GraphQL is awesome. Still, we can cover it at another time!
Pregeneration (SSG)
Pregeneration is the process of fetching all the data for a page when building the application. This means we can request data from slow servers, do expensive computational tasks, etc., without every user needing to sit and watch a loading spinner. We do all these slow tasks once, build static HTML pages with the data, and then serve them as static assets - much cheaper to host and scale!
Next.js makes pregeneration super easy! All you need to do is export a function called getStaticProps from a page-level component. It will pick this up when building the application, run the function and inject the result into the component.
Here is a simple example of how this can be used.
Here is an example from our SaaS application where we need to fetch all of the prices from Stripe, then iterate over each one and request its associated product.
In this example, we have two subscription plans, so we would be making three requests - one for the list of prices and then an additional request for each one's product. Imagine if we had one hundred products. What about a thousand! This could take a while and provide a pretty bad experience for our users 🙁
Remember, happy customers, like to buy our things!
If we make these requests when we build our application, then they only happen once - when we deploy. No users are sitting around and waiting for us to deploy. When they visit the site, they get a super snappy pregenerated static page that doesn't need to rely on any third-party services for its data!
Pregeneration works amazingly well for public content - pages where you don't care who the user is. Great for marketing pages and things that don't need to change frequently - such as a pricing page.
If the page requires a user to be signed in or you are rendering different content for different users - such as a user dashboard - pregeneration is no longer a viable option. The problem is that when the server is building these static pages, there is no user!
Server-side Rendering (SSR)
That's where server-side rendering comes to save the day! This process runs when the user requests the page rather than when the server builds the application. Therefore, we know who the user is and can determine what they should and shouldn't access. Additionally, because this logic is running on the server, we can do secret things - such as fetch premium content from Prisma or check whether the user has a particular role - without worrying whether the user has tinkered with it.
NEVER TRUST ANYTHING ON THE CLIENT! We can only trust our server-side code!
Again, Next.js makes it super simple to run some server-side code. We export a function called getServerSideProps, and it will automagically turn it into a serverless function that runs when the user requests the page. Again, the data returned is injected into the component and displayed to the user.
Here is a simplified example of this logic.
And here is a more realistic example from our application where we only want to display a lesson's video URL if the course is free, paid for, or has an active subscription.
In the above example, videoUrl is either null or a URL for the lesson's video, depending on whether the user is allowed to see this content or not. By only returning the bits of data that the user is allowed to see, we make sure that the secret stuff remains secret! If we had returned the entire lesson from getServerSideProps and simply checked in the component whether we should display it or not, then that data has still been sent across from the server to the client. The secret stuff is no longer secret! Take this example.
If we were to run this in the browser, it would seem equivalent to our previous example - the video would only display if the user were allowed to see it. However, if we open the console, the entire lesson object will be displayed - including the videoUrl. Once we have sent the page to the browser, it runs on the user's machine and is very easy to tinker with! Therefore, if we only return the bits of the data that the user is allowed to see from getServerSideProps, then we can keep the secret stuff secret.
Server-side rendering with getServerSideProps allows us to encapsulate some logic that we need to run on the server without needing to maintain one.
Ready to pick up the pace?
Enter your email and receive regular updates on our latest articles and courses


We're here to help.
Sign up for our FREE email course
- ⭐️ Portfolio Building: Learn how to build a badass developer portfolio so you can land that next job
Hosting
Next up, we need a place to host this application to share it with the world! Again, there are many options that vary greatly in the amount of control vs. work done for you. Since hosting the application is not the thing my users care about, I wanted to use a service that did as much of the heavy lifting as possible.
Netlify and Vercel were the main options I was considering. Netlify is awesome and has recently released a zero-config plugin that enables all the SSR Next.js magic. However, I chose to go with Vercel as they are usually slightly ahead of the curve with new Next.js features - probably because they are the creators and maintainers of that too!
Hosting the application was super simple with their CLI.
That's it! This will deploy a new version of your application with a .vercel.app domain. This is now hosted live on the Internet and can be seen by anyone in the world with an Internet connection. Very cool!
Automatic deploys
Automatic deploys with GitHub were also a breeze to configure with Vercel. Just push the code to GitHub, authorize Vercel and tell it which branch.
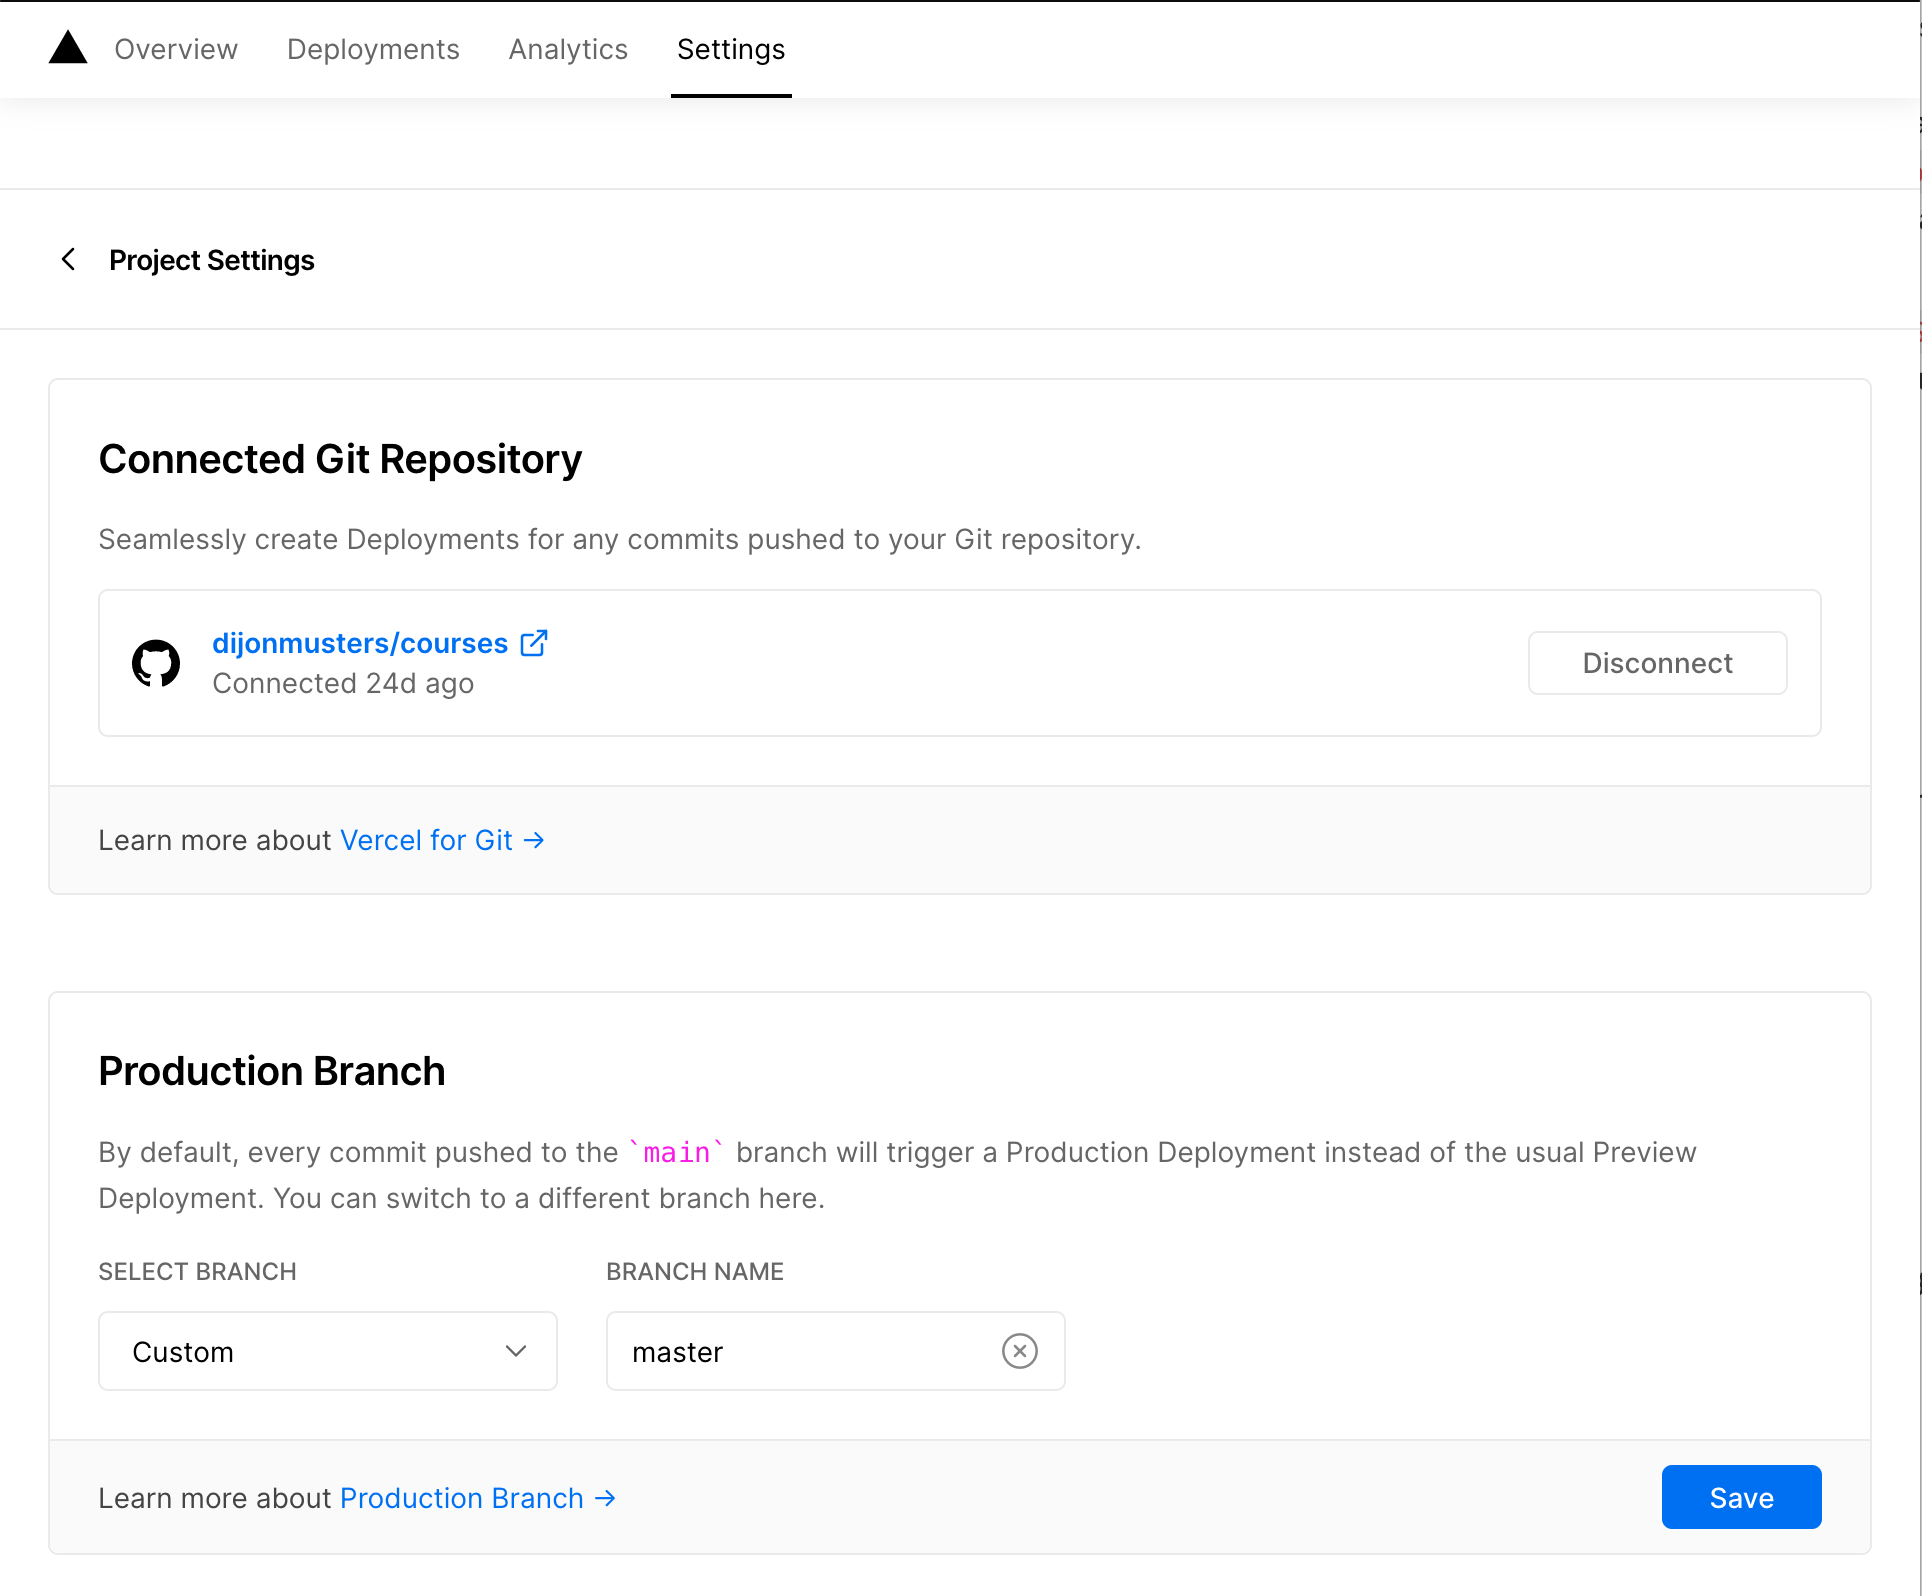
It will now automatically deploy a new version of our application anytime new commits are pushed to the master branch of the courses repo.
Preview deployments
Another awesome thing Vercel gives us for free is Preview Deployments. It will listen for any changes that we push to branches other than master - such as opening a new Pull Request - and automatically deploy a new preview version of our application with its own unique URL. This is an awesome way to test new features or get feedback from the team before something goes live!
Secrets
Next up, we need to tell Vercel all of our secrets! Secrets are the variables our application needs to do all the secret things when running in production. These often include API keys to send authenticated requests to a service, database connection strings, and special values we need for auth stuff.
Vercel does environment variables a little differently from other platforms. You first create the secret, then link its value to a particular environment variable. This gives you more control over sharing secrets across multiple projects and granting or restricting particular environments access - e.g., available in production and preview, but not development.
Again, super simple to configure. Head over to Settings > Environment Variables and create what you need.
There are three different types of Environment Variables in Vercel:
- Plaintext - things that don't need to be secret - such as API_URL
- Secret - sensitive values - such as API keys, DB connection strings etc
- Provided by system - values populated by the system during deployment - such as Preview deploy URL
I used secret for all of my environment variables. These are made available to your API routes (serverless functions) and any functions that run on the server - getStaticProps, getServerSideProps, etc. If you would like an environment variable to be available in your client-side code, it must be prepended with NEXT_PUBLIC_. In our SaaS application, we have a publishable key from stripe called NEXT_PUBLIC_STRIPE_PUBLISHABLE_KEY.
You can run the vercel dev command locally to run a development server with access to secrets that you have granted the Development permission to, however, I find it easier to just create a .env file for secrets running in dev. This is automatically loaded by Next.js and applies the same rules - environment variables available to server-side stuff, variables prepended with NEXT_PUBLIC_ available client-side. This also means you don't need to add a second copy of your secrets just for dev, or use the same secrets across all of your environments - which is a bad idea!
Vercel is an awesome host that makes deployments and hosting super simple. They take care of all the difficult stuff so you can focus on building the thing that makes you money! Additionally, they have a super generous free tier. If you hit the ceiling then you probably have enough users to justify paying Vercel!
Database
The next thing we need to consider is what kind of database we need. The first question to ask is whether you actually need a database at all? Could you get away with just using content in markdown files? In my case, I will need to store course content - this sounds great for markdown files - but I also need to know which users have bought particular courses and whether they have subscribed. This might be getting a bit hard to do with markdown. Since we already know we will need to build relationships between different bits of data, a relational database sounds like a good option.
Again, there are many options for database hosts with varying levels of management. I decided to go with Supabase due to its simplicity of getting up and running. They are an open-source alternative to Google's Firebase and offer so much more than what we are using them for here. Creating a hosted Postgres DB was as simple as authenticating with GitHub and creating a new project. The connection string can be found at Settings > Database > Connection String.
Now we need to decide how we want to talk to this database. I'm a huge fan of not manually writing SQL! I can fumble through a query or two but don't trust myself to do it in a performant way. I also have a background in Rails and really like how ORMs (object-relational mappers) abstract away the complexity of writing queries - it feels more like writing code.
Prisma is a fantastic ORM that makes building queries that request data across multiple tables super simple and easy to read. Here is an example where we want to find a user based on their email.
If we wanted to also select the courses they had enrolled in (data from another table), we can just tell the Prisma query to include it.
Schema
Prisma uses a schema.prisma file to define the structure of the database. Models represent different tables and declare the relationships between them. This is the final schema for our SaaS project.
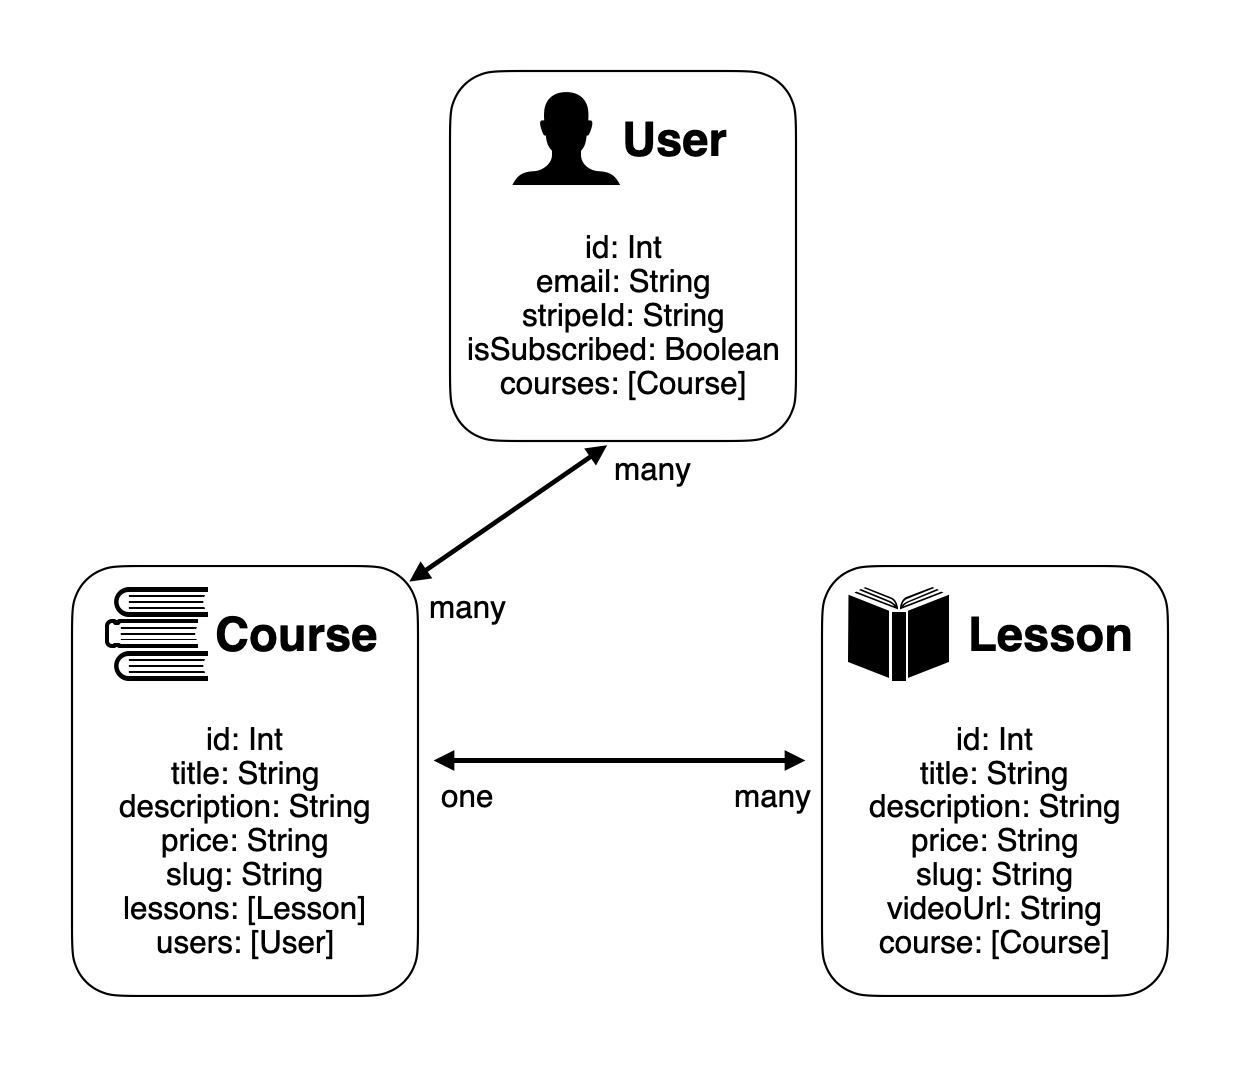
A many-to-many relationship - such as a user's courses - can be easily queried like this.
A one-to-many relationship - such as a lesson's course - can be queried like this.
No need for scary joins!
Migrations
Prisma uses migrations to track changes to the database structure - such as adding a new table or column. This is inevitable as a project grows, so having a way to make these incremental changes without breaking things is a must! Prisma validates each change before applying the migration and altering the database structure. This means you get helpful errors and warnings if you try to do something that will modify or destroy existing data. For example, if I tried to remove the ID column on our user model, I get the following helpful error:
To create a migration you just modify the prisma.schema file to reflect what you want to change and then run this command to tell Prisma to update the database.
Seeds
Another thing I found particularly useful when making lots of changes to the DB was a seed.js file. This can be populated with test data, which makes playing around with database structure much more fun! If you break things too much, just reset the DB and populate with the seed file again! Here is an example course from our SaaS project.
Using
upsertmakes this file idempotent, meaning it can be run over and over again without filling up our database with unnecessary records.
Auth
Since we will be locking down premium content to only display for people who have purchased a course or have a subscription, we're going to need to know who they are. For this, we will need them to create an account. Like all of these services, you can manage as much of the process and have as much control as you want. Since I have had fairly limited experience with building authentication solutions, I want something else to stay up to date with all the security best practices and tell me whether a user should have access or not.
Auth0 does exactly this - and has done for many, many years. It is yet another awesome service that has a super generous free tier! They also integrate with a huge number of social providers - even things like Strava and Fitbit. This means that users don't need to create yet another account just to use our application. Since my product will be pretty heavily targeted at software developers, I set up the only authentication method to be with GitHub.
Auth0 and Next.js
So, how easy is it to integrate Next.js with Auth0? Install an NPM package and copy in a small amount of starter code! Super easy! Auth0 has built an amazing integration library called nextjs-auth0. I recommend checking out their Getting Started guide to get everything configured.
This library takes care of all the session management logic between the Next.js application and API routes. It also creates new API routes for login, logout, token exchange, and a "me" page to check who is currently logged in. Additionally, it includes a collection of helper functions that we can use in different parts of our application to determine who the user is and whether they should be able to view the content. Check out the Examples page to learn more about when to use each one.
Rules
Auth0 Rules are serverless functions that allow us to run some code during the authentication process - after a user has signed in but before they are redirected to our application. This is the perfect time for us to create a new Prisma user and anything else we need to do to keep our local bits of data in sync with Auth0. This is how we make a request to our SaaS project and tell it to create a new Prisma user.
Since we only want to do this the first time the user logs in, we can set some metadata on our Auth0 user to let us know this has already been done before.
We are also sending across a secret value to validate that this request is coming from Auth0.
This is our API route to receive the request from Auth0.
Auth0 will halt the authentication flow until it receives the response from our API. This will eventually timeout and fail to authenticate the user if we forget to send a response. Best not to do anything too computationally expensive here, but perfect for creating a new DB record!
This is what the interactions between our application, Auth0 and Prisma look like when a user logs in for the first time.

Payments
Now for the exciting bit! Let's make some money! Stripe is an incredible service for dealing with payments. They take on all the scary credit card stuff so that our application doesn't even need to know about it. We just subscribe to particular Stripe events and update our database accordingly. Again, they have a huge security team constantly updating how they process payments and store data. I do not want that responsibility!
Make sure to check out their pricing page to make sure you are happy with what they are charging. Given how easy they make it to set up credit card payments and complex subscriptions without needing to pay upfront, I am pleased with it!
Creating a Stripe customer
Since we will be using Stripe pretty extensively - once-off payments, subscriptions, and a customer portal - we probably want to create a Stripe customer as early as possible and store their ID with our Prisma user. Since we already have a serverless function to keep Auth0 and Prisma in sync, let's also add the Stripe logic.
This is what the interaction looks like between our application, Auth0, Stripe and Prisma when a user signs in for the first time.

One-off payments
To charge a customer for a course, we need to create a new API route to set up a Stripe session. Remember, we cannot trust any data coming from the client - especially the price! Think about the minimal amount of information you actually need from the user to know what they would like to purchase. This is usually just an ID of the product and the quantity they would like to purchase. Since it doesn't make sense for one user to purchase multiple copies of a course, we have hard-coded the quantity.
So there is a bit going on in this example.
- We need to know who the user is so this needs to be an authenticated API route. We're using
withApiAuthRequired()to help us with that. - We get the course ID from the dynamic part of the URL.
- We get the user's email from the session. The session contains session information from Auth0, but is missing things like their Prisma and Stripe ID.
- We make a request to Prisma for the full user.
- We make a request to Prisma for the full course. We don't want to trust the client to send us data about the course, just which one they would like to purchase.
- We create an array of line items that the user would like to purchase. We are just charging for a single item, but this still needs to be an array for Stripe to process it.
- We create a Stripe Checkout session with some information about the transaction and pass this back to the client so they can be redirected to Stripe.
- We are attaching some metadata to the session - user ID and course ID. This will be used when we configure webhooks.
Subscriptions
Subscriptions are significantly more complex than one-off payments. We need to keep a track of when to charge the user again, as well as store their card details and deal with all the edge cases when they want to change to a different plan or cancel their subscription altogether. Thankfully, Stripe does all the hard work so we don't need to worry about any of this. We just create our different pricing options as products in the Stripe dashboard, and create an API route to initiate the session.
It is actually fewer lines of code than a one-off payment! Amazing!
Now that we have payments implemented we probably need to tell our Prisma DB that someone has purchased a course or updated their subscription.
Webhooks
Webhooks allow us to subscribe to particular events, and have Stripe let us know when they happen. Let's create a new API route to handle this.
This one is a little complicated as the req object we get from Vercel is structured differently to what Stripe is expecting. Let's break it down.
- We export a
configobject to tell Vercel we want the raw request. - We compare the request we get from the user with Stripe's
constructEventfunction. This validates that the request was sent by Stripe and returns the webhook event object. If it cannot validate the request, it throws an exception, and we return an error to the client. - Next we determine which event has been received
charge.succeeded- user purchased a course.customer.subscription.created- user subscribed.customer.subscription.updated- user has changed their subscription. Since cancellation events are triggered separately, we can just trust the user is still subscribed.customer.subscription.deleted- user cancelled their subscription. This is triggered when the subscription expires, rather than when they cancel.
- Update our Prisma user.
Webhooks can be tested locally using Stripe's CLI tool. Check out this article from the Stripe docs to get it setup. Prod webhooks can be setup in Stripe's dashboard.
This is the interaction between our application, Stripe and Prisma when a user subscribes.
Customer portal
The last thing we need to set up is a customer portal. This will enable users to manage their own subscription and payment information. This can be configured via Stripe's dashboard Settings > Billing > Customer Portal and gives super granular control over what you would like customers to be able to change. A new portal session can be initiated from an API route like this.
By allowing users to manage this stuff directly with Stripe, we do not need to build these flows ourselves, and since we have subscribed to those webhooks, Stripe will just let us know if the user changes anything.
Final thoughts
It is amazing standing on the shoulders of giants! These services are incredible! We have created a complex SaaS project with authentication and multiple payment options with a very minimal amount of code. This stack was a pleasure to work in and was almost seamless.
Stripe is not only making this stuff a delight for developers to build hobby projects, t hey are also enabling people of all kinds to set up their own online businesses and make a living. Very cool!
Helpful resources
- Build a SaaS project with Stripe by me!
- React 2025 by Lee Robinson
- Minimum viable SaaS By Jared Palmer
- nextjs-auth0 repo
- Calling external API from Auth0 Rule
- Rules metadata in Auth0
- Calling a rule after social login
- Stripe API docs
- Stripe webhook verification with Next.js
- Testing Stripe webhooks
Ready to pick up the pace?
Enter your email and receive regular updates on our latest articles and courses
We're here to help.
Sign up for our FREE email course
- ⭐️ Portfolio Building: Learn how to build a badass developer portfolio so you can land that next job