This course is aimed for using
zodeffectively in projects based on TypeScript (both browser and node.js). The benefits you gain with this course is not just simply coding, but also understanding when/why/how should you perform runtime validation.zodis the missing piece to TypeScript's capabilities, which can guarantee type-safety only in compile-time.zodcan be used whenever the compiler cannot guarantee what happens in runtime. And... it's a very frequent usecase, such as HTTP calls, websockets, etc.In this course you get quickly up and running by:
- using
zodwith primitives and objects - adapting
zodquickly to existing projects thanks to automatic generators - changing the strategy frm type-first to schema-first
- using error-throwing
parseor non-error-throwingsafeParsebasing on your needs - applying
zodto the most common usecase - validating API responses - handling errors the most convenient way (out of many!)
Take advantage of runtime validation with
zod. Take advantage of the detailed lessons in this course 🔥- using
SolidStart is a JavaScript Framework designed to build full-stack SolidJS apps and enhance your developer experience.
In this course, you will learn how to:
- Set up a SolidStart project
- Toggle different rendering modes
- Leverage file system routing to turn your files into routes
- Create API routes to expose some public endpoints
- Fetch, prefetch, update and cache your data
- Turn your functions and actions into server-executing ones
- Get rid of unnecessary network waterfalls by using Single Flight Mutations
After this course, you should be able to leverage SolidStart to build your Solid applications.
How you build with Angular has changed quite a lot over the years.
For example, the
injectfunction was introduced in version 14 but you might still be familiar with Angular's constructor injection.Similarly, structural directives like
ngiforngforhave been replaced with@ifand@forblocks since version 17 and beyond.These are patterns that need to be adjusted if you want to stay up-to-date with the latest Angular has to provide.
Luckily, Angular gives you great tools in the form of a migration CLI for supporting your migration efforts as you incrementally update your App from older version features and patterns.
When you're done with this course you'll know how to target specific features, folders, and files to migrate to the latest Angular version.
You'll learn how to migrate:
- Structural directives with control flow syntax
- Constructor dependency inject to inject function
- Make components standalone
- Lazy load routes
- Input/Output decorators to signal-based API
Bootstrap is an incredibly popular CSS framework designed to make your website look great on mobile and desktop.
By the end of this course, you'll be familiar with many of the popular classes and components that Bootstrap uses to apply in your own projects.
For each feature you build in the course, you'll get a sense for what the relevant classes do for those components and links to documentation for further exploration.
For the course demo application, we will analyze the landing pages of Microsoft and Apple to identify common components that are implemented. When these are identified, you'll implement these components yourself with Bootstrap.
You'll build several common UI elements such as a nav bar, a carousel of images, Cards, and Forms.
Through building these components, you'll understand what is behind the different classes Bootstrap gives you and get familiar with how it exposes flex and grid layout for you.
This course is perfect for those looking for a lightweight alternative to NgRx Store that scales effortlessly.
Note: This course is being actively developed and more lessons will be added in the future.
Cursor is an AI-enhnaced code editor that allows you to call upon the robots to refactor or stub out functions for you with natural language.
In this course, John will show you workflows that will save you time and effort by utilizing the features such as its mult-line editing and context.
In particular, by giving Cursor's AI the proper context, whether that's lines of code or multiple files, you'll get better output when trying to extend or refactor logic that's present.
Dive into the world of real-time web development with this hands-on course! You’ll learn how to build a dynamic chat application using Fauna Streams and Next.js 14, focusing on the essentials and best practices.
What You’ll Learn:
- Next.js Best Practices: Master Next.js best practices for building fast, maintainable apps.
- Server-Side Rendering (SSR): Learn SSR techniques and master features like server actions, server side form submission etc.
- Database Access Patterns: Efficiently connect and retrieve data using Fauna.
- Real-Time Updates: Implement real-time updates with Fauna Streams.
- Basic Authentication: Secure your chat app with simple authentication methods.
Course Highlights:
- Practical, project-based learning.
- Clear, step-by-step instructions.
- Focus on modern, real-time web development.
- Tips and tricks for optimizing performance.
By the end of this course, you’ll have a working real-time chat app and a solid grasp of the tools and techniques used to build it.
You'll learn the fundamentals of building and manipulating linked lists, a data structure that is very popular in technical interviews.
We’ll start by creating a basic linked list and then advance to inserting and deleting nodes at specific positions. We'll also learn how to retrieve node values by index, find the index of nodes by their values, and calculate the length of the linked list.
By the end of this course, you'll have a solid grasp of implementing and managing linked lists in TypeScript.
course repository: https://github.com/ducin/egghead-typescript/tree/brand-types-value-objects
Learn the fundamentals of React Query by going through the basic API and then implementing search in an employee tracking app.
Learn how the latest JavaScript features can help you improve your codebase.
You've seen that Angular signals are here, and know that signal-components are coming up.
This marks a paradigm-shift towards reactive programming in Angular.
Are you ready?
What if you could start learning signals and feel pleased with your progress? And reach a point where you feel confident when using signals in production?
And feel ready when signal-based components come?
Changes are coming, and you can get ahead of them.
By taking this cousre you will learn how to:
- Create computed signals
- Share your signals in services
- Use and cleanup signal effects
- Turn signals into observables and vice versa
- ... and more
In 52 minutes over the course of 20 bite-sized lessons, you'll learn everything you need to know to take advantage of signals now and be prepared for signal-based components!
Get started with Supabase on your machine
Beginner’s Guide to Storybook 7 with React
In this course, you'll create a blog that runs without a database. You'll be able to edit your content from your local file system or from GitHub.
You'll deploy your blog to Vercel and set up real-time previews with Next.js' draft mode!
Expo Application Services (EAS) is a cloud build service used to build and publish React Native apps.
This course will show you how to create the common types of builds for iOS and Android on EAS. We'll cover Development builds for local development, Preview builds for internal testing, and Production builds for release.
Additionally, you'll learn about:
- app versioning
- automatic store uploads
- setting up store listing pages
- installing multiple app variants on the same device
- installing past builds with Expo Orbit
iOS
An overview of build signing, and why an Apple Developer account needed in order to install builds on a real device.
How to create:
- an iOS simulator build
- a build to use on your device for local development
- a build to share with your team without uploading it to App Store Connect
- a release build to use on the App Store
You will also learn how to upload your build to App Store Connect, share it on TestFlight and create a Release.
Android
How to create:
- a build to use for development on an emulator or a device
- a build to share with your team without uploading it to Google Play
- a release build to use ob Google Play
We'll cover what is needed to create a new Google Play account, and the current restrictions for individual accounts.
You will also learn how to set up auto-submit on Google Play.
In 2018, Kent C. Dodds wrote: "The more your tests resemble the way your software is used, the more confidence they can give you." This phrase became the guiding principle for the entire Testing Library ecosystem.
A few years later, the React Testing Library became the de facto library for writing unit and integration tests in the React ecosystem.
Thanks to its user-centric perspective, our tests are closer to our user experience and far away from implementation details.
In this course, you will learn how to:
- render your components
- properly query your UI for elements while keeping accessibility and your users' experience in mind
- improve your testing experience with the usage of some utilities
- interact with your components to fire events
- leverage asynchronous utilities to customize your testing flow
- get rid of the annoying "not wrapped in act" warning
After this course, you should be able to write and debug any test using the React Testing Library!
Amazon AWS is one of the most popular cloud providers in the world, but it can also be daunting to learn thanks to the alphabet soup of service acronyms.
Once you've figured out which subset of services to use, you've got a lot of clicking around to do in order to get things configured.
Not anymore!
With the AWS Cloud Development Kit (CDK v2), you are able to configure AWS services from your terminal & editor.
Even better, you can do your configuration, frontend, and backend all with the same language.
In this course, Tomasz Łakomy will guide you through using TypeScript to complete the lifecycle of an application powered by AWS CDK v2. You'll see how to start a project, develop it locally, deploy it globally, and then tear it all down when you're done.
The services & development approach Tomasz demonstrates in this course are used by countless companies around the world.
Is yours next?
"Build a Full Stack Blog with Astro" is a hands-on course that cuts straight to the chase, offering developers a practical approach to building a fully functional blog website. Throughout this course, you'll get to grips with Astro, a modern web framework designed to help you create fast content websites with a modern development experience.
Here's what you'll be tackling:
- Styling and Layout: You'll learn how to style Astro pages, exploring a variety of ways to make your site look good without compromising on performance.
- Astro Components and Static Assets: Get comfortable creating reusable components and managing static assets like images.
- Content Publishing System: Delve into managing blog content with Astro’s content collections, with type safety included with Zod to keep your data structured and error-free.
- Dynamic Features: Implement pagination and dynamic pages to make your content discoverable and your site easy to navigate.
- SEO Essentials: Tackle SEO fundamentals with
astro-seo, ensuring your site ranks well and reaches the right audience without the guesswork. - React and Vanilla JS: Enhance your site with interactive components, first using React, then refactoring with Vanilla JS for optimal performance.
- Backend Integration: You'll dive into back-end functionality, creating custom API endpoints, and interfacing with a database using Drizzle ORM to manage your content behind the scenes.
- Dynamic OG image generation: Every content website needs decent OG images for social sharing. You’ll learn how to dynamically generate the OG images for your pages and blog articles.
By the end of this course, you won't just have a theoretical understanding — you'll have a live, deployable full-stack blog that reflects current best practices in web development. You’ll also gain valuable and easily-transferrable skills for working with databases and containerizing and deploying full-stack web apps. This course is about building something tangible that you can use as a springboard for more complex projects down the line. So, let's learn how to build great content websites!
Controlling the network is the key to fast prototyping, bullet-proof tests, and efficient debugging. In this course, you will learn how to use Mock Service Worker for API mocking—from the setup and your first request handler to describing more complex network scenarios, such as dynamic requests, HTTP streams, and schema-first GraphQL mocking.
There are two major categories that you'll encounter when you start to build Full Stack applications.
You have: 💽 Database Management 👥 Authentication
Both of these contain their unique set of challenges and layer on top of each other as you build out your application.
You want to be able to Create, Read, Update, and Delete data from your database and also make sure that only the right users are performing these actions that you specify.
That is why this course is set up around these two categories.
You'll learn everything you need to about managing data using a service called Appwrite within your React application. Using Appwrite, you'll be able to create a database, upload files, and manage users.
You'll start out by building out the database while purposefully ignoring authentication/authorization through out the application.
The second part of the course will have you layer on auth so that you can enable users to log in and scope specific actions to roles that you'll create.
This course is focused on the full stack nature of web development so we will start with almost all of our UI built out for us. You can explore the course repository to get familiar with what components are available.
As new features are added to Nextjs app router that do not fall within the scope of the main course, these lessons will be updated and more will be added
How to use this course:
This course is meant to be a supplemental course for the Next Migrate Course.
The lessons match up as follows:
- The two 'primer' lessons follow the 'Initialize The App Router' lesson in the Next Migration Course.
- The 'migrating routes/pages' lessons (3 & 4) match up with the migrating routes lessons (sales, customer routes, and deposit route)
- The migrating route handler and api routes lessons follow the migration of customer api routes from the main course
- The refactoring of api routes to server components lessons follow "Refactor Customer Id Api Route Handler to Server Component" lesson
- The refactoring to server actions lessons follow/fall within the main course refactoring to server action lessons
This course will be updated as all the app router features and apis become stable
Credit for this application goes to Kent C. Dodds. The starter application was ported to Next.js from Kent's Remix workshops at Frontend Masters.
Why this course? Simply put, many are wondering how to migrate their application to Next.js new app router architecture and make use of server components, server actions, etc.
"Server components are the future." Twitter is saturated with comments like this. Many of us feel like it is tech version of Thanos, "Dread it. Run from it. Server Components arrive all the same."
Is this true? Emphatically no. So we can silence the infinity war now and say there is nothing wrong with using the pages router.
In fact, after the initial deployment lesson, you could stop this course and go make it something better or into something you want it to be using the pages router.
There are many incredible additions to Next.js new app router architecture. This is simply a course and resource for you should you choose/desire to migrate from pages router to app router.
You will learn how to:
- migrate api routes, pages, and nested layouts
- take advantage of routing in the app router for a better nested layout experience
- turn getServerSideProps into a React Server Component
- use server actions
And much more.
Due to the applications scale here are a few things to note:
- The course shows how to migrate a set of routes, api routes, etc with a few exceptions
- The remainder videos have been added to a supplemental course which you can find by searching for "Next Migration Course Extras" or clicking here. Consider them your bonus features and deleted scenes from the 'movie'.
- The extras course has been set up to align with the lessons here. For example:
- As you create the app router, there are 'primer' videos for how to create a page and dynamic routes in the app router
- As you go through migrating routes, you will find additional 'migrating routes' videos in the extras course
- As you migrate api routes, the remainder of the api route migration videos are in the extras course
And with that you are good to go!
Start your journey today and experience the possibilities of the Next.js app router
In this course, we build a Twitter clone from scratch, using the Next.js App Router and Supabase. We dive deep on the Next.js App Router, learning about:
- Client Components
- Server Components
- Route Handlers
- Server Actions
- Middleware
- Implementing Optimistic UI
On the Supabase side we look at:
- Configuring Supabase Auth to use cookies
- Using Row Level Security (RLS) policies to implement Authorization
- Querying data across multiple tables
- Introspecting PostgreSQL schema to generate TypeScript definitions with the Supabase CLI
- Subscribing to realtime database changes
This course is a deep dive into modern web development and I'm very excited to see what you're going to build on the other side! 🚀
Developers aren’t the only ones working on sites.
Marketers, copywriters, designers, and other non-coding roles all need to be able to make content changes. If you don't want to be bothered to open a PR every time a typo needs fixed, you need a CMS.
And Strapi is an amazing CMS option.
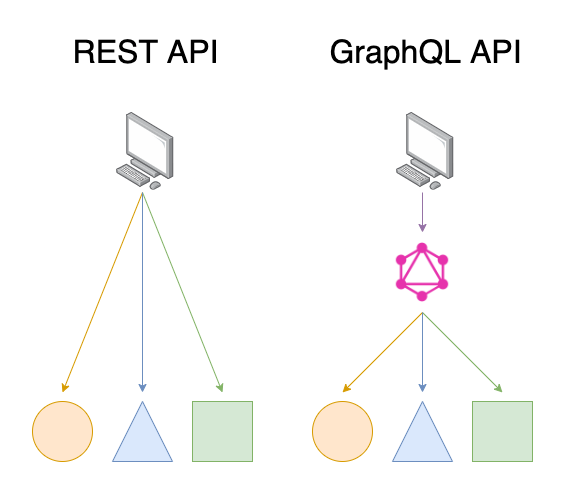
Strapi helps you quickly build a robust content API. You can host it yourself, it supports both RESTful and GraphQL, handles your authentication, lets you bring team members and it's highly customizable with plugins and extensions.
You can take those gains even further by adding Next.js 13 to the stack.
Next.js is fast, supports both server and client-side rendering, and features dynamic routes. Once you are generating dynamic pages from your CMS you’ll see just how powerful the combination of Strapi and Next.js is!
In this course you will do the following:
- Building Content Models with Strapi
- Fetching Data from your Headless CMS
- Using React Server Components
- Using the Next.js App directory
- Setting up pagination in Strapi and Next.js
- Parsing and rendering content in your Next.js application
- Connecting external services to your Headless CMS (like Cloudinary for Media Management)
- Deploying your Next.js and Strapi Applications to a production environment
- Setting up and using Strapi Plugins Transferring data between your Strapi environments
By the end of this course you’ll be building pages and managing your content like a pro!
SvelteKit is an application framework that builds on top of Svelte that provides you the app level functionality you need. It does the boring stuff that you don't want to so you can execute on the projects you want.
As you build with SvelteKit, you'll find it continues the philosphy of Svelte by adhering to Web Standards and APIs. It builds on top of Web APIs so when you're develop SvelteKit sites you are also learning skills that will transfer to any web-based project
In this course, you will build a modern SvelteKit blog powered by Sanity CMS. You'll start from scratch and build out a site that dynamically generates pages that you create inside Sanity.
As you build your blog, you will learn how to:
- Style Svelte components with TailwindCSS
- Add error pages to different routes
- Query your CMS in the front end
- Parse and validate your data with Zod and JSDoc
- Deploy both Sanity and your app to the web
lorem ipsum
lorem testss
lorem ipsum
Get started building web applications with Angular and Firebase.
In this course, you'll learn how to set up and use Firebase in your Angular applications using the AngularFire library.
We choose the AngularFire library because it is an official library created by the Firebase and Angular teams to work better with Angular.
It helps you by wrapping everything into observables and helps update zones.
By the end of this course, you'll be able to build web applications using Cloud Firestore as your database, Firebase Authentication as your Auth system, Cloud Storage to save files, and Firebase Hosting to deploy your applications to the web.
RTK Query is a powerful new way to model data fetching and caching in Redux applications. It’s built on top of Redux Toolkit, but hides almost any interaction with reducers, selectors or thunks behind custom hooks generated specifically for your API.
If your redux application relies heavily on data coming in from over the network, there’s a good chance RTK Query is worth adopting. It will allow you to remove significant chunks of code while also giving you new tools for error handling and cache invalidation that will make your users smile. Apply what I teach in this course and you won’t have to think about thunks ever again.
Sample code can be found here: https://github.com/xjamundx/egghead-rtkq
Learn how to build a pin-input component with state machines, Zag.js and React.
We’ll look at modeling a UI component with state machines, implementing those in a framework agnostic way using Zag.js, and connect the logic to the UI component.
This course is a must-watch if you’re unfamiliar with State machines, and want to learn how to use them to build UI components with ease.
In this course, you will:
- Learn fundamental concept of state machine, event and transition
- Model a UI component with state machine
- Connect state machine logic to UI
- Manage DOM events in state machines
- Create custom React hooks with state machines
Auth0 Actions are serverless developer tools you can use to customize Auth0.
Actions allow developers to extend Auth0 beyond what it can do out of the box by adding logic to login, user registration, password changes, and other events. You can quickly solve complex identity problems without hosting your own environment, and worrying about performance, maintenance, and security. Your code is stored and runs on infrastructure owned and maintained by Auth0.
Actions are JavaScript functions that run as part of a flow. Action integrations can be installed in the Dashboard, or Actions can be written directly in the Dashboard’s JavaScript code editor.
With the drag-and-drop flow editor, you can visually arrange Actions to build custom identity flows. You don’t have to rewrite your code to reorder and reconfigure functions.
Follow along with Will Johnson as you download a sample application configured with Auth0, then write code for several Actions.
Some examples of Actions you can create:
- Block access from certain counties with an Action from the Auth0 marketplace.
- Use an npm package and secrets to send a Slack message.
- Redirect users to an a URL after login and back to Auth0
This course will give you a solid foundation to start developing your own Actions.
Supabase is a collection of open-source tools that wrap around a PostgreSQL database. In this course, we look at building a realtime chat application with Remix, using Supabase for db hosting, authentication, authorization and subscribe to realtime db events - updating the UI as the database changes.
We will learn about:
- loaders and actions in Remix
- querying and mutating data with Supabase
- authentication with GitHub
- authorization with RLS
- merging client and server state with realtime events
- deploying a Remix app to Vercel
This course is 100% TypeScript, however, don't stress if you don't have any experience with TS, as Supabase does most of the heavy lifting here! 🎉
Almost every React application needs to fetch data from a server and cache the result between renders.
Traditionally, in-memory API Caching is something that has been done in React applications either on a per-component-level, which lead to application state running out of sync, or using a global state like Redux, which required a lot of hand-written code.
RTK Query is part of the official Redux Toolkit and provides an application-global API cache that abstracts most of that hand-written code away, leading to a lot more readable code bases.
It also offers a lot of advanced features like auto-generated hooks
In this course, you will learn about
- Using
createApito define multiple endpoints to interact with your API - The auto generated
useQueryhooks and how to use them in your application - The RTK Query Dataflow and the role of the
baseQueryfunction - The Redux Devtools “RTK Query” Monitor and which actions are flowing though your app
- How to use RTK Query either with an
ApiProvideror a pre-existing Redux store - Using RTK Query with TypeScript
- Using
Personalizing the user experience is becoming more critical every day, even more so if your application or content is consumed by users in different parts of the world who most likely use other languages, date formats, currency, etc.
There are multiple solutions to make your content adapt to the location or language of your users. Still, many of these methods have become outdated, complex, or dependent on a particular framework.
Javascript also offers an internationalization solution, the Intl object.
Monorepos are an amazing way to collaborate on a multitude of projects with other team members. The ability to share code seamlessly between projects and have a single source of truth is paramount when working on projects with multiple moving wheels.
One of the tradeoffs of a Monorepo is all of the management you have to do to make your projects run flawlessly and simultaneously. Each project has it’s own linting, building, testing, and deploying that it runs whenever code in that project changes.
This becomes a real problem when each of your projects lints, builds, tests, and deploys on every PR into your monorepo. You might be fine with a handful of projects but as your applications scale and you accrue more projects, you will need a way to scale.
Turborepo is the tool that solves your monorepo’s needs.
Turborepo is a task runner for Monorepos. Turborepo caches the results of your CI tasks, schedules those tasks to run at maximum speed, and only runs tasks on the affected code in your PRs. And because of remote caching, your coworkers, wherever they are, will have the most up-to-date code possible.
One of the greatest things about it is that it's easy to use and can be incrementally adopted. Turborepo is a thin layer on top of your Monorepo.
Turborepo doesn't get in the way as it is only a task runner. You don't have to modify your application code or anything to make it work.
You’ll learn about
- How to set up caching for both local and remote
- CLI-commands and how they enhance your Monorepo
- Parallel execution of your tasks
So hop in and learn about Turborepo today!
Prerequisite: This course is a continuation of Introduction to Monorepos with NPM Workspaces. To get the most out of this course, watch Monorepos with NPM Workspaces first.
In a monorepo, all of your apps and packages reside in a single repo. Structuring your code this way has many organizational benefits. You can more easily manage your dependencies, and you can maintain more consistency across your various apps.
But, if you attempted to do this with just yarn or pnpm alone, you'll quickly start running into productivity issues. Your build times will be very long, and you'll have to make sure to run builds for any internal packages an app is depending on.
That's where Nx comes in.
Combining the speed of pnpm with the efficiency of Nx gives you an amazingly performant monorepo setup.
Nx builds a graph of your workspace and all of the connected dependencies. If there is a change anywhere, Nx will know about it and everything that is affected by it.
Which means that Nx is able to use caching to prevent unnecessary builds when nothing has changed. Nx's caching features enable blazing fast <10ms build times 🔥
You get to have all the advantages of the monorepo with none of the performance issues!
So start watching this course and learn how to achieve these speeds today.
The “Edge” is where you write and store your code where your data is being produced. This allows for a quick and efficient data transfer, eliminating or severely reducing lag.
Supabase is a suite of open-source tools wrapping a PostgreSQL database. It provides the building blocks of an app - database hosting, auth, file storage, real-time, and edge functions - so we can focus on what makes our app unique.
Cloudflare Workers are serverless functions that run at the Edge! In this course, we will use the Wrangler CLI tool for interfacing with your Cloudflare account and creating or publishing your Workers.
KV Storage is a cache that Cloudflare makes available to our Workers. It replicates across multiple CDN nodes, making it super performant to cache data.
Combined, these three things give you the benefits of that reduced lag in a smooth and streamlined process.
Throughout this course, Jon will teach you how to create a small blog that hits the key points of how to:
- Query Supabase from Cloudflare Workers
- Read and write KV Storage cache from Cloudflare Worker
- Cache Supabase response at the Edge with KV storage
And more!
Web3 is a paradigm shift in how applications are interacted with, ran, and built.
It’s not just a Pump-and-Dump scheme on cryptocurrencies or Bored Ape NFT profile pictures you can put on Twitter.
A fundamental tenet of Web3 is bringing ownership back to the user. You no longer have to trust that your data is being properly handled on someone else’s server (although, currently Web3 ecosystem mainly depends on centralized infrastructure such as GitHub).
This ownership is achieved through blockchain, cryptocurrencies, NFTs, and smart contracts.
A great example of this type of ownership is through how you exchange money in Web3. There is no intermediary like Stripe, or PayPal to process your transactions. You can even build your own smart contracts that receive crypto (e.g. Ethereum or ‘eth’ for short) and then process that eth how you’d like.
Building this type of smart contract is exactly what Matías is going to show you how to do right now.
Matías builds out a Web3 application that allows you to receive tips in the form of eth in a tip jar on your website. This means your application will be backed by a smart contract that’s accepts eth, stores data, and emits Solidity events.
The frontend application uses SvelteKit which you’ll see how easy it is to get up and be productive with in minutes. A huge benefit here is that the JavaScript you write is just that, JavaScript. You’ll be able to take what you learn and implement it into any framework of your choosing.
While you build this application you will learn how to:
- Write a smart contract using Solidity language
- Test the smart contract using just JavaScript through the waffle framework
- Communicate and interact with the smart contract using ethers.js in a SvelteKit application
- Deploy your smart contract to make it public and accessible to anyone
Smart Contracts are programs stored on the blockchain that run when certain conditions are fulfilled.
These Smart Contracts have many benefits to them such as speed, transparency, and security. The contract is immediately run as soon as the requirements are fulfilled. This creates a system where you place trust in a transparent system, instead of an opaque intermediary.
Noah will show you how to write, test, and deploy smart contracts on Ethereum, using the popular smart contract language, Solidity. You'll also learn how to use Foundry, a popular dev-toolbelt, to streamline our whole development process.
Throughout this course, you'll learn how to:
- safely and securely set up Smart Contracts
- write and read data on your Smart Contract
- send transactions with specific arguments to your Smart Contract
- deploy your Smart Contract using Forge and QuickNode
And more!
lorem ipsum
Approaching testing at a component level has definitely its benefits. Seeing your component rendered in isolation, and making sure it behaves correctly with different properties is definitely faster that trying to interact with an app at end-to-end level. On the other hand, seeing your app render in a browser in an end-to-end test is a significant advantage.
With Cypress’ component testing you can now take the best of both worlds. Render component and interact with it in a real browser. You can pass different properties, spy on its function calls, click and type into them or even intercept its network calls. All this with a minimal setup and vast options.
What you'll learn
- setup component testing in Cypress
- customize component mounting properties
- render a component in a browser
- examine a component with different passed properties
- make asserrtions on component’s emitted events
- render a component with content passed into its
<slot /> - catch edge cases by calling actions and passing values into Pinia’s state
- handle router and it’s effect component behavior
Next.js is one of the most popular server-side-rendered React frameworks you can use to build production-ready serverless applications in record time.
On the other hand, Fauna is a flexible, serverless, distributed document-relational database. Fauna has a powerful GraphQL API and custom resolver support.
Using Next.js and Fauna, you can build robust, feature-rich, production-ready full-stack applications without the hassle of managing any servers or databases.
In this course, Shadid guides you through building your very own full-stack serverless marketplace application using Next.js, GraphQL, and Fauna.
You will learn,
- How to work with Apollo GraphQL Client in Next.js
- How to setup Fauna GraphQL
- Data modeling in Fauna
- How to write custom Fauna GraphQL Resolvers (UDFs)
- How to authenticate with Auth0?
- Stripe payment
D3, or Data Driven Documents, is the defacto standard for data visualization on the web. It's an incredibly powerful library that gives you all the tools you need to build just about visualization you can dream of.
D3 is not a collection of predefined charts. Instead, it's a robust set of utilities you can use to ingest and transform data, to map that data to screen values, and ultimately to manipulate the DOM to render your visuals.
When working with React, D3's desire to manipulate the DOM is at odds with React's goal of rendering the UI as a function of state. So how do we handle this? Simply put, we use D3 for everything up to the point where we want to render our output, and then we hand all that data to React for rendering.
In this course, we'll start from scratch and build out an SVG bar chart for some sample data. We'll lean on D3 for its tools and then hand that data off to React for rendering.
In this course, Colby is going to do a deep dive into creating a full store for your products. You'll learn how to set up and use GraphCMS as your content management system. You'll learn about the Cloudinary UI extension and how to use it to host your images. You'll learn about Snipcart and using the useSnipcart hook to handle the cart state and the checkout. You'll learn how to implement Stripe as your payment gateway. And lastly, you'll learn how to deploy a Next js app to vercel from github with environment variables.
In this course we demonstrate how to get started with Microsoft Playwright. We follow this up with various features of Playwright that make it extremely easy for you to test and automate modern web applications.
Jotai's state management is primitive and flexible. This gives you room to build, compose, and share state throughout your application exactly how you need it.
This flexibility can become hard to manage when you have complex requirements that span across a number of states your application can be in.
Jotai lets you leverage other state management solutions through integrations so that you can solve the problem you're facing exactly how you need to.
One of those integrations is XState. XState gives you a safe abstraction to enumerate and handle the complex states your application can be in.
With Jotai + XState, you get the flexibility and ease of use of Jotai with the power of XState.
XState is a sophisticated library to provide a better and safer abstraction for state management.
lorem ipsum
Intro
TypeScript has been growing in popularity among companies who build their products with React, and for good reason!
Types play nicely when working with components, and lead to a super smooth developer experience.
But what if your application is already being shipped and continuously deployed? It doesn't mean you can't take advantage of everything TypeScript has to offer.
Refactoring an application to TypeScript doesn't have to be daunting. Follow Chance's lead, and you'll be well on your way!
The course starts with an overview of some of Chance's favorite tools and their TypeScript-specific settings. These tools will help you search your project's TypeScript paths for auto-importing, a shorthand tool for writing JSX and TypeScript to speed up your writing, and a tool for helping you to maintain your code to a high quality.
The tools are Emmet, ESLint, Prettier, and a variety of VSCode extensions. There's even some rollup and Babel thrown in for transpiling and compiling our TypeScript to make configuration and build setup a breeze.
The Project

Once the tooling is in place, Chance works through converting a completely functional Windows 98-style Minesweeper game away from JS React into one that takes advantage of the power of TypeScript. It'll be clear how changing the JS to TS will not affect the functionality of the game at all but improves the safety of your app.
Topics in the second half of the course include component refactoring as well as adding types to React Hooks, useReducer, and Context. You'll even see how to add types to a legacy Class component!
Chance has several years of experience working with component libraries and this is your opportunity to learn from his experience and apply his process to your own.
Gain these Skills
Chance will give you the knowledge of how to incorporate TypeScript into any React application, whether it's shipped and continuously deployed or not. You'll take the practices and tools that you learn here to be much more productive in your TypeScript, wherever you use it. Lastly, He will give you the knowledge of when you see React Types vs your own custom types.
Prerequisites
This is not an introduction to React or TypeScript course. You will need to have a basic understanding of the two to be able to follow along. If you don't have that basic understanding, or just want a refresher on the subjects, The Beginner's Guide to React and Up and Running with TypeScript are the best two places to start.
What's Next?
The Beginner's Guide to React is the best place to go if you are just starting out in React. This course by Kent C. Dodds covers all the basics to get you up and running with React.
Advanced TypeScript Fundamentals by Marius Schulz will take you beyond the basics to teach you some new language features TypeScript has to offer courtesy of the wonderful team over ta TypeScript.
TypeScript: Tips and Tricks by Kamran Ahmed is where to go once you've started using TypeScript but looking for that little something to take it to the next level.
Most developers would raise an eyebrow if they saw database queries being done in a for-loop, but GraphQL provides just enough abstraction that it isn't always intuitive exactly how many times each resolver fires at scale, nor is it obvious how to batch operations efficiently and still return the correct results to the correct consumer.
You'll learn how to use the GraphQL Data Loader pattern to improve the performance of your application, and solve scaling issues before they become a problem.
To do this, we'll first implement our own naive version of the pattern to understand why the API is shaped how it is. Then we will switch over to the official DataLoader package and explore the benefits further.
Skills you'll Gain
- Implement a cache layer to optimize your requests
- Batch requests so your Database isn't overloaded
- Build a performant GraphQL API
Front-end web architecture has made exciting advances in recent years. But before we get to that we need to have a discussion on what has led us to this point and the driving principles behind it.
Since JQuery, we've progressively been decoupling our logic from the DOM. After JQuery, frameworks like Angular were able to abstract that logic into controllers and services. Then Redux came along and brought a simplified that let us reorganize our logic into more cohesive units.
We should be taking advantage of improved decoupling in the modern web. If you can write a function you can write an endpoint. And if you understand frontend architecture principles, then you already understand cloud architecture principles.
In this course, you will learn how to decouple JavaScript functions from the environment they live in. By using the Serverless framework and AWS, you will see how straightforward it is to create an endpoint.
So check out this course and start lifting your functions into the cloud today!
Scripting can save you a ton of time by automating your daily workflows.
But it's hard to justify the time investment of learning Bash to write your scripts.
Bash is the great barrier we all face when trying to script away our daily tasks. There are some common problems that we run into when dealing with it. Like what if we want to display images? Or share our script with other devs cross platform?
You know what you want your script to do. You know you could figure it out if you had the time. But it's all just too darn much.
What if you could write your scripts in JavaScript, launch a GUI, and were actually easy to share with your team? audible gasp
Script Kit is the tool that’s been missing from your developer toolbox for so, so long. 🛠
Download the new hotness here: https://scriptkit.com 🔥
We even use Script Kit internally at egghead.io to manage our lesson transcripts! With a single script, we query an API to list the transcripts, modify them as necessary, then post the changes.
This course was made to show you what Script Kit can do for you.
John Lindquist, the creator of Script Kit and co-founder of egghead.io, has put together this series of lessons to give a quick overview of the features of Script Kit to help you get oriented.
We know you’ll be off and having a blast with your own scripting ideas in no time!
Intro
Animations do more than just look good. They can draw the user's attention to important information or let them know they can interact with certain elements.
You can use them to smooth transitions and bring your applications to life. It makes you stand out from the usual wall of text that you see on most applications.
But here is the issue, animations can get complicated. You have to have a good understanding of how CSS works but it takes hours of studying before you can even start trying to animate.
Framer Motion solves this for you and Will Johnson will show you how.
The Project

In this course, you’ll iteratively add animation to a fully-styled shopping list app that’s built-in React.
You’ll see how Framer works out of the box, and learn just how customizable it is. Throughout the course, Will demonstrates animation through changing size, direction, and even appearance.
It has smart defaults that handle making the animations smooth and performant. Automatically animating layout changes. It does so much for you it almost feels like you're cheating.
You’ll even see how to animate the path of an SVG making it draw the path for your image.
Gain these Skills
Will gives you the knowledge of how to incorporate Framer Motion into any React application. You will be able to customize your animations to do whatever it is you want/need and show your users what items on your app are interactable. You’ll be able to take your static application and make it interactive.
Prerequisites
There are no prerequisites for this course. The application we are working on is already built for you so you just have to be able to follow along with Will as he integrates Framer Motion into the app.
What’s Next?
If you are further interested in learning about animating your applications, Spring Animation in React with React Spring is a great place to learn! Christian Nwamba will teach you the skills to begin using the react-spring library and add animation to your React components.
If you are interested in more courses by Will Johnson, he has a mini-course on how to Create A Blog With Jekyll. Will shows you how to download, install Jekyll plugins, and create blog posts.
Build a fully managed, serverless GraphQL API powered by TypeScript and AWS CDK in a matter of hours, not days.
AWS CDK gives us the power to go all-in with infrastructure as code for AWS. With it, we can create a full GraphQL API with AppSync, a database with DynamoDB, serverless functions with Lambda, and much more.
In this course, you will learn how to do all of the above from your command line and code editor, which will save you time and give you greater flexibility.
Want to delete your stack? That's fine, just run
cdk destroyand poof, all of the resources are gone. Changed your mind? Just deploy the stack again and they all come back.AWS CDK makes it that easy.
And since we are working from the command line and our code editor, we will take advantage of TypeScript and other third-party libraries to improve our developer experience.
So stop wasting time in the AWS console, check out this course, and learn how to leverage infrastructure as code to your advantage.
GROQ (Graph-Relational Object Queries) is a query language for JSON. This course will help you build your first query and walk you through filters, projections, functions, and the other features of GROQ to help you request exactly the data that you want.
In this course, John Lindquist will teach you how to create and structure GROQ queries to load exactly the data you want.
The course will kick off by giving you a quick introduction on what GROQ is, and then you will learn how to use the different features the language supports.
At the end of this course you will know how to use GROQ in the context of a Sanity.io dataset.
Your app can react in various way on different network conditions. Cypress has a great toolset for setting up those conditions, which enable you to test your app thoroughly. That way you can ship your app with confidence.
Cypress’ .intercept() command is one of the most fun command to use. And it’s also one of the most useful.
Especially when you are done with all your happy paths and want to increase your test coverage with some edge cases.
These edge cases can mean different data, headers or server behavior. You can modify all of these, dynamically or with a static fixture prepared beforehand
In this course, we will be building a React Native news app that is read-only when offline.
The videos are recorded on a Mac with an iPhone 13 Simulator using plain React Native, but you can do this course using Android, Windows and even the Expo managed workflow. See the lesson description for platform-specific instructions. The solutions repo has been verified to work on a Pixel 3a Emulator on Mac.
The completed app for this course is available here and each lesson will include a link to the commit that added the code so you can check your work.
After we build our news app, we're going to enhance it to make it read-only when offline using urql'g GraphCache.
This course will require you to run the api locally on your device. The api repo is available here.
Resources:
- urql: https://formidable.com/open-source/urql/docs/
- Insomnia: https://insomnia.rest/
- Async Storage: https://github.com/react-native-async-storage/async-storage
- React Native Netinfo: https://github.com/react-native-netinfo/react-native-netinfo
Get started building dynamic apps with GraphQL and Vue3.
As your app scales, so does the complexity of managing your routes and API endpoints.
It gets tiresome.
But this aspect of web development can be streamlined considerably!
GraphQL is a powerful tool for querying and mutating your data. In this course, we are going to create a Vue3 app that leverages GraphQL to create a dynamic front end.
But what does GraphQL do?
Its power comes from giving you a single endpoint that you make all your queries to. Instead of making a request to a specific endpoint and getting a fixed response, you can write flexible queries to a single endpoint.
Vue3 has some great new features that we will be exploring, such as the setup script syntax. But you won't just be exploring Vue3's new features, we will be building a dynamic front end with an index, view pages generated from data, and forms.
To make our frontend dynamic, we will be powering it with GraphQL. We start with the basics by creating queries but we move on to more advanced topics such as query params, mutations, and pagination.
To actually use GraphQL in our Vue app we will be using the Vue Apollo Client. Which gives us convenient methods for making queries, getting the data back into the client, and handling errors.
Gain These Skills
- Add GraphQL to a Vue 3 project
- Query and mutate data with GraphQL in Vue 3
- Create data-driven views with Apollo client
- Handle routing within a Vue 3 project
- Implement optimistic updates and infinite scroll
Prerequisites
Some entry-level knowledge on Vue and GraphQL is recommended, but this course is beginner-friendly enough to where it isn't a strict requirement.
If you want to build a deeper foundation for both Vue and GraphQL we have a couple of awesome courses that you can hack through.
For Vue, check out The Beginner's Guide to Vue 3, which is also by Kevin. It's great for both newcomers to web dev and veterans alike.
And for GraphQL, work through GraphQL Query Language from Eve Porcello. Eve literally wrote the book on learning GraphQL and her course is similarly top quality.
What's Next?
Progressive Web Apps are a more advanced topic, and converting an existing Single Page Vue App into one makes for an excellent follow-up project. -> Offline-First Progressive Web Apps (PWA) in Vue.js
If you want to take your GraphQL game to the next level, then becoming an expert in designing GraphQL schemas is the way to go. -> Designing GraphQL Schemas
And I know the following recommendation is a React course but it really is that good. You will learn some advanced techniques that will be applicable to Vue or any other Apollo compatible framework that you work with. -> Manage State in React Apps with Apollo Client and GraphQL
todo
Storybook is a tool for UI development. It makes development faster and easier by isolating components. This allows you to work on one component at a time. You can develop entire UIs without needing to start up a complex dev stack, force specific data into your database.
In this course, Michael Chan will teach you how to integrate Storybook 6.3 with Next.js 11 so that you can flawlessly build UIs.
The course will kick off by taking the default Next.js page and turning it into a Story. You will then learn how to leverage Story
Args, configure thenext/imagecomponent to be unoptimized, and mock server workers with MSW inside Storybook.You're going to find cloud services being used at nearly any enterprise you work for. So it's important for us developers to at least have a high-level understanding of this infrastructure.
And since AWS has the dominant share of the cloud market, being familiar with it is incredibly valuable and opens a lot of doors.
But gaining that familiarity isn't easy. Just browsing through the list of 200+ services is overwhelming.
Getting started with learning AWS usually involves having a dozen or more open tabs and the feeling that you're going down a rabbit hole that never ends.
This course is an alternative to that stress. It has been structured like a boat tour on a river of knowledge, linearly guiding you through the core of AWS.
By the end of this course, you will be confidently spinning up servers, creating relational databases, storing static assets, and writing serverless functions with confidence.
So, whether you need to learn AWS for your current job or are looking to earn your cloud practitioner certification, start watching this course and gain the skills you need today.
The Edge is one of the most exciting new topics in web development. At the front of the pack is Cloudflare, whose network boasts servers located in hundreds of cities all over the world instead of in regions like "East" or "West".
More servers in more locations mean a faster experience for your users.
But what about the data part of the equation?
If the application you're working on skews more toward "reading" rather than "writing" data, Cloudflare Workers KV is a perfect fit.
Once you create a KV namespace— the "KV" stands for "key-value"— Cloudflare keeps track of your application data. The most commonly accessed data will be propagated around the world to the various Edge servers, while less popular data will be stored in more central locations.
Kristian Freeman has produced courses that introduce how to build and deploy sites and JSON APIs powered by Cloudflare Workers.
Today, he will show you how Workers KV can be integrated into a Cloudflare Workers project through building a Todo App.
The Project
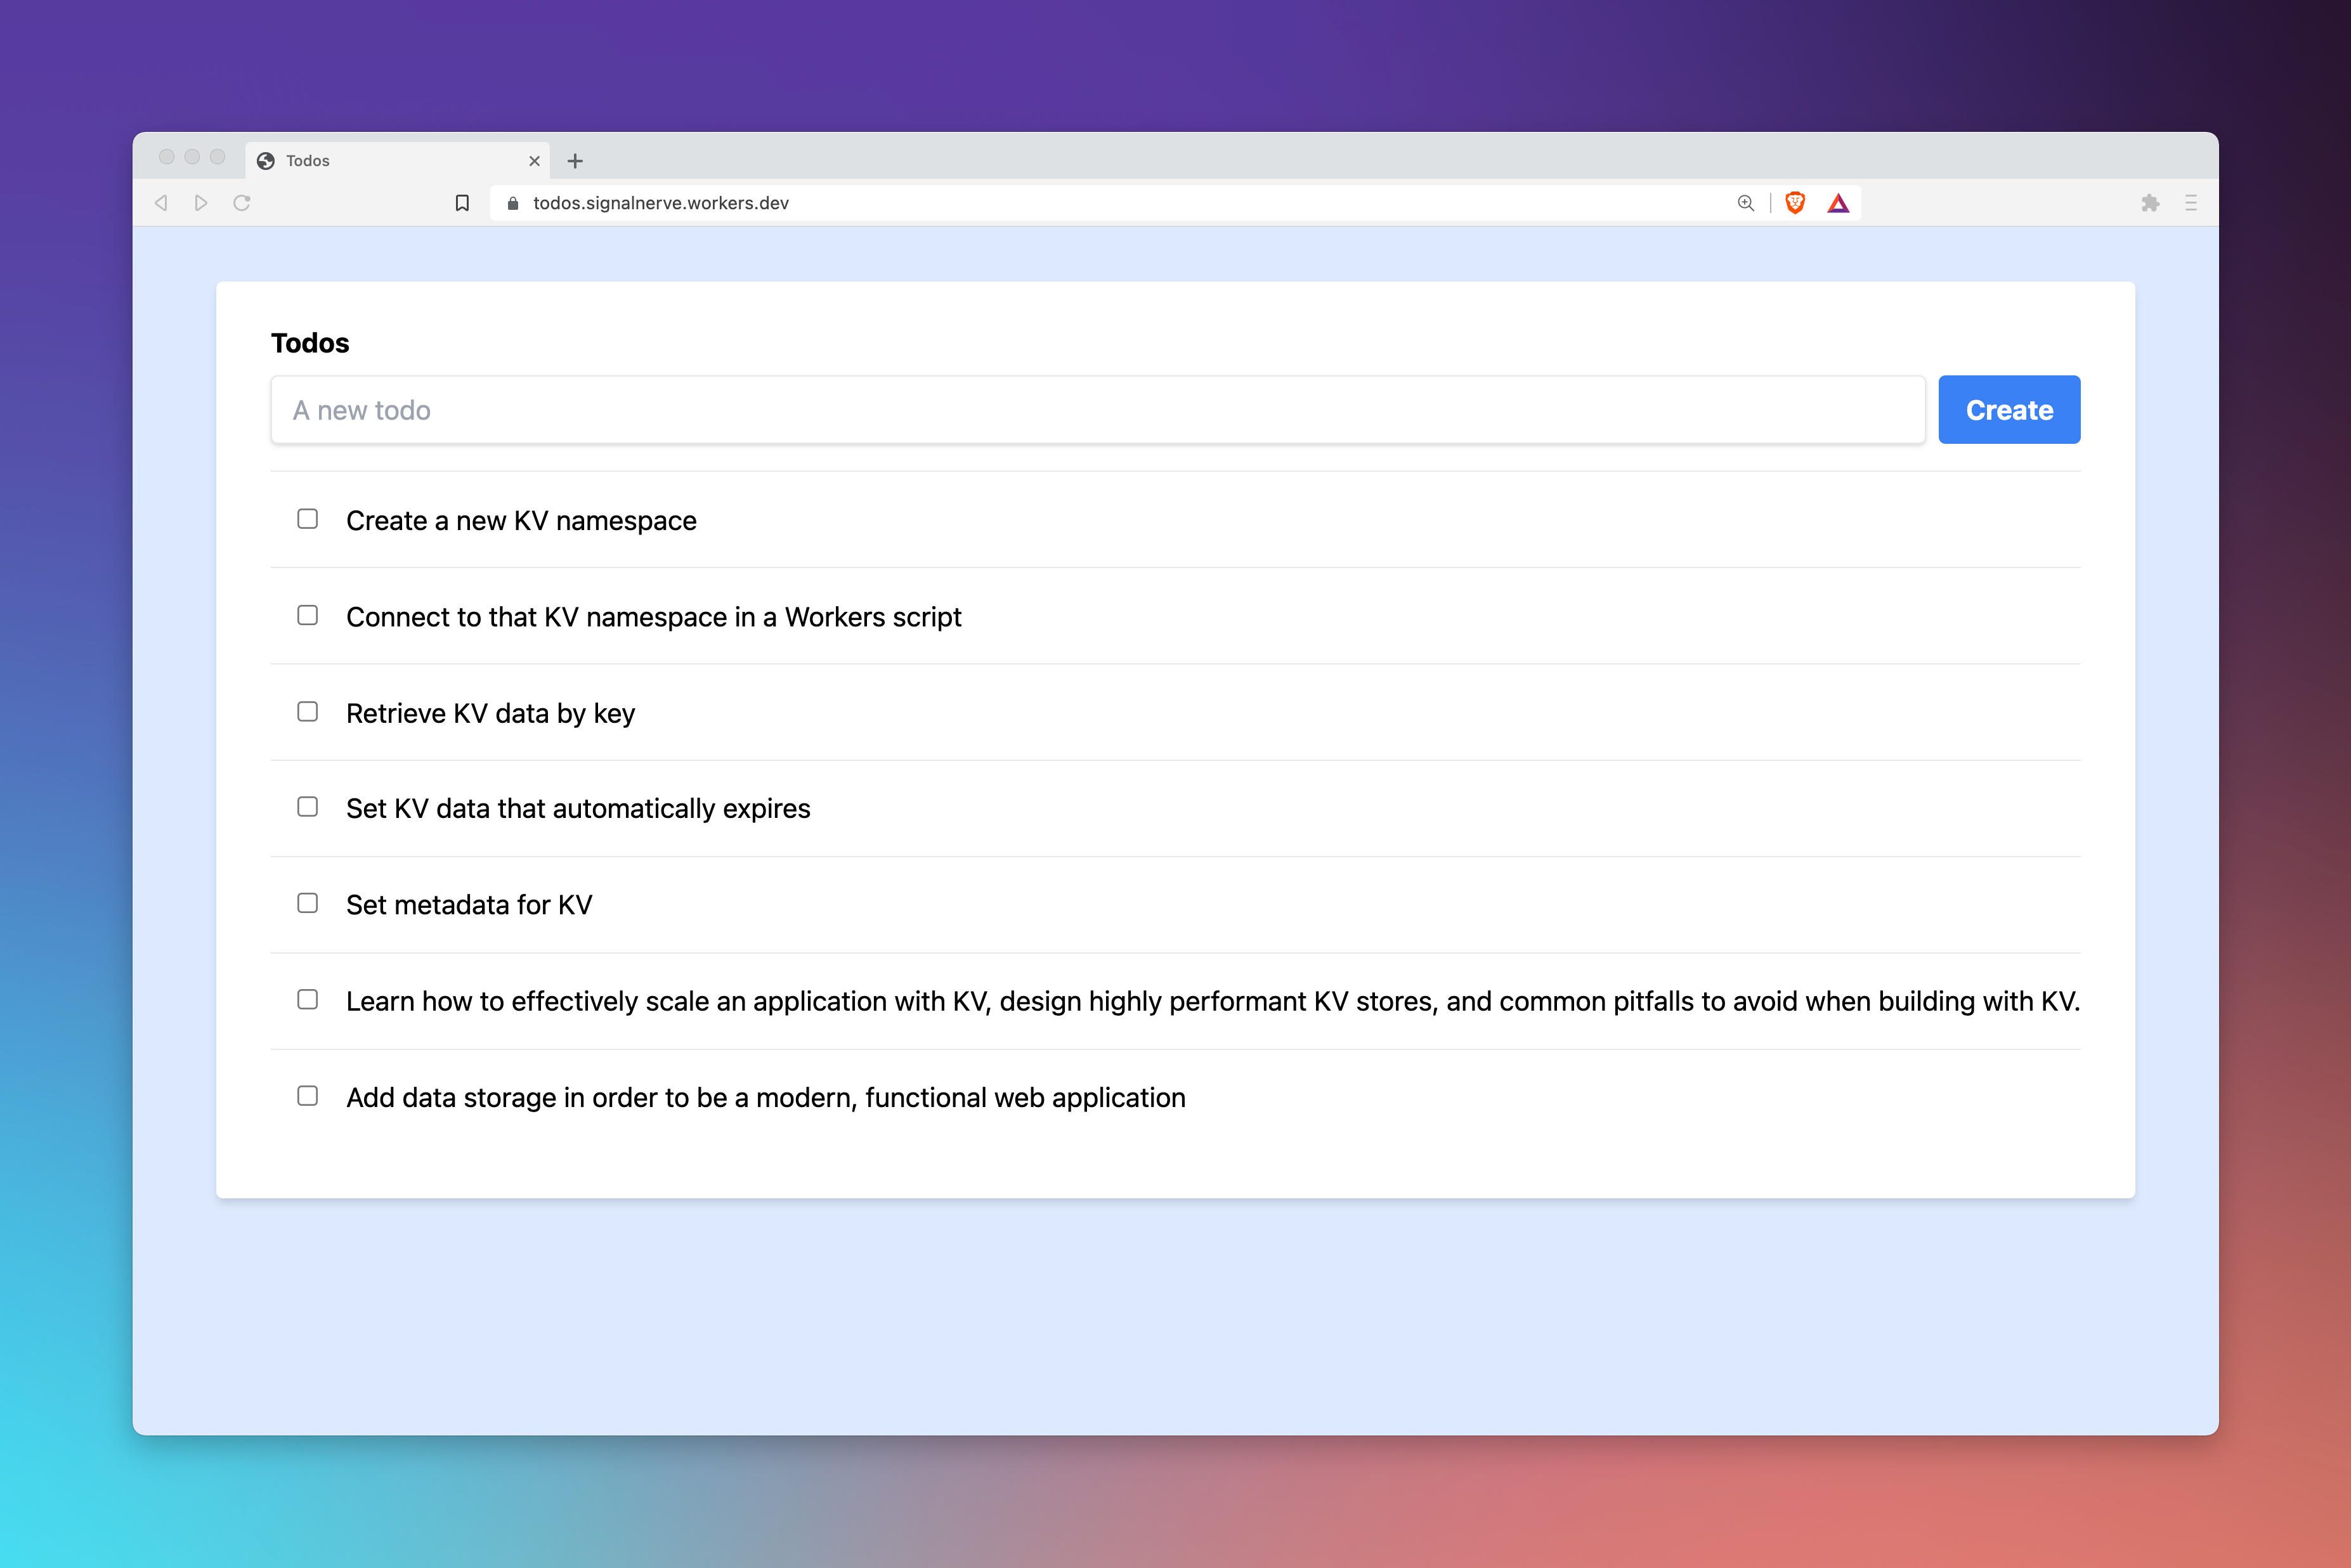
Before you groan about a bland Todo App, think about it this way:
The Todo App is the perfect example of the CRUD operations. Cloudflare KV has its own nuances for reading and writing data through a concept called Binding that is easier to grok when you understand the larger example as a whole.
As the course progresses, Kristian shares examples of how you can store more complex key-values, along with data operations like editing and filtering.
One of the coolest features that Cloudflare KV allows for is user-specific data that is tied to the IP address the request originates from. In other words, you'll be able to share your deployed Todo app with anyone around the world, and they will only see their personal items.
Gain these Skills
- Manipulating data using Cloudflare Workers KV
- Make data unique to each user without logging in
- Effectively store lightweight data in Cloudflare Workers KV
- Setting up a key-value store and connected projects
- Reading and writing to a serverless key-value store
- Storing complex values in a Cloudflare KV store
Prerequisites
You'll need to have a basic understanding of what Cloudflare Workers is recommended but not necessary. This course is relatively beginner-friendly into the world of Workers KV that you can get by with no knowledge on Cloudflare Workers.
But if you want to get the most out of this course, we would recommend taking Introduction to Cloudflare Workers to get a better understanding of how Workers KV comes into play.
What's Next? (You might also like these resources:)
Follow along with Kristian Freeman as you build a localization engine that renders data based on the Edge location nearest to the application's user. → Introduction to Cloudflare Workers
Learn how to build your own serverless APIs so you can manage a highly available backend for your projects. No Learning DevOps or managing services necessary. → Build a Serverless API with Cloudflare Workers
Using Cloudflare Pages and Cloudflare Workers, it's easy to create dynamic front ends that you can deploy in just seconds from GitHub. → Deploy Dynamic Frontend Applications with Cloudflare Pages
Protect yourself from unexpected charges by learning how to use Firebase emulators.
By using Firebase emulators you no longer have to create a second dev firebase project to avoid using production data. You also don't run the risk of having a cloud function crash and run up a huge bill.
In this course, you'll learn how to set up and use Firebase's authentication, function, and Firestore emulators. You will also learn how to safely set up Cloud Function emulation, import seed data into your emulators, and disable the emulators in production.
By the end of this course, you'll be able to confidently set up a safe environment for testing in your own applications!
Create a serverless application and deploy it in under thirty minutes!
We'll be using Netlify, Vite, TypeScript, and React in our project. This stack synergizes extremely well for rapidly developing professional-quality applications.
If you haven't heard of Vite, it's the French word for quick! It's also a build tool that consists of a dev-server and an extremely fast bundler. It makes for a rapid development loop.
As for the rest. Netlify makes hosting fast and easy with serverless functions and continuous deployment. React enables you to quickly create reusable components. And TypeScript helps you write cleaner code that is easier to refactor.
So get started and learn how to use this stack in your own applications!
For your frontend, this application will be using Next.js and Tailwind CSS. You will learn how to maneuver around an app and build a strong static pricing page.
For your backend AND authentication, we will make use of Supabase. Supabase is open source and is all of the backend services that you will need to build your site. It includes a dedicated and scalable Postgres database and user management with Row Level Security!
Lastly, for payments, you will be using Stripe. It will be an individual payment checkout system that will create and update users' subscriptions.
Jon will take you through all of this and more in just 1 hour and 10 minutes!
Optimizing your application is key to being able to provide your users with a clean and pleasurable experience.
To make your app as performant as possible, you have to send to the browser the least amount of code possible. Also, you want to render the least amount of components on a page at a time as necessary. Then you also want to rerender components in the least amount of time possible.
Tyler has found that working in enterprises and startup cultures that, as you get more developers in a team and as your application grows, a lot of these little practices become ignored or forgotten or missed on a refactor or a pull request. They start to build up over time. Then, at the end of the day, you have a slow-performing app. You go through it, and you have to do all these little updates.
In each one of these lessons, Tyler going to be adding and deleting code to walk you through how to optimize a React app using a dashboard React app as the example.
Web accessibility (also referred to as a11y) is the design and creation of websites that can be used by everyone. Accessibility support is necessary to allow assistive technology to interpret web pages.
React fully supports building accessible websites, often by using standard HTML techniques.
Erin Doyle is an expert in creating accessible React applications and has developed a course that will give you a concrete process for auditing react apps for accessibility. In this course, you will go through different tools and libraries to audit components in a React app.
Notion is a note taking application that empowers super productive workflows, without compromising on beautiful UI or intuitive UX. Next.js is a React framework that sprinkles in server-side logic in the places it is needed. This allows each page to be dynamically rendered by the client, rendered by the server or entirely static and rendered at build-time. This makes it an incredibly flexible option that can start off as simple as
create-react-appand incrementally introduce complexity as the application evolves.In this course, you will learn how to pre-render static pages with data from the Notion API. We will cover querying
page,blockanddatabasedata, as well as updating properties with mutations, and some helpful techniques for transforming raw responses into convenient data structures for our React components. Using Incremental Static Regeneration (ISR), we will learn about dynamically creating static pages any time new data is available in Notion.We will be building two example applications - a recipe app and a movie picker. The data for these applications will live in Notion, and be queried by Next.js at build time. This allows us to use Notion for its delightful authoring experience, and Next.js to make this data publicly available via super performant static pages.
Zustand is a state management library aimed at staying simple and un-opinionated so that you as the developer can build your application as you see fit. To do this it creates a store (module of state) that you can subscribe components to read and update data from.
Zustand leans on hooks as the primary way to interact with your state. This means you get less boilerplate and a centralized, action-based state management solution that scales with the complexity of your app.
Daishi, a core contributor of Zustand, will show you the inner workings of the library by creating a small version of it. You learn how Zustand's API came to be and gain a better understanding of it by the end of this course.
At the core of a good client-side GraphQL library is a cache. The cache is very important for improving the efficiency of your data retrieval and providing your users with a clean user experience.
In this course, we're going to see how Apollo's powerful cache helps easily solve complex UI problems, such as pagination, handling loading and error states, optimistic updates, and minimizing network requests.
We'll start from the basics, and look at how to make queries and mutations, but then we'll look at how the cache is behind most of Apollo's immediate benefits. We'll explore in-depth how it works, how it stores data, and how we can manually modify it manually for advanced scenarios.
Even if your backend doesn't fully support GraphQL yet, we'll look at how to write GraphQL queries in your components that retrieve local client state under the hood - or that can even make REST API calls.
After completing this course, you will be able to build well-designed user interfaces without spending a lot of time (if even) styling every component and element. You will drastically simplify your front-end work and learn to modify and build on top of existing design systems.
Chakra UI is a React components library with built-in accessibility. It comes with a modern-looking design system that's easily extendable and configurable. The simple styling API significantly reduces development time, so developers can quickly prototype their ideas and achieve the desired style and "brand" by editing a single file.
The result of using Chakra UI is a well-designed app that's accessible out-of-the-box, achieved with minimal effort and time.
In this course, you'll learn how to build a checkout UI.
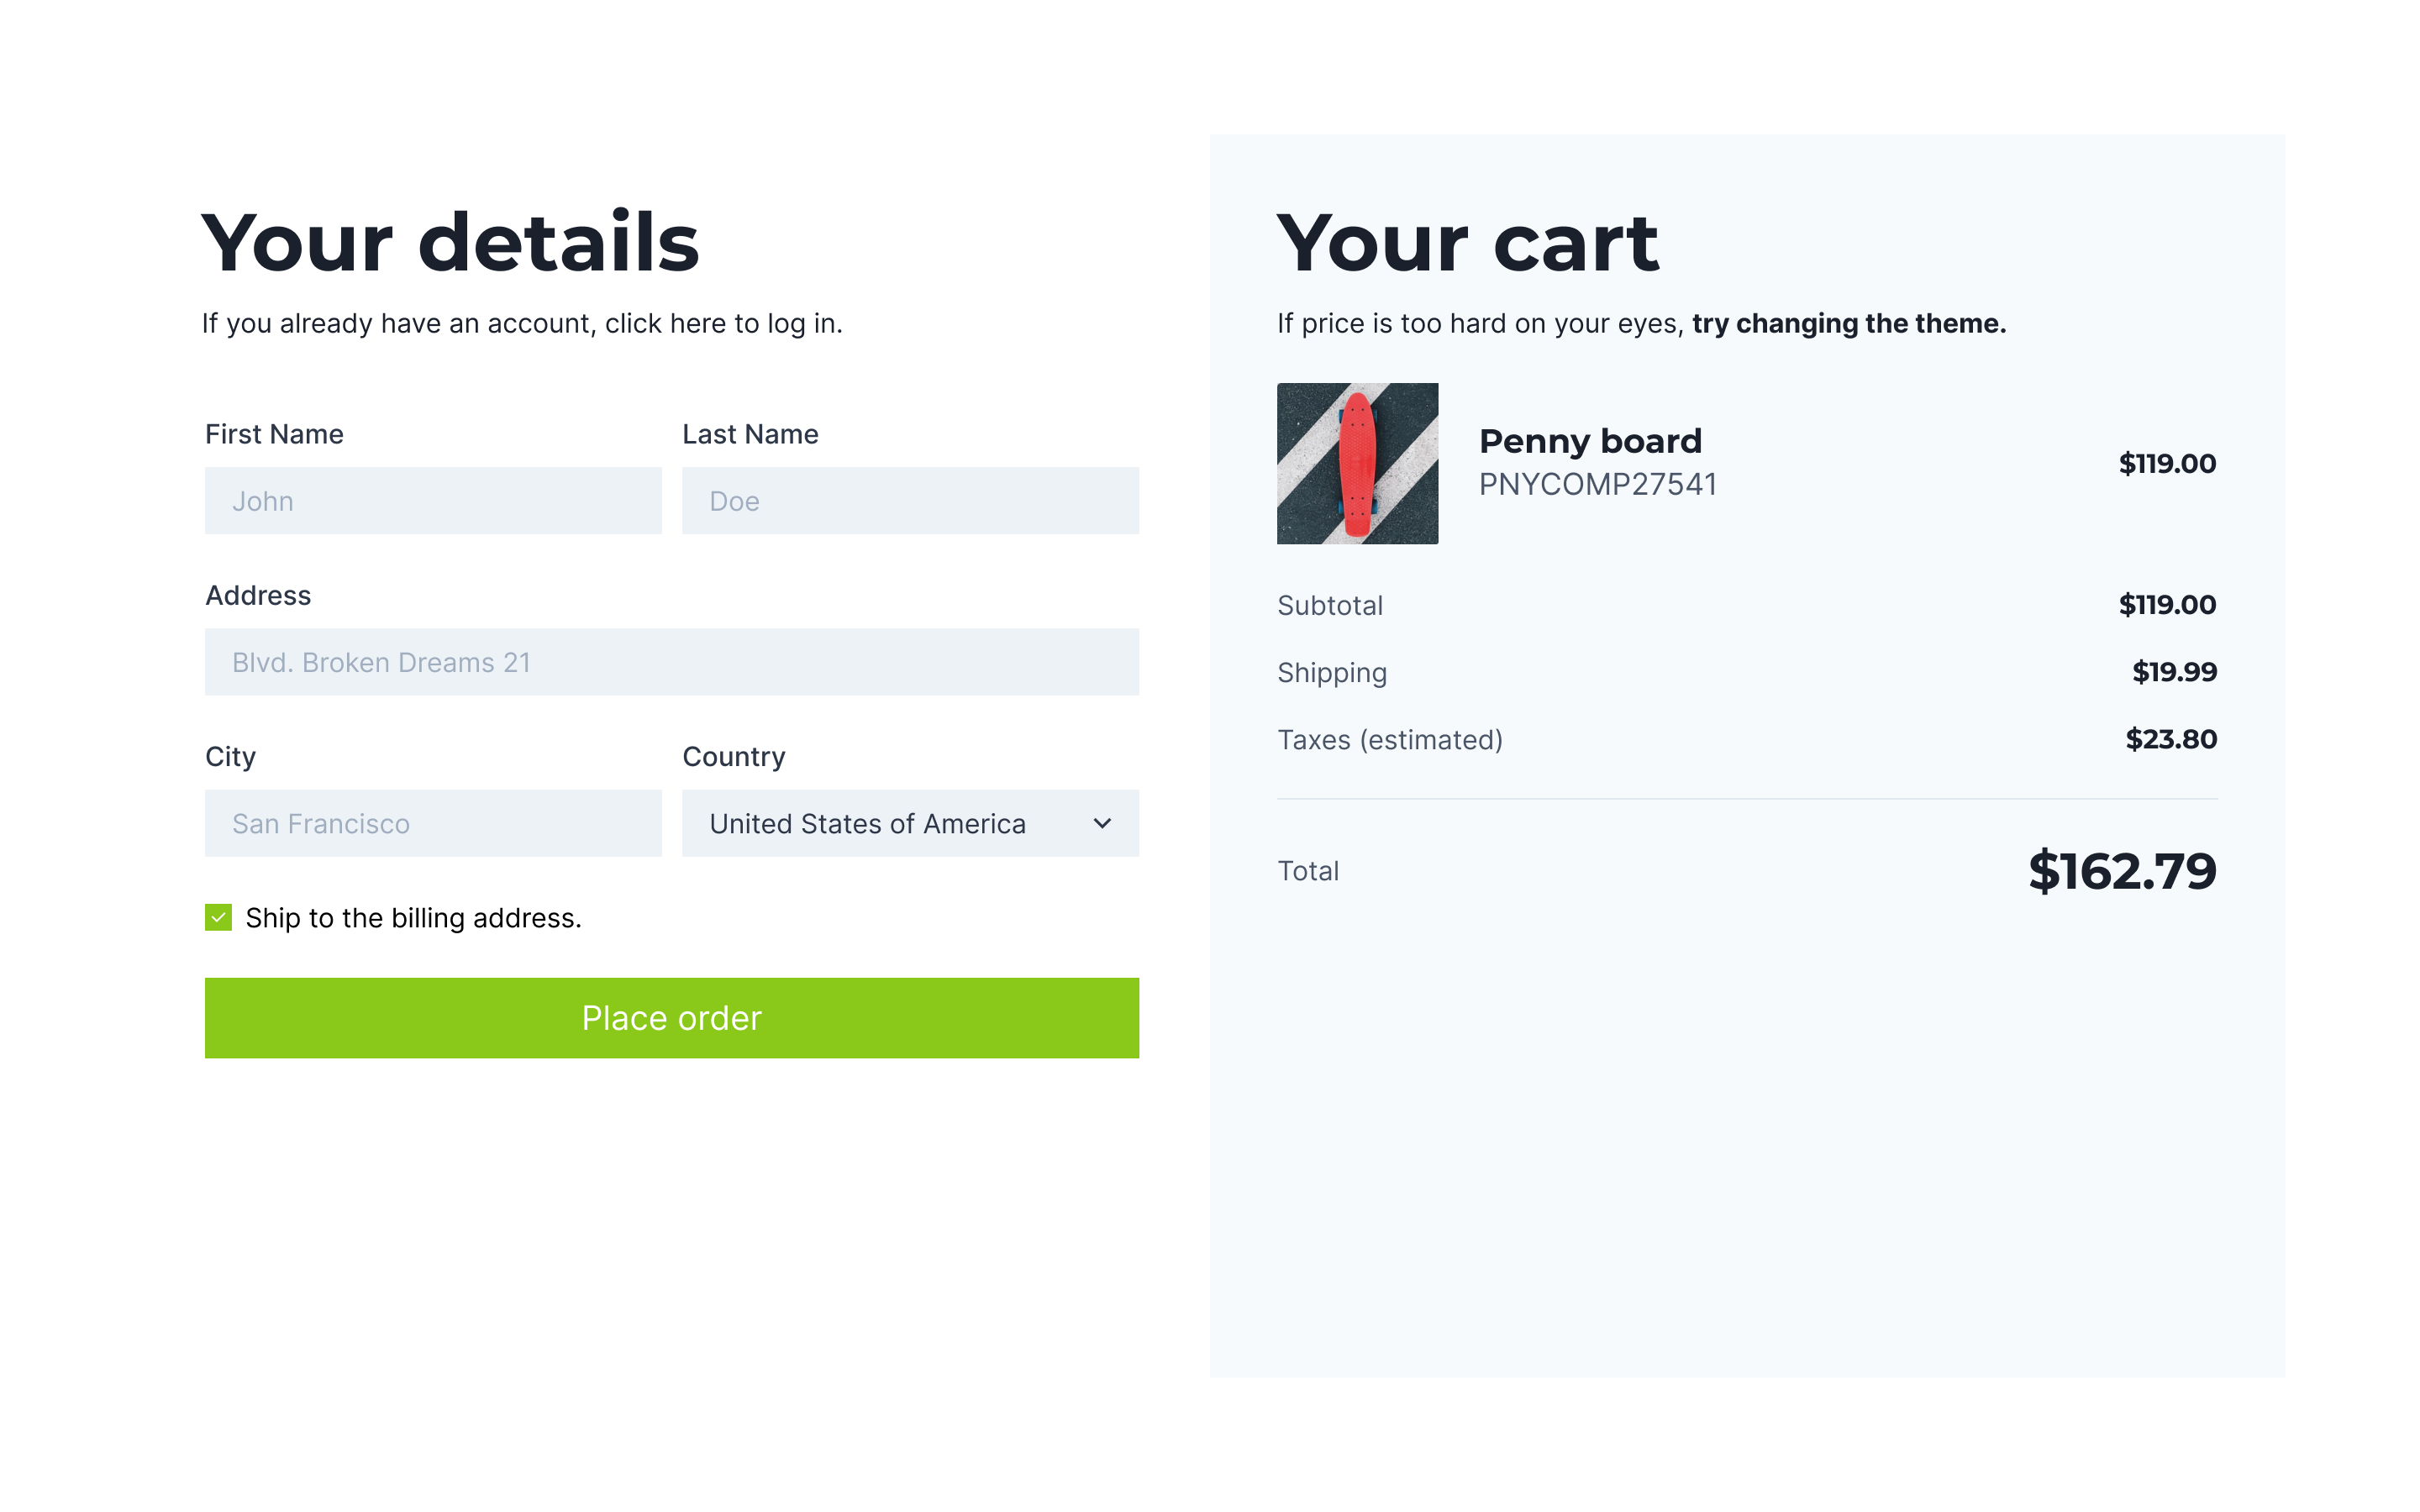
In the first phase of the course, you will learn all about the built-in components. Then we will override the theme, add custom fonts and colors, and make our UI unique.
This course provides all the design files to follow along. You can download them here.
A skeleton loader is a popular UI pattern for loading screens: instead of a spinner, we show static or an animated placeholder for the information that is still loading.
In this course, we go through 3 instrumental libraries for React Native - Linear Gradient, Masked View, and Reanimated 2 - and in the end, we use them in tandem to build a Skeleton Loader.
Linear Gradient Expo | Pure React Native
Masked View Expo | Pure React Native
Reanimated 2 Expo | Pure React Native
This course is built using an iOS simulator on plain React Native. Still, it will work on Expo and Android (you'll need to follow the relevant installation instructions available in the documentation).
The finished code for the skeleton loader (last 2 lessons) is available on Expo Snack.
Tailwind CSS is a utility-first CSS framework for rapidly building custom user interfaces. It is a highly customizable, low-level CSS framework that gives you all of the building blocks you need to build bespoke designs.
Prisma is an open-source ORM. It consists of the following parts:
- Prisma Client: Auto-generated and type-safe query builder
- Prisma Migrate: Migration system
- Prisma Studio: GUI to view and edit data in your database
Prisma Client can be used in any Node.js or TypeScript backend application (including serverless applications and microservices). This can be a REST API, a GraphQL API, a gRPC API, or anything else that needs a database.
In this course, you will learn how to initialize Prisma in a TypeScript Node project, use Prisma Client to create and find records, use Express to create data dynamically, and more!
Best practices for building & testing redux applications have changed dramatically over time. This course aims to be a comprehensive and up-to-date resource for those seeking to confidently test their redux apps. Whether you're just getting started or want to improve on your existing testing strategy, there will be something in this course for you.
This first few lessons of this course look at how to add jest to an existing react/redux application that was built on top of vite. We cover basic functionality like using
npm testvsnpx jestand generating and using code coverage to inform our testing strategy.The next 10 or so lessons cover the specifics of unit testing the redux code in our application. We'll go over how to test reducers, selectors and thunks. As part of this we'll touch on mocking APIs and using Redux Mock Store as well as running actions through our applications' actual reducers to broaden our test coverage.
In the final part of this course we'll look at how we can test our redux connected react components using the various utilities that come with the React Testing Library. We'll cover simulating various kinds of user input with the User Event Module, populating our redux store with test data, using jest spies, how to wait for asynchronous tasks to complete, and several approaches for finding & asserting that visual elements exist on the page.
This course is built on top of content that was created for the Modern Redux with RTK and TypeScript course and I highly recommend you start there if you haven't completed it already. It does expect a basic familiarity with react, redux and jest. TypeScript is used in these lessons, but is not a major focus and hopefully won't distract you too much if you prefer plain JavaScript.
No matter your experience level with redux and testing react applications, I'm confident your abilities will level up as you watch this course and follow along with the examples.
Thank you!
In this course we take a basic shopping cart application built with React and fully power it with Redux and RTK using TypeScript. For those of you familiar with Redux Hooks, we use those here, but the emphasis is more on how the Redux Toolkit simplifies the process of setting up your redux application including building slices, reducers, selectors and thunks. Everything we do in the course is typed with TypeScript to make your application development process as smooth and powerful as possible.
jotai is a primitive and flexible state management solution for React.
jotai gives you a minimalistic API that you can use that separates your state management from your UI. You get the benefits of well manages state AND you don't have to set up any boilerplate like defining actions, reducers, dispatchers, or stores.
You create an atom and you're off to the races managing your application state.
In this course, you'll build an SVG drawing application. You'll see how you can represent the canvas as state through atoms and add svg path, change the path colors, delete, and even undo actions. You'll sum up your learning by learning how jotai can isolate state in your applications by using and composing Providers.
You'll be able to use the concepts you learn here to manage any state in your own application.
Learn how to make flexible customized Twitch Scenes using the static site generator Eleventy (11ty), CSS, and ComfyJS.
Throughout this course, you'll create scenes for preshow, host, and main desktop display streaming purposes. Using ComfyJS, we'll add embedded chat and be able to create responses to chat commands. Finally, we'll see how to actually setup the scenes in OBS to prepare to use them for your stream.
Bonus: you'll learn a bit more about CSS grid layout, and also the "cicada principle" to be able to show the commands randomly across the scene!
Every developer who has attempted to demystify OAuth 2.0 must be presented with mind-bugging complicated flow diagrams. It becomes worse when you try to understand all the terminologies of OAuth 2.0 and Open ID protocols.
There is no getting around the OAuth 2.0 flow being complicated with back and forth between your browser, the service you are authenticating with, and the application you want to access.
This course gets straight to the point without any application code distracting you from the core takeaway -- You will learn how to authenticate and authorize yourself using GitHub as your Auth Server.
We'll first cover the OAuth 2.0 flow for authentication and then integrate the Open ID protocol for authorization.
LIVE EVENT: Register here for a live webinar with Christian on OAuth. Bring any questions you have from taking this course!
Vue is a progressive framework for building UIs that allows you to incrementally integrate the technology into any existing project that you're working on. This makes it a great tool for you to learn as you can bring it anywhere.
This course is for learners just starting out in web development as well as for those who want to get up to speed on Vue 3 as fast as possible. You'll learn all the foundational skills of web development and how they are presented in Vue.
We will start with an HTML, CSS, and JavaScript file as to not distract you with any possible tooling that goes on top of the building websites with Vue.
You will incrementally build an app that sells comedy event tickets. In the end, you'll see how to deploy the application with Netlify Drag and Drop.
Cloudflare Workers let you write JavaScript Service Workers that run directly in Cloudflare's 200+ edge locations around the world.
With a Cloudflare Worker, you can modify your site's HTTP requests and responses, make parallel requests, and even reply directly from the edge.
Cloudflare Workers are written against a similar API to the W3C Service Workers standard. However, while Service Workers run inside the end user's browser, Cloudflare Workers run on Cloudflare's servers. This means that Cloudflare Workers can implement trusted code (which the client cannot tamper with), and will work no matter what browser the user is running.
In this course, Kristian Freeman will teach you how to build and deploy a Serverless API with Cloudflare Workers. By learning how to build your own serverless JSON APIs, you can effectively manage a highly-available backend for your projects, without needing to learn DevOps or manage services.
Listening to and responding to events is a foundational skill for building software for the web. The Document Object Model, or DOM for short, has a powerful built-in event system. And yet, many of us have a pretty basic understanding of the DOM event system and only scratch the surface of the available power.
This lack of understanding leads to bugs in our applications and writing lots of code to work around the DOM event system rather than leveraging it. The goal of the course is that you will walk away with the confidence to successfully and meaningfully engage with the DOM event system.
The DOM event visualizer domevents.dev will be used to explain many behaviors throughout the course. You are welcome to play with the visualizer yourself to continue your learning
One of the hardest parts of learning AWS is understanding how the different moving parts work together.
In this course, we tackle a real-world project of deploying the blogging platform Ghost to AWS using EC2 (the server where Ghost will run) and RDS (a relational database for Ghost to store data).
This course ties together skills like networking, SSH, and using the command line while getting a realistic full-stack platform up and running.
Whether you're studying for a certificate like Certified Cloud Practitioner or just learning for fun, this hands-on project will be a great way to dig in and get some practice!
Using TypeScript in your project has never been easier than it is today. The TypeScript team has continually added features to allow you to reap the benefits of static typing while reducing the overhead to get there.
This course will teach you these new language features TypeScript has to offer. You'll use optional chaining, handle undefined behavior with the unknown type and assertion functions, create private classes, handle tuple (and other data types) types, as well as learn about conditional types.
You'll also learn how to prevent type widening with TypeScript's new const assertions and efficiently type string literals through the use of template literals.
All of these skills will be brought together into examples that Marius will show you how to apply these new TypeScript features to real-world problems.
Skeleton screens show users that content is loading, offering a vague preview of how content will look once it fully loads.
CSS Animations are crucial for the perceived performance purposes since it shows for the user the content is loading by using animations as feedback for whoever is accessing the page.
Follow the steps in this course and you will learn how to create a beautiful and pleasant Skeleton Loader for your web app using CSS animations, focusing on Web Accessibility and Web Semantic.
Learn how to make a fully functioning Tic Tac Toe game that doesn't need any client-side JavaScript!
For this course, we'll be using Pug and Stylus which are preprocessors for HTML and CSS respectively.
Learn how to:
- Generate markup with loops and template literals
- Leverage native HTML behavior
- Create SVG
- Use CSS variables and scope
- Implement game logic with HTML forms
- Animate SVG with CSS
- Use CSS Animation to provide motion
- Use Pug Mixins
- Disable motion when users don't want it
- Apply visual effects using CSS filter and backdrop-filter
- Generate random animations using Pug and CSS variables
Many engineers working with redux have felt burdened by large amounts of boilerplate code and confusing indirection. These apps often rely on legacy patterns that are no longer recommended, but are still commonly found in production code bases. If you are are an engineer working on such an application, this course is for you. In it I will show you how to modernize your application, with react hooks, one component at a time. At the end of it, we'll still be using redux, but the structure and content of your code will be significantly improved.
We will cover migrating class components to functional components with react hooks and how to replace
connect()with redux hooks. This course will serve as a good tutorial for learning react hooks. It will also help you apply modern patterns for using redux. These patterns, powered by the new useSelector and useDispatch hooks will transform your redux applications for the better.In this course, Chris takes a README-driven approach to build out a Rust CLI that supports content authoring for a digital garden.
Specifically, you'll work through the first command for the CLI, writing files. You start by initializing a new Cargo binary crate through creating the
writecommand that allows you to create files (and their contents) to the folder that you set.Step by step you'll learn about:
- Handling user input
- Error handling
- Rust Move semantics
- Rust Copy semantics
- Integration testing
...and more!
A series of lessons to help you get more familiar with modern JavaScript syntax.
- Web audio APIs include support for features that aren't available by default in the native HTML audio element.
- The operating system includes basic controls
- Custom controls must be accessible with a keyboard, and make sense to a screen reader
- Don't hide the built-in controls until you know that your custom controls are working
- Listening to what VoiceOver reads should inform the a11y information you include
- VoiceOver says "Elapsed Time" on its own, so we wouldn't want to write it in our code.
loadedmetadatashould have the duration to avoid glitches from new audio not being loaded.- Elements should be labeled with a unique
id
elm-uiis a language for layout and interface design. This is a novel iteration on declarative styling where you can use Elm types and functions to define your UI in a declarative way.The novel part is that it does not require you to know CSS to be used. The API is very simple and can be learned quickly!
The approach taken by
elm-uiis based on two big ideas: Getting the compiler to verify as much of the layout and styling as possible by defining them in Elm code Enabling refactoring capabilities of Elm for UI codeForms are one of the most common features of a web application. They are also a common cause of headaches. The controls you use, the markup for the structural layout, and the styling all have to be considered.
What you build can look and behave differently depending on the browser being used, and how you build it can impact the accessibility of your application.
Stephanie Eckles has prepared several lessons that work through the creation of a complete form demo featuring the most common controls with a variety of attributes.
You'll create semantic fieldsets, add responsive styles without media queries, and prepare styles for accessible validation.
The demo is built with Sass and Eleventy. Don't worry if you don't have prior experience with these tools— Stephanie's code and explanations make it easy to follow along, and additional resources are available if you need them.
Redux was announced back in 2015 and immediately took off as the de-facto state management solution for React. As it gained widespread traction, it also became clear that in many cases it was brought into applications prematurely. The community in some ways started to push back on its use and recommended the built-in
setStatemethod as an alternative. Several other state libraries also started popping up around this time. Finally, as React Hooks were announced with a built-inuseReducermethod it appeared that Redux's time was up. However, these claims have proven to be premature. Redux is not dead and instead remains React's most popular state management library*.Recent updates to redux exposing a hooks-based API address some of its most serious drawbacks and make it even more appealing. This course will show you how to apply redux to a modern react hooks application. I hope you leave this course with a continued appreciation for React Hooks and renewed enthusiasm for Redux.
Thanks for watching 📺.
Notes
-
This content has been inspired by the incredible work done by Mark Erikson on modernizing redux and the fantastic Redux Style Guide.
-
Add Conversation Intelligence to your video or voice application without training Machine Learning models. Integrate speech to text and all of the below capabilities, out of the box:
- Speaker Diarization
- Sentiment Analysis
- Contextual Insights
- Conversational Analytics
- Topics of Discussion
- Entity and Intent Recognition
- Pre-built UI and Symbl JS Elements
In this course we will use Symbl.ai to get transcripts for the video we will upload as well as more meaningful insights.
Additionally, you will pick up NextJS for the main stack and will use Symbl's RESTful APIs for processing a conversation from a video and rendering transcripts to screen. Get your Symbl account here and start building.
Cloudflare Workers is a serverless application platform that enables you to create and deploy functions to Cloudflare's Edge Network.
Unlike other serverless providers that only have regional data centers, Cloudflare's Edge Network consists of hundreds of servers all over the world.
Cloudflare Workers is a powerful platform, and this course serves as a great introduction for what it can do.
Follow along with Kristian Freeman as you build a localization engine that renders data based on the Edge location nearest to the application's user.
After this course, you'll be ready to start experimenting with your own Cloudflare Workers projects. Need an idea? Check out the suggested Portfolio Project for this course.
The CSS Grid Layout introduces a two-dimensional grid system allowing both fixed and flexible track sizes to be defined. This allows for easy management of an app's layout.
You'll start with an empty HTML file with minimal global styles applied in your CSS file. You will then iteratively add sections and items to your HTML page to structure through a CSS grid. You'll learn how to control a grid's columns and rows and define the size of each respectively.
By the end of the course, you'll have a fully responsive landing page that behaves how you expect it to on any device.
Starting from a prebuilt frontend, Jason Lengstorf guides you through the creation of a "Corgi Up-boop App" that uses Netlify Functions and Hasura. You can view the deployed final product on Netlify.
You'll set up the Netlify CLI, and configure a local development environment before writing and deploying functions with a few different use cases.
The first example function bypasses CORS restrictions to retrieve corgi data from an example third-party API.
Next, you'll configure environmental variables to securely communicate with the Unsplash API without exposing private keys to the client.
Serverless functions don't persist data by themselves, so we will use Hasura to create a GraphQL API for tracking the number of "boops" each corgi receives.
This course is an excellent illustration of the speed of Serverless functions, and how fast you can implement functionality in your web applications.
How to create buttons in React Native depending on the level of desired customisability: the quick and simple Button, a more customisable Touchable, and the most customisable Pressable.
Button component is useful for quick prototyping.
TouchableOpacity is the most common way of creating buttons and other touchable areas, and is suitable for most use cases.
Pressable gives you the most control over the look and feel of your button, including customising the pressed state and text, as well as handling long presses separately from regular presses.
Accept payments & sell products powered by Stripe and the best of the JAMStack
There are as many ways to build an e-commerce store on the internet as there are products to sell. One thing is for certain, e-commerce is here to stay and as professional developers we need to understand how to build fully custom stores for our clients using the best modern tools available.
- React: flexible and customizable while following modern best practices
- Next.js: lightening fast with guide rails to help your project perform as consumers expect
- Stripe Checkout: lets you offload reams of complicated business logic to a trusted third party that maintains regulatory compliance, global payments, and a standard UX.
Your store will have well managed local component state using React Hooks and you'll also have clear and cohesive shared (global) state with React Context.
Finally you'll deploy your custom store to Vercel (the platform behind Next.js) as well as how to make your Next.js e-commerce store portable to deploy to other platforms.
Learn how to use the AWS Cloud Development Kit (CDK) to create and deploy a DynamoDB table with Next.js.
- 🛠 API Route to handle CRUD actions
- 📦 AWS CDK for Infrastructure as Code
- 🔓 IAM role to restrict permissions
- 🚀 Deploy instantly to Vercel
You can view the completed code here.
While "It works on my computer" might give you an excuse to close a bug ticket in the backlog, it doesn't really work when you're working on a team.
You need to ensure that your application can run regardless of what hardware your teammates are running or libraries they have installed.
Docker solves this problem by collecting everything your application needs to run into a container.
Containers aren't just for source code. They can hold configuration, scripts, and even their own filesystem. It's similar to a Virtual Machine, without having to bring a full operating system along for the ride.
Because containers run in isolation, there is some configuration involved to allow for files to be saved and containers to communicate with one another.
One of the most useful ways to get your head around Docker is to see it in action.
Follow along with Joel Lord as he works through the process of preparing an application to run in separate containers for the frontend and backend of an application that searches for gifs and re-encodes them with a caption supplied by the user.
You'll see how to configure the separate containers to communicate with one another, work with environment variables, and persist data to your local machine. Along the way, you'll pick up some tips on useful commands and bash scripting. Finally, you'll learn how to use Docker Compose to make it easy to run multiple containers simultaneously.
WordPress has been around for a long time and powers a huge number of sites.
Just because WordPress isn't brand new doesn't mean it can't get the job done!
Running WordPress as a Headless CMS gives you the benefit of a great content creation experience on the back end with the powerful Gutenberg editor while allowing you to use a modern JavaScript framework on the front-end.
In this course, Kevin Cunningham will guide you through setting up WordPress as a headless CMS from scratch, as well as migrating from an existing WP site. You'll get practice with different WordPress content types, implement a GraphQL endpoint for querying data, and backup & deploy your site. All the while, you'll deepen your understanding of how headless WordPress approaches the relationship between content & rendering.
Using WordPress as a headless CMS turns it into a datasource ready to work with Gatsby, Next.js, or whatever else you want to build with. Your and your clients will be able to take advantage of WordPress's content editing experience, without having to settle for a cookie-cutter theme on the frontend.
With WordPress being decoupled from the rendered site, the database isn't hit for every request. This means faster performance and more security against WordPress exploits. You don't even have to host the editor at the same domain as the published site.
While watching, consider...
- What are the tradeoffs of using a CMS for a site?
- Would headless WordPress work for me or my clients in this scenario?
Managing state in a UI is challenging. It's genuinely difficult and the solutions require a depth of knowledge and experience to understand. Everything is a balance of tradeoffs in complexity, performance, and user experience.
This is a series of interviews with experts, open-source maintainers, and UI developers that have combined decades of experience building stateful UI applications for millions of users.
Part interview, part screen share, these videos should benefit you if you're building web applications.
They focus on React, but the underlying principles are valid for UI work in general (and beyond).
On the surface, starting a project sounds easy. First you make some directories, install some dependencies, then you write some code.
But there's a bit more to it than just those three steps.
The type of project you're working on impacts the decisions you make. It gets more complicated when you're working on multiple projects that are related. For example, maybe you have a customer-facing frontend app, an admin dashboard app, and a single backend used for both.
How does this change your directory structures? How should you share code between projects? What happens when you add a Design System into the mix?
It can get hard to keep things straight in your head.
Nx is a tool that aims to solve these problems for you, whether you're working solo on a small full-stack app or on a dev team of thousands.
It's not just an opinionated folder structure. When you create an app with Nx, it generates unit and e2e test setups as well as preparing bundling and code-splitting with Webpack, and stubbing out common features like routing.
One of the coolest features of Nx is its Dependency Graph. The graph can visually show you the relationship between the parts of your application, and is optimized to ensure that compiling, testing, and linting only happens in the affected areas of your project.
In this course, Juri Strumpflohner demonstrates these features and more through the iterative creation of a React + Storybook + Express app. Don't worry if this isn't your preferred stack! Nx supports the most popular frameworks & libraries on the web.
More importantly, the focus of this course is more on the workflow than the implementation.
Watch Juri's course, and see if the Nx tooling & workflow is right for you and your team!
The new React Hooks API allows using different patterns in a simple, direct, and functional way.
In this course, you will find a step-by-step guide to build a complex component using different design patterns implemented with the Hooks API.
We will start with a simple component
<Wizard>that uses theuseStatehook and in each lesson, we will be improving the implementation by using different strategies.In the last lessons, we will have a full Wizard component with a flexible API to allow the user to manage the component based on their requirements and You will have learned the use of
useState,useReducer,useContext,useEffectanduseCallbackalong with some popular design patterns to build React applications.You will be able to find the code and notes for each lesson in the GitHub repository.
Techniques to improve your CSS, Sass, and HTML implementations for everyday scenarios.
Learn how to create tuples in Python. The videos in this collection will also cover more advanced features of tuples
As a developer, you'll often make use of APIs that have you pass in a callback function. For example, adding event listeners or using various other DOM or Node APIs.
What's less common is writing your own code that makes use of callbacks. Many developers know what a callback is, but not the why or how of implementing them in their projects.
A callback is a function that you pass to another function, so that the function that you pass it to controls the invocation of that function.
To help keep things straight, John Lindquist calls the innermost callback the Listener, and the function it gets passed into the Broadcaster.
Think of it as one function broadcasting values to another function that is listening for them.
These Broadcaster-Listener callback relationships can be composed to solve problems in the realm of timing, buffering, and caching.
This pattern of composing callbacks is the foundation of RxJS and other libraries that handle complex async scenarios.
In this course, John Lindquist guides you from a blank JavaScript file all the way through creating a library of reusable functions not unlike those found in RxJS. The difference is you'll be writing from scratch.
You'll learn techniques for solving Callback Hell with composition, implementing debouncing, and building a word game among several other examples.
Using callbacks in code is a major pattern in JavaScript, and learning to work with them effectively will take your problem-solving skills to the next level.
In the previous section, 07 Building Light Search Box, we implemented a search box with the pattern that we've built in this course. This works great but doesn't have as much business logic applied as other async scenarios.
In this section, we will implement a word game where the values coming in from the user will be piped to different listeners to be consumed. Along the way, complex business logic will be applied to determine if the user won the game or not.
You're in Section 08, the last of Composing Closures and Callbacks in JavaScript
Like in section 04 Implement the Pattern in Common Async Scenarios, it's time to implement the pattern in common scenarios!
Now that you're familiar with the pattern we'll build a search box that handles a few different async scenarios.
You'll filter values based on user input, debounce text while a user is typing, and send a request once they are finished. Finally, we'll see how to implement a cache to save on network requests
You're in Section 07 of Composing Closures and Callbacks in JavaScript
It's time to introduce a "View" to our codebase so that we can present the values in the DOM. Since React is the most popular View library, we'll convert our basic JavaScript project to a React project to demonstrate how this pattern fits.
We'll create several hooks (
useCallback,useListener,useBroadcaster) in this section to see how you could implement the pattern in react terms.By the end of the section, you'll know how user input is handled and how to fetch resources in React with this pattern
You're in Section 06 of Composing Closures and Callbacks in JavaScript
The concept of 'done-ness' is not something that is often considered when writing functions in JavaScript — you end up just running out of data or a function stops getting called.
There are many async scenarios that make sense to signal that work is completed.
By following a completion pattern, we can easily trigger repetition and sequencing (async or not) into our code.
You're in Section 05 of Composing Closures and Callbacks in JavaScript
In this section, we will introduce another concept to the pattern that we've created:
Operators.
Operators are the final big piece that allows us to bend all asynchronous behaviors to our will. They give us a chance to redefine broadcasters and listeners in any way we want.
We'll several operators throughout this section to implement mapping, filtering, and piping behaviors (and more!).
By the end, you'll get a real sense of how you can continue building on top of the functionality you've already built.
You're in Section 03 of Composing Closures and Callbacks in JavaScript
JavaScript is full of inconsistent APIs. Wrapping those APIs in functions allows you to have full control over how to configure them and make them more reusable.
This becomes even more beneficial when dealing with the async nature of JavaScript. You'll learn how a broadcaster is a function that wraps another function (which we call listeners) and modifies the behavior. We will build up this pattern in a way that allows you to compose broadcasters together making your code more reusable.
You're in Section 02 of Composing Closures and Callbacks in JavaScript
Now that you've been introduced to the pattern in-depth, let's implement it in a few common Async Scenarios.
You'll notice the benefits of re-using broadcasters through different scenarios as well as tweaking behavior through operators like when to start and stop code.
You're in Section 04 of Composing Closures and Callbacks in JavaScript
Before we dive deep into the pattern of composing callbacks and closures, we need to take start with the definitions and basic building blocks that we will be using for the rest of the course.
You'll be able to answer questions like:
- What is a Closure?
- What is a Callback?
- Why does Callback Hell happen and how can we handle it?
We will see that by establishing a contract between functions and holding to the pattern that is established, you will have gained a lot of power and flexibility in writing reusable, robust functions.
You're in Section 01 of Composing Closures and Callbacks in JavaScript.
A collection of CSS tricks to tackle various problems.
Optional chaining ?. in javascript is a new feature introduced in ES2020. Optional chaining changes the way properties are accessed from deeply nested objects. It fixes the problem of having to do multiple null checks when accessing long chain of object properties in javascript.
In this collection, we'll go through each of the standard hooks offered by the React library, learn how they work and build small applications that leverage them internally.
MDX has grown rapidly since the first commit two and a half years ago. We'd like to celebrate our accomplishments so far, and talk about what lies ahead. We've got lots of plans. Learn how MDX increases developer productivity, improves educational content authoring, and even peek behind the curtains to see how MDX works.
La nueva API de React Hooks permite utilizar diferentes patrones de forma sencilla, directa y funcional.
En esta colección encontrarás un paso a paso para construir un componente complejo utilizando diferentes patrones de diseño implementados gracias al uso de la API Hooks.
Comenzaremos con un sencillo componente
<Wizard>que hace uso del hookuseStatey en cada lección iremos mejorando la implementación mediante el uso de diferentes estrategias.En la última lección tendremos un componente Wizard completamente flexible al uso del usuario y habrás aprendido el uso de los hooks
useState,useReducer,useContextyuseEffectjunto con algunos patrones de diseño populares en la construcción de aplicaciones con React.Podrás encontrar el código y notas para cada una de las lecciones en el repositorio en github.
Cada lección tiene un directorio asociado dentro de
src, 101, 102, 103, etc. Dentro de cada directorio encontrarás el archivo fuente para el componenteWizard.jsy un archivoApp.jscon el código que utiliza el componente además de algunas notas extra en el archivoReadme.mdIn this free collection on Facebook's new state management library, we'll get started using Recoil in our React applications and then delve into various common use cases that we may encounter in the field.
We'll start with the basics of state management in Recoil: the Atoms and Selectors. Then we'll dive further into the Selector API, an important part of the library. Along the way we'll learn different strategies for handling synchronous and asynchronous Selectors.
In this collection, we explore creating CSS art and illustrations by walking through creating the Egghead.io logo with CSS.
We walk through everything from planning and creating a responsive foundation, to creating shading effects with
box-shadow.If you've ever worked on a website for a business, there's a good chance you've included a map.
A Google Map embed is sufficient for showing a location, but doesn't leave you many customization options.
React Leaflet to the rescue!
In this course, Colby Fayock will guide you through a series of lessons and challenges that will build your map making skills as you build out a web app for a fictional restaurant.
You'll get practice with handling API keys and using React Hooks to implement a custom interactive map complete with metadata and additional overlays.
This course has built-in challenges that you are encouraged to pause and work through, but feel free to just watch.
Tic Tac Toe is a classic game that has a relatively simple win condition. Get three of your pieces to line up in a row on a 3x3 grid-style board and you win, and also prevent your opponent from doing so.
This makes the game a great challenge to represent as code.
In this course, you will start with a blank create-react-app application, learn how to build a 3x3 grid (with CSS Grid), and power that grid so that you can take turns with another person and play tic tac toe.
You'll model the game state as a multidimensional array where you will manage and update that state with
useReducerRustlings is a set of exercises that serves as a great introduction to the Rust language. It covers many concepts from the Rust book by asking you to work through sets of exercises.
This collection walks you through Rustlings in a way that explains what's going on in each exercise. We cover everything from basic types to generics and threading.
Una colección de lecciones que describen como crear un plugin fuente para Gatsby desde cero hasta su publicación en npm.
A collection of lessons that describe how to create a Gatsby source plugin from scratch to npm
Express is a well-known and supported framework for Node web applications. It provides a lot of excellent functionality to process requests, interact with other APIs, handle authentication and return appropriate requests for any client.
This collection will look at providing an API for a specific application but will explore concepts that will be helpful in building a wide variety of applications.
AWS Amplify allows developers to create, configure, and deploy Serverless APIs and functions directly from their front-end environment.In this collection, you'll learn how to deploy various types of APIs and functions using the Amplify CLI. You'll also learn how to share code among various functions using Lambda layers and schedule functions to run at an interval to implement Serverless cron jobs.
Learn how to use the features of
gatsby-theme-blogversion 2.0.The Gatsby ecosystem supports a ton of plugins that allow you to easily source data from a variety of sources like a GraphQL CMS or Wordpress. But what if you wanted to source your own custom data?
In this collection, we'll walk through learning how to source custom data and create nodes in Gatsby in order to build out a Pokedex using the PokeAPI. We'll learn how to request the data in Gatsby's build process, create nodes with that data, query that data, and use it to create a Pokemon Pokedex UI.
I go through the steps of taking an initial mockup, writing html, css layout, css styles and javascript to make a fully functioning webpage.
If you like the content so far, tweet @MannIsaac so I'll be motivated to finish the series.
Start here! This is where you will get oriented, set up your work environment, and get ready to succeed as a React developer. It's important not to skip this section! It applies to all lessons below.
In this collection of lessons we will create a developer dashboard in the terminal using react-blessed and react-blessed-contrib. We will discuss various ways to layout the dashboard, show how to change fonts, style with colors, and position text within each widget. Then we will shift focus on creating some widgets to display developer content such as an interactive time log, a pomodoro timer, displaying recent commits, currently running docker containers, and more. Once you know the basics you can create a widget of your own to add to the dashboard.
🚀 In this collection, I will be going over some command line tools I use on a daily basis that make my life a lot easier.
fzf is a general-purpose command-line fuzzy finder.
Github Actions are an awesome tool from Github that allows us to automate tasks using code-based workflow configuration files. There's also a large marketplace that comes stocked with many useful tools that are ready out of the box.
But sometimes the options available don't completely solve our needs or maybe we're working with a new technology that's simply not available as an Action yet. Luckily, Github allows anyone to create their own Actions using common technologies like Javascript via Node.
We'll learn how to create a new Javascript-based Github Action running on Node. We'll first walk through a simple Hello World example, learn how to test it locally, version control it, use it in the wild, and move on to more advanced solutions that include using packages from npm!
Una revisión de las nuevas características que la nueva versión de Javascript ES2020 o ES11 trae para esta iteración.
SSH provides a secure way for your to connect to and authenticate with GitHub's servers. While HTTPS connections use usernames and passwords as credentials, SSH instead uses public and private key pairs. These can be generated on your system using a CLI like
ssh-keygenand then associated with your GitHub account using the public key.In some cases, you may need to connect to more than one GitHub account from the same system. For example, you may have separate accounts for personal and professional projects, which can be difficult to manage manually. Using
ssh-agentand a SSH configuration file, you can alleviate this pain point by automatically determining which key to use based on your GitHub repository'sgitURL.It's tempting to pick up a framework which has preselected flexbox or grid as the layout tool of choice, but it's important to learn when and why to use each method. This leads to slimmer stylesheets which results in better site performance, and less likelihood for "hacks" to make one method do what the other does inherently better.
Throughout this collection, we will be progressively styling a responsive landing page template while building your knowledge on when to select grid or flexbox for any layout scenario. Spoiler alert: sometimes the best solution is using both!
Lodash is a collection of utilities that have become a staple of modern web development. This collection will show you how to re-create its most common methods using simple JavaScript techniques available in any modern web browser. In addition to re-building tools like
_.merge,_.getand_.debouncefrom scratch you will also learn how to replace them completely in some cases with modern syntax such as optional chaining, nullish coalescing and Object.fromEntries.This collection should interest the following groups:
- Those who want to better understand common JavaScript patterns
- Engineers who want to reduce their dependence on Lodash (for performance or other reasons)
- Candidates preparing for a technical job interview (where it is common to be asked how to implement some of these methods).
(This collection is still WIP)
Databases are essential for any full-stack applications, but working with them is traditionally very difficult. Prisma is here to change that. It's a powerful database toolkit that helps us think in data itself - not SQL, not classes, just the data we care about in our apps.
In this series, we will learn how to leverage the power of Prisma to automatically generate a type-safe, autocomplete-ready, and efficient query builder, all based on a simple and easy-to-read schema. We will integrate all this good stuff into a Next.js project to complete a simple social network app.
In the end, you will be able to understand how Prisma works, and confidently start using Prisma in your own project.
Recoil is a brand new state management library for React, developed by Facebook.
Recoil works and thinks like React. Add some to your app and get fast and flexible shared state.
This quick collection will get you up and running with Recoil, you're going to learn how to:
- add Recoil to your React project
- create a Recoil atom and use it to store a piece of state
- use
useRecoilStatehook to update an atom - use
useRecoilValueto access value stored in an atom in a read-only fashion - use 🔥
selectors🔥 in order to calculate derived data based on state stored within atoms (this is really powerful!)
Recoil is a new (experimental!) library from facebook that can handle complex shared data across a large react app.
In this collection, we'll create a simple game with React using Recoil, to explore how you can share and update state across an app.
Recoil is similar to (but different than) Context, Redux, or other shared state libraries (like MobX), but is designed to handle large (and variable) numbers of state that can update without re-rendering your entire app's component tree.
Whether you enjoy CSS animations or not, learning how to work with CSS transforms and transitions can help the overall user experience on your websites.
In this collection we will look at the various CSS properties that help create the kind of experience user have come to expect from websites.
We will explore:
- The transform property
- The transition property
There are many ways to build a new website, but it can often be a slow, painful process for both beginners and those who have been working in the field for a long time.
With the modern tooling in the Jamstack world, we can take advantage of tools like Gatsby that can allow us to rapidly spin up a new project and TakeShape that can provide us with an all-inclusive content management system (CMS) to focus on the important parts of what makes our websites unique.
In this collection, we'll walk through building a new company website from scratch. After creating a new example project in TakeShape, we'll use the TakeShape API to fetch that data and dynamically build a website using a Gatsby Starter for a TakeShape Startup project. With your new website, we'll learn how we can customize it to make it your own by adding new content and changing the branding like the logo and colors.
Welcome to this beginner level series on Alpine JS! 👋🏞
Alpine JS is a rugged, minimal framework for composing JavaScript behaviour in your markup. It brings declarative, reactive, data-driven nature of libraries like React or Vue to your HTML templates.
In this series, you will learn about Alpine's handy directives. You'll discover how to define a component scope with
x-data, run code on mount withx-init, attach event listeners withx-on, display data withx-text, decide wether or not to show an element withx-show, iterate through data withx-for, retrieve a DOM element withx-ref, learn how to achieve two-way data binding withx-model, and much more.You'll also learn how "modifiers" can be applied and chained to directives to provide additional functionality: control the animation transition of entering and leaving DOM elements, debounce an event listener, etc.
We'll also touch on what Alpine calls "magic properties", which give you access to native browser events (
$event), reference to DOM elements ($refs), and more.You'll gradually discover Alpine's API and syntax, from building simple tabs to a mini app that fetches a dog picture based on a "breed" search field. 🐶
Get ready to breathe some fresh air - it's time to walk into cool, green Alpine pastures! 🏞
This collection intends to provide viewers with examples of the different Algebraic Data Types that are commonly used in programming. All of these ADTs can be found within the Fantasy Land specification which consists of common algebraic data types used in the realm of web development. By adhering to the different laws that each ADT is built upon, users of the spec are provided with interoperability when using different algebras, ultimately providing them with an incredibly powerful set of tools.
Resources
Learn how to build a simple REST API to store notes using the latest built-in node features including native ES modules, the fs/promises API, async/await, the nullish coalescing operator, and destructuring. No compilers, no build steps, pure code.
This collection of lessons is great for beginners to Express as long as they are familiar with JavaScript and the HTTP protocol. Those more familiar with node and express will appreciate a fast-paced, modern take on using these popular tools and will likely benefit most from the lessons on input validation, models (which emphasizes a lot of new syntax), using fs/promises to serialize a
Map, and accessing asynchronous data withasync/await.Pre-requisites:
- Install curl
- Install node 14
- Be familiar with the terminal
View the source for this project in the project's github repo.
Notes:
- I'm not very pedantic about REST and basically just mean an API over HTTP
- Express 5 is still in alpha (and has been for over two years), but most of these lessons apply to Express 4 as long you use something like express-async-errors to add support for
asyncroutes and middleware
Get started with React! (with Hooks)
This course gets you up and running with react in under a minute by using codesandbox.io to skip the painful process of setting up your dev environment.
You'll learn:
- How to write React code with JSX
- How to "think in React"
- How to use local state to store changing data
- How to pass data from parent components to children components using props
So get started now! You need some javascript and HTML experience, but no prior React experience is needed.
This playlist will be a smorgasbord of Auth0 authentication and authorization topics. Everything from adding Auth0 to various apps, customizing your Auth0 settings, adding specific rules / audiences / features, and debugging errors.
Vercel's data-fetching library SWR features a client-side cache. Learn how to use the mutate hook to manipulate this cache in order to optimistically update your UI without waiting for a response from the network.
Learn more about SWR here: https://github.com/zeit/swr
There are 1000s of plugins and themes in the Gatsby eco system, which is amazing but introduces the problem of deciding which to use to accomplish the feature you actually want to build.
Analysis paralysis is real.
Enter: Gatsbyjs Recipes
Gatsbyjs Recipes are run from the CLI and automate common tasks like creating pages and layouts, installing and setting up plugins, adding a blog to a site, setting up Typescript, and many more.
With the release of this new feature, Gatsby has created 11 official recipes that you can explore including: ThemeUI, Sass, Cypress, animated page transitions, and persistent layout components.
In this collection, you will learn how to:
- Set up Gatsby to use Recipes
- Create a multi-step Recipe
- Install NPM packages
- Configure Gatsby Plugins
- Create Custom files with Recipes
In this beginner friendly series on React, we'll start a new project from scratch with Create React App, and step by step, build a functional and relatively useful React app that lets you find inspiration on "baby names", with search and shortlisting functionality.
Through the lessons, we'll cover an introduction to JSX, approach concepts like props, state, React hooks, "thinking in components", and embrace a progressive refactoring mindset.
Once the app is complete, we'll look at how to reduce prop drilling with the use of the Context API, and we'll even create our own custom React hook!
How does e-commerce work on the Jamstack?
Jason Lengstorf and Thor 雷神 teamed up on Learn With Jason to build a serverless Stripe Checkout implementation. This collection is a cleaned up, egghead-style tutorial for selling products on a Jamstack site using Netlify Functions and Stripe Checkout.
In this collection, you'll learn the basics of creating a new map in your React application with React Leaflet. We'll walk through adding the map itself as well as adding markers with popups, different shapes, and increasingly complex features to your map!
The only better feeling than deleting code is automating away mundane tasks. This playlist shows off many variations of tasks that can be automated away with tools like zsh functions, alfred, and karabiner. These techniques apply broadly to the small development tasks you tackle every day.
Miscellaneous one-off lessons on debugging, productivity hacks, and JavaScript tricks.
MongoDB has a quite powerful aggregation framework that allows you to write data processing pipelines. Documents in the MongoDB collection go through a series of stages or a pipeline that transforms them into an aggregated result. In this short video series, you will learn how to write aggregations in MongoDB.
This collection gathers lessons that resemble JavaScript interview coding assignments and teaches you to write quality, readable and reusable code. It's always frustrating when you learn the language for months and then some tricky question at the interview stops you from getting a job. Follow the lessons in this collection and be prepared for tricky coding challenges!
Although solving coding assignments is pretty important the true value of the collection lies in the approaching problems correctly, using shortcuts where it's needed and writing verbose code where necessary.
This collection starts with an overview of how to set up a scratchpad in VSCode using quokka.js, so you can follow the lesson in an easier fashion, as this is the technology used to explain concepts! It is followed with an explanation of how to write arrow functions as those are also frequently used throughout the playlist.
!!! New content is still getting added to the collection !!!
Next.js is a fantastic framework that allows us to build performant server-side rendered React apps with ease.
In this series, we will learn how to utilize the powerful features of Next.js 9, like API routes and Static Site Generation (SSG), to build full-stack React apps. We will use Auth0 to handle user authentication and authorization, and we'll also learn how to integrate the excellent Chakra UI component library into our Next.js project to make it a breeze to build beautiful and modularized user interfaces. Finally, we will import and deploy our project from GitHub to Vercel, the deployment platform built by the creators of Next.js.
This collection will still be continuously updated with new and more advanced content. Subscribe to the RSS feed to get notified of the latest lessons!
Extracting meaningful data from strings is a crucial skill when working with bash, and bash gives us powerful tools to do so:
head,tail,cut,sed, andawk. But these tools can be hard to understand without spending time to learn them, so many developers fall into a rut of blindly copying and pasting commands. No more! With this mini-course, you'll understand the basic ins and outs of these commands in under 15 minutes.Angular is a robust, powerful framework for building applications at scale, but it can be really intimidating to beginners! This collection by JavaScript teacher Sam Julien is here to help you learn Angular in bite-sized chunks.
Note from Sam: these lessons are loosely related but are not meant to necessarily be followed in order from start to finish. I've provided embedded code and links to GitHub where applicable, though, so you can always have access to the finished code for the lesson.
These videos include the introductory steps to writing your first Elixir function and beginning to understand some key concepts in Elixir that make it unique.
Some of those concepts include:
- the Mix build tool
- project structure
- collections of functions written in modules
- function arity
- pattern matching and common uses for it
- the pipe operator
React got that name for a reason. It’s a component-based JavaScript library that renders smartly and can seriously simplify your work.
This course is for React newbies and anyone looking to build a solid foundation. It’s designed to teach you everything you need to start building web applications in React right away.
Each lesson in this 19-part course is a single index.html file. This keeps your focus on learning React, no distractions. We’ll start with a blank file and add more complexity as we go along, wrapping the course with a lesson on how to move into a more production-ready development environment—and even deploy your app to a great service like Netlify.
You'll come out of this course with a solid grasp on:
what problems React can solve how React solves those problems under the hood what JSX is and how it translates to regular JavaScript function calls and objects You’ll build a solid understanding so when you come across JavaScript challenges down the road, you’ll know how to…react.
On many websites, images and video make up the vast bulk of the data being sent over the wire; websites will often have several megabytes of images!
There's a lot of low-hanging fruit in this area. In this collection, we'll learn how to convert our images to the
webpformat—a format often 2-3x smaller than png/jpg—and how to use thepictureelement to ensure graceful fallback on unsupported browsers. We'll see how to come up with a great abstraction for React to make it as painless to use as possible.Later in this collection, we'll also cover:
- Automatically generating webp images on build
- Leveraging
gatsby-imageto do the same thing in Gatsby - Smaller images across the browser spectrum with jpeg2000 and jpegxr
- Avoiding layout problems with
display: contents - Smaller video with
webminstead ofmp4
Subscribe to make sure you don't miss it!
A collection of Vim videos for beginners
Learn how to use the react-spring library to animate our React applications. Start with the
useSpringhook and end with theuseTransitionhook with React Router for transitions between your routes!You'll get the skills to begin using the react-spring library and add animation to your React components.
OpenGraph images are the images you see when you paste a link into a social platform and it "unfurls" into an image, title, and description. This happens on Twitter, Discord, Slack, and many other platforms. This collection goes over everything from designing OpenGraph images in Figma, to implementing them in CodeSandbox, to returning headless browser screenshots from Netlify Functions, and finally using Cloudinary as a write-through cache.
You will come away from this collection with the ability to ship an API that you can use on any of your sites, and also on-demand, that can generate images for not only OpenGraph unfurls, but also for Instagram, GitHub, and more. Using headless browsers with playwright to generate our images means we get full access to all the responsive power of CSS and all the logical power of JS to handle layout, importing assets like pngs, choosing different fonts, and more.
The image below is generated via the project you'll build and deploy in this course
Go is a server-side language, but today we can compile Go code to WebAssembly as well - making it possible for us to bring programs written in minimalistic Go code into the browser!
With this collection, we will learn how to compile and run Go WebAssembly programs in Node.js and the browser, and how our Go code can interop with JavaScript and manipulate the DOM. We will also talk about configuring our VS Code workspace and optimizing the Go WASM binary size.
Imagine the following.
You join a new project and after getting access to the repo you notice that there's no tests.
You decide to ask the team whether they are in different repo or something and unfortunately the answer is:
We don't have any tests, we didn't have the time.
😐
In this collection we're going to learn how to add e2e tests with cypress.io to an existing React app in order to do two things:
- 🌟 Ensure that our app currently works as intended
- 🌟 Allow us to add features to it with a technique called "Cypress Driven Development"
In less than 20 minutes we're going to go through:
- ⚡️Adding cypress.io setup to an existing project
- ⚡️Testing search functionality with
data-cyproperties - ⚡️Using "Cypress Driven Development" to add a new feature to an app
- ⚡️Use Cypress UI to debug an API response
- ⚡️How to use
cy.onlyandcy.skipin order for us to build our e2e test suite faster
and much more!
Some cool stuff in nodejs
This playlist will get you going with the Amplify Console, including showing you how to host your website, integrate continuous integration and continuous delivery, set up a custom domain, and enable pull request previews.
Practical, repeatable CSS for application development.
WordPress is the most popular content management system in the world. Content creators are able to easily customize nearly everything about WordPress from their admin dashboard, providing a really pleasant content management experience. Using Gatsby as a frontend for your WordPress sites makes the experience of developing the site and visiting the site just as pleasant.
Moving your WordPress frontend to the Jamstack means you keep the convenience of using WordPress’s custom backend for creating and editing content while also avoiding some of WordPress’s biggest downsides.
Historically, WordPress has many downsides, including:
- Security — because it’s the most popular content management system in the world, hackers work hard to find and exploit security holes in WordPress sites. Performance — through a combination of legacy code, community plugins, and other challenges, WordPress sites can easily become slow to load.
- Scale — if a WordPress site suddenly becomes very popular (a great thing!) it can overload servers and cause the website to go down (a not-so-great thing!) without complex scaling techniques.
- Cost — a WordPress site requires always-on hosting, and specialized hosting can be expensive. Adding support to handle massive scale adds significant cost, too.
Switching to the Jamstack helps mitigate — and even eliminate! — these downsides:
- More secure — Jamstack sites don’t connect to the server or database after they’re built. This makes it much harder to hack the site.
- More performant — by doing less work for each request and leveraging modern tools, Jamstack sites tend to outperform WordPress sites out of the box, and can be very fast with a bit of extra effort.
- More resilient — because Jamstack sites ship to a content delivery network (CDN) by default, a sudden surge of site visitors won’t take your site down.
- More affordable — many Jamstack hosting solutions have generous free tiers that are plenty for most small to medium sites, and upgraded accounts typically cost less than specialized WordPress hosting.
Switching to the Jamstack gives you all of the benefits of WordPress and helps you avoid the downsides!
In this collection, we walk through the full process of migrating a WordPress site to the Jamstack, which keeps all the flexibility and power of WordPress’s admin dashboards while adding all the benefits of the Jamstack.
This collection contains videos that explore the basic types in Rust, including Fixed size Integer, Pointer sized Integer, Boolean, Strings, Characters, Arrays, Tuples and more.
If you're just starting out learning Rust and wrote your first program, this collection is the right place to get more familiar with the language!
This is a list of web components lessons showing the technologies behind it and some practical ways to use it now in production.
This playlist covers all of the ways to use the node.js DocumentClient to interact with one or more DynamoDB tables.
note: We do not cover scan() as it is not recommended for most usage and if you need it you'll know how to read the documentation to use it by the end of this collection.
Frontend runtime optimization is heavily impacted by rendering. Understanding the way the JS engine and the browser work is crucial for optimizing applications and understading how to avoid performance pitfalls. This collection explains about the Critical Rendering Path, performance bottlenecks and practical solutions.
This collection includes introductory level material for AWS DynamoDB. We cover what DynamoDB is, when you'd use it, and the vocabulary you'll need to understand documentation and talks in the ecosystem.
You'll come out of this playlist with the ability to understand what people mean when they say DynamoDB and the base you need to get started yourself.
View and contribute to the Community Notes!
Learn to use some of the tips and tricks that can help you write better TypeScript.
We'll look at some utility types, understand how immutable types work, learn how to use conditional types, and finally go through some examples to see how we can write them better.
View and Contribute to the Community Notes!
We generally tend to avoid paying for things unless we actually need them, and the same goes for AWS
When using a cloud provider like AWS sometimes an unexpected charge may occur and we'd like to understand what are we being charged for and how to be notified whenever an unexpected charge occurs (especially when we're trying to stay within a free tier).
In this quick (4 minutes, 2 lessons) collection we're going to learn how to:
- Review the AWS Billing & Cost Management Dashboard
- Set up a billing alarm to be notified whenever our bill is larger than $5
- Review the AWS bill to understand how much are we going to pay this month and why
This collection will cover the basics of how to interact with an HTML document with JavaScript. We will go over:
- What is the DOM?
- fetch elements from an HTML document
- add HTML nodes to a HTML document
- Respond to click events
This collection is a sequel to the Building a Serverless JAMStack Todo app with Netlify, Gatsby, GraphQL, and FaunaDB collection. In this collection we take the TODO application we built and convert it to run using Netlify Identity, AWS Lambda (using the serverless framework) and DynamoDB. We cover
- Fauna vs DynamoDB and when to use each
- Setting up AWS accounts
- Creating DynamoDB tables and data modeling differences between Fauna and Dynamo
- Converting our Netlify Functions deployment to a Serverless Framework deployment
- Implementing Custom authorizer functions on AWS
It uses tools that remove as many of the barriers as possible. Netlify Functions grows into Serverless Framework adn AWS Lambda, Netlify Identity is kept around, and FaunaDB can grows into DynamoDB.
GitHub is one of the most popular places for a developer to store their code. There are a lot of benefits that come with using GitHub such as easy collaboration on code with other programmers and developers and version control for your repositories.
These help you to have a productive workflow but there are a lot more tools that are built into GitHub that you might not know about!
Dive into the weeds with Joe Previte as he provides for you some helpful tips and tricks you’ll need to run a productive repository with your team.
He teaches you how to setup PR Templates to make sure your team doesn’t leave out vital information. You’ll learn about auto-assigning reviewers to your PR’s so that they don’t get missed. You’ll even get to learn a little about the GitHub CLI!
Joe teaches you how to:
- Creating issue templates
- Automatically delete branches after merging PR’s
- Open repositories in your browser using the GitHub CLI
... And more!
So take your productivity up a notch when using GitHub and take Joe’s course today!
You've got some practice with using SQL to select, update, and join database tables.
But perhaps you've found yourself with a sneaking suspicion that you could be more efficient with your PostgreSQL.
Does your query seem slow?
A lesson on how to profile queries will point you in the direction of a fix.
Are you performing multi-step operations one at a time that are susceptible to errors?
The "all or nothing" transaction is the cure.
These are just a couple of examples of the techniques, tips, and tricks that Tyler Clark has learned in his years of experience working on large scale production applications.
Other topics in this course include working with CSV files, different techniques for aggregating & filtering, and more!
Watch Tyler's course, and continue your journey toward SQL mastery.
Check out the Community Notes for this course.
This application serves as an introduction to building products with a JAMStack and Serverless approach. We cover everything from the beginning:
- starting with the Gatsby client
- handling authentication with Netlify Identity
- Shipping a GraphQL server on Netlify Functions
- Building in access control with a serverless capable database
It uses tools that remove as many of the barriers as possible while also allowing upgrading in the future. Netlify Functions can grow into AWS Lambda, Netlify Identity can grow into Auth0 or Cognito, and FaunaDB can grow into DynamoDB.
In this collection, we will dive into using
@reach/routeras a routing option for your React application. We will start from the beginning and cover everything from Links to Nested Routes.Building your web app with a fully customized design is a daunting task. If you aren't a CSS expert, applying a design style to your markup can consume hours and hours as you try to tweak pixels, align elements, and bang your head on the desk in frustration.
There are options. You can turn to a full-blown CSS framework like Bootstrap to help build your app. But, out of the box, you end up building an app that people will look at and say, "Hey there, nice Bootstrap app."
So if you want a fully custom design, you are back at step 1.
There's a middle way. An approach that gives you the freedom to apply your custom design, but in a way that greatly simplifies the CSS, providing you with core functionality without applying heavily opinionated design to your app.
This is Tailwind, a utility-first CSS framework for rapidly building custom user interfaces.
Design with Tailwind CSS is a series that teaches you how to build fully responsive, professionally designed UIs from scratch using Tailwind CSS.
Together we’ll build Workcation, a property rental app loaded with interesting details that will help you master Tailwind in no time.
In the course, we will learn how to use the
styled-componentslibrary to style our React applications. We will start from the basics and dwell in more advanced cases.With this course, you can get the necessary knowledge to use the
styled-componentslibrary to style your React applications in the future.Yarn 2 (Berry) has finally released a stable version!
The yarn team has been working on this release for over 2 years.
This collection goes over:
- What yarn pnp is and how it tries to solve the
node_modulesproblem - How to install yarn globally and locally inside of a single project
- How to use
yarn dlx - How to use
yarn upto manage yarn workspace dependencies
- What yarn pnp is and how it tries to solve the
Building larger serverless applications can be tricky - creating many lambda functions as well as other resources such as DynamoDB tables, S3 buckets, API Gateways using AWS Console takes quite a lot of time. Not to mention other problems such as redeploying the app to a different region, reviewing the infrastructure etc.
AWS Serverless Application Model (AWS SAM for short) simplifies a lot of those issues 🤩
Built with with best practices in mind, SAM allows you to:
🌟define your infrastructure as code using a YAML template (which can go through code review!)
🌟define resources such as lambda functions, DynamoDB tables etc. in a much simpler way than doing it directly in CloudFormation (which SAM is built on top of)
🌟build and deploy a serverless application from a command line
🌟debug and test lambda functions locally using SAM CLI
🌟debug and test lambda functions from WITHIN your editor with AWS Toolkit extension
Add AWS SAM to your toolkit with this quick collection!
View and Contribute to the Community Notes!
Rust is a modern language that is close to the metal. It's got the performance of C, but with a more friendly syntax and community.
It's also memory safe, and ensures your applications are bug free by catching errors at compile time instead of runtime.
These features make Rust a great choice for developing code for embedded systems, web servers, and CLI apps. You can even compile Rust into WebAssembly in order to run it in-browser!
But as the saying goes, "before you learn to run, you must learn to walk".
In this course, you will write your first Rust application.
Starting from “Hello World” you’ll quickly move on to learning about Rust’s types, configuration files, and the
cargopackage manager along with classics like functions, loops, and handling user input.More Rust-specific concepts like macros and pattern matching will also be introduced.
Check out these community notes for this course on Github.
Next Steps: Basic Types in Rust
When a manager gives us the requirements for an application feature, they don't care too much about how we build it. And often times, they think that hard things will be easy.
Dealing with time and coordinating different types of events can be tricky.
Luckily, we have RxJS to help!
In this course, you will use RxJS to build a loading spinner in an app that meets the ever-changing requirements from a mock Product Manager.
You'll also learn how to implement a "Konami Code" style feature that listens for a correct sequence of keys to be typed in a set amount of time.
Follow the thought process that Rares uses as he breaks problems down into manageable pieces that remain flexible, and become more comfortable solving problems reactively.
AWS Lambda, Serverless, FaaS - there is a lot of noise around those topics online (and for a very good reason!) and it can get confusing at times 🤯
In this collection we're going to take a look at AWS Lambda from scratch, in order to get YOU from:
"I have no idea what a lambda function is"
to
"I know quite a bit about AWS Lambda, and I'm going to use it to solve my problems"
Checkout the community notes for this collection on github.
Joe Previte is an active egghead instructor and blogger. This is a collection of screencast versions of selected blog posts. You can find his blog here: joeprevite.com
Angular is particularly popular at large enterprises. Most of the time those line of business apps are very data driven and forms heavy. While Angular gives us two different approaches to implementing forms, neither of them is very satisfying, nor do they help keep the maintainability high especially in large enterprise apps.
In this course we're going to learn about ngx-formly, a library that helps cope with some of the mentioned issues. With Formly you define the form structure once in your component code and the HTML will be taken care of by the library. This helps to reduce maintainability and moreover Formly has some nice reactive features built-in that help you reduce your form code even more.
Questions? Ping me on Twitter or on juri.dev 🙂
A collection of lessons about generators in JavaScript to help developers understand how useful they can be in many common scenarios.
In this collection, we build a minimal flashcard application using React, primarily focusing on function components and the hooks API. To make sure we can understand and maintain existing code, there are also a few lessons toward the end that use class components so you can get familiar with the syntax. We cover important React concepts, and sprinkle in libraries that are pretty standard in the ecosystem like @reach/router, Jest, and React testing library. We start with create-react-app so we can get right into it without worrying about configuring tooling. There's a separate course for that here
Lessons based on posts from my blog - https://kyleshevlin.com
Node.js is a well established server runtime that many companies are using worldwide. Express.js is a server framework for Node.js used by over 5 million projects. ReasonML is a type-safe functional language that compiles to Javascript.
This playlist collects the basic pieces of information a programmer needs to get started building servers in ReasonML on Node.js and Express.js. Follow along to learn how to get the speed of Node, combined with the added type-safety of Reason.
Live Workshop Recording
Mike Sherov18× completedA short list of screencasts to cover essentials of Gatsby to get started and have enough knowledge to become dangerous.
The content comes from multiple instructors that have each covered different essentials, this cherry picks some of the most important concepts.
Videos in this collection cover these topics:
- installing plugins
- creating pages
- navigating between pages
- adding optimized images
- theming your styles
- deploying your site
Kent C. Dodds is an active egghead instructor and blogger. This is a collection of screencast versions of his blog posts. You can find his blog here: kentcdodds.com/blog
This is a preview and overview of all of the modules included with Testing JavaScript
Testing JavaScript applies the four-layer testing method to a React application, but this foundational strategy can be applied across any JavaScript framework: Angular, Vue, legacy Backbone apps, even frameworks and libraries we haven’t met yet.
Following this course, you’ll be equipped to:
- deliver solid features that work for users as expected choose the best tools for the job
- communicate more effectively with your coworkers
- be a more confident, professional JavaScript developer
Learn the professional method for JavaScript testing and always ship high-quality software like the professional you are.

As developers, we have a responsibility to protect the data our users trust us with. No one wants to wake up to the news that their site was hacked and all of the user accounts stolen.
Security is important, yet it is often overlooked and forgotten.
Part of the reason for this is that security seems hard to get right. This results in developers crossing their fingers and hoping for the best.
In this course, you'll learn how to protect your application by learning how to attack it.
Start your journey into web security today!
Check out these community notes for this course on Github.
A menu dropdown is a common component that you will build and style in any application.
In this course, we'll start from scratch, build and style a static dropdown menu and then add functionality to the component so you can open and close the dropdown. There are some keyboard accessibility topics we'll cover when adding interactivity to the dropdown. We'll use Vue in this example but these concepts will apply to any framework.
After the drop down is fully functional and styled properly, we'll see how sometimes you need to rethink the design of a component when considering the mobile view. For this case, the dropdown is removed entirely and the links shown inline underneath the navbar content.
The Navbar is a common component you will find yourself styling in almost any application.
In this course, we'll style a Navbar for a mobile view with a logo and toggleable hamburger button that will contain nav links.
After building up the mobile view, we will refactor the navbar to be responsive by removing the hamburger menu from the navbar and replacing that with the links directly inline within the Navbar
Now that we covered fundamentals, we're going to design and implement common components that you will see in the wild.
We'll start with a basic Vue.js application and some hard-coded data that will be displayed within the application.
Meet Tailwind, a utility-first CSS framework for rapidly building custom user interfaces.
Tailwind provides us with highly compassable utility classes but leaves the design specification completely up to the user to maintain that custom look and feel to your app.
A large number of people are unable to use the web effectively due to an impairment or disability.
As developers there are several tools and techniques we can use to make our web applications accessible, ensuring a great user experience that includes everyone.
We all agree that Accessibility is important. However, it’s a broad landscape and can be overwhelming figuring out where to start!
Erin Doyle is an expert in creating accessible React applications and has developed a course that will give you a concrete process for testing, refactoring, and building your applications with accessibility in mind.
After this course, you'll have a jump start on auditing and fixing accessibility issues in your applications and gain a better understanding of your target users and how to approach your web app design from their perspectives.
VSCode is a free and powerful text editor for writing code. I use it daily and continue to find useful and interesting tips and tricks regularly. I want to share those tips and tricks with you.
Framer Motion is a production-ready animation and gesture library. With it you can create beautifully smooth animations with minimal effort, or compose together elaborate sequences of animations with low level APIs.
These videos showcase some of Framer Motion's key features and how to get started implementing them.
This collection of lessons will cover a variety of topics that teach you how to work with slices and arrays in go. You'll learn how to declare them, create them using literal syntax, iterate over them, add to them, remove from them and other useful things.
GraphQL brings joy to using APIs. Even though it's based on a type system, GraphQL in many ways is more flexible than REST.
But the flexibility that makes GraphQL a joy to work with can have its downsides if you aren't careful.
Schema design is an area where one small oversight at the beginning can get you stuck having to deal with weird naming, bloated duplicates, and other annoying workarounds.
It doesn't have to be like this!
Nik Graf has extensive experience designing GraphQL schemas, for a variety of business applications.
In this course, Nik has prepared several examples following different design patterns. Through exploration and comparison, you'll come away with actionable knowledge for designing and extending schemas.
Follow Nik, and avoid making Schema mistakes that will come back to bite you later.
Today, you can't do anything in JavaScript without bumping into a CLI.
Want to install a library?
yarnadd it. Want a React app?create-react-app. Want to format your JavaScript?prettier --write. Want your types checked?tsc. Bundling? Pick fromwebpack,rollup, orparcel. Deploying?nowornetlify deploy.CLI's are everywhere, and even if you don't write them, sooner or later you'll have to debug them.
This workshop serves as a comprehensive survey of the state of the art of CLI tooling for everyone looking to make an impact in open source, across their company, and even in their own productivity.
Check out these community notes for this course on Github.
The difficulty of managing state is one of the primary reasons our applications become so complex. We try and manage this complexity with a lot of booleans, somewhat semantic variables like
isLoading,wasFetched, andhasError, and over-engineered systems that are still full of bugs. Surely, there's a better way.That better way is state machines.
State machines formalize how we define and transition through the states of our application and give us ultimate control of the most complex parts of our apps.
In this course, we will explore the problems state machines purport to solve, like boolean explosion. We'll try to solve it our own way first, get so far, and then demonstrate how state machines get us all the way. After that, we'll dive into the XState library, JavaScript's premiere state machine library, to learn its API and how to use it to solve our problems.
By the time you're done taking this course, you should have a solid education about state machines and be able to start applying them.
Our applications have lots of states that they can be in.
We usually remember “Loading” and “Successful”. If we’re having a particularly good day, we’ll get “Error” handled as well.
But what about other states that our application can be in?
Things like “Haven’t requested yet” or “The request was successful but there isn’t any data for us to show”.
It’s frustrating to think you’re “done” and then an edge case shows up (and this cycle repeats at least one more time).
Fed up with forgetting to handle the edge cases that appear when developing UIs, Isaac Mann started looking for a solution.
The answer? State machines.
In this course, Isaac will teach you how to plan and visualize your application’s states and the transitions between them through the creation of a React & XState powered Star Wars quiz app.
This workshop will start by breaking down the four states in which a file can exist, and we'll build up our mental model of git from there. Then, we'll look at how to move files between those states in different ways.
Once we've developed a new model for how git operates, we'll be able to purposefully get ourselves into some sticky situations, and then gracefully recover from them.
If you can handle git add/commit/push, but not much more - then this workshop is perfect for you.
You can finally get some proper git training, and will never have to worry about losing data or messing up the repo again!
🚧 SUSPENSE IS EXPERIMENTAL
One of the biggest challenges to writing software for the web is dealing with asynchrony, but we have to deal with it all the time.
This leads to a bunch of boilerplate code for handling loading and error states just to get the data we need to show the user-- whether the data comes from a remote endpoint or from browser APIs like geolocation and Bluetooth.
The end result is countless spinners and the dreaded FOLC (flash of loading content).
React Suspense is the answer to these problems.
React Suspense is a primitive built-into React that drastically simplifies asynchronous state management in our applications, and helps you avoid FOLC out of the box.
It's a bit of a different approach to managing these problems and understanding how it works is key to taking advantage of what it has to offer.
In this workshop, you'll learn how Suspense works under the hood, preparing you for the future of asynchronous state management.
🚧 CONCURRENT MODE IS EXPERIMENTAL! 🚧
Michael Chan has years of experience with React, and in this course, he will guide you through the ins-and-outs of working with Suspense.
React Suspense gives us a new way of describing with fine-grain controls how users experience should look based on data we have or don’t have.
This will change the way you build React applications forever and this is the opportunity to get an early look and head start!
In this workshop, Jason Lengstorf will take you from an empty project folder all the way through deployment of a Twilio-powered video chat app built on Gatsby.
Along the way, you’ll learn powerful concepts like dynamic route handling in Gatsby, form management with React Hooks, writing custom React Hooks, context management and reducers in React, handling real-time interactions in a React app, creating serverless functions in Twilio, and setting up a Twilio account to support realtime video calling.
It all starts with syntax. From there, once you’ve got the concepts down, you can move into using a framework where you figure out how to make things “just work”.
Everything is great, until it’s not.
If someone put you on the spot right now and asked you to explain
this, would they like your answer?What about prototypal inheritance or coercion?
In this workshop, you’ll be taking things to the next level, shining a light into “black-box” concepts like prototypes, the
thiskeyword, and what primitive types are.Tyler will walk you through each concept, and build your understanding through examples in the areas you need to know.
Your guided path to React
Released in 2015, ES6 was a major update to the JavaScript language, providing many new powerful additions to the language. From arrow functions, classes, generators, and proxies to Promises and Modules, ES6 solved many of the languages problems with cleaner, more concise syntax and functionality.
Since then, a new version of JavaScript is released every year, providing even more power to JavaScript Developers:
ES2016 brings with it Array.prototype.includes, ES2017 has async and await, ES2018 adds new capabilities to regular expressions and async iterators, ES2019 has Object.fromEntries, Array.prototype.flat and flatMap, and ES2020 has dynamic imports, globalThis, and BigInt.
Staying up to date with the language as it evolves saves you from being stumped by new APIs and syntax! Learning ES6 and Beyond will ensure you can drop into any JavaScript codebase and have the best shot at being productive on day one.
Learn some of the new features of TypeScript 3.7
Theme UI is a library created by Brent Jackson for building themeable React apps with Gatsby. It's built with Styled System which provides a constrained set of styling APIs based on props. It uses Emotion and MDX underneath which abstracts us away from a lot of the challenges when dealing with global CSS and styling content.
Theme UI uses "presentational context" to allow a component to apply styling to child elements without introducing global styles. You can use a styles object in your configuration to apply theme-aware styles to ensure consistency.
React 16.8 introduced Hooks like
useStatefor using stateful logic in our function components, anduseEffectfor side effects previously only used in class-based components.The React Team has given developers a way that simplifies using core features, but what's that mean for the code that you write?
In this self-paced workshop, you'll work through refactoring a component to use a custom hook, and learn to apply the patterns used by the React team to your own code.
Follow the React Team's lead, and make your code more readable, reusable, and reasonable!
Awesome VS Code Extensions
FaunaDB is a global serverless database that gives you ubiquitous, low latency access to app data, without sacrificing data correctness. It eliminates layers of app code for manually handling data anomalies, security, and scale, creating a friendlier dev experience for you and better app experience for your users.
Fauna is inspired by Calvin, has built-in GraphQL integration, and a query language based on lambda calculus. Be sure to check out the Jepsen analysis and the associated chart of consistency models
unified enables new exciting projects like Gatsby to pull in Markdown, MDX to embed JSX, and Prettier to format it. It’s used in about 300k projects on GitHub and has about 10m downloads each month on npm.
unified uses abstract syntax trees, or ASTs, that plugins can operate on. It can even process between different formats. This means you can parse a markdown document, transform it to HTML, and then transpile back to markdown.
unified leverages a syntax tree specification (called unist or UST) so that utilities can be shared amongst different formats. In practice, you can use unist-util-visit to visit nodes using the same library with the same API on any supported AST.
A list of Python tidbits that I've used in projects so that I can remember them later.
Flexbox is a powerful way to layout HTML so that elements can grow to fit the size of their container. It can also control how the elements are positioned within a flexed container.
Once you start thinking in
rowsandcolumns, you can control almost any flexed layout with just a few simple flexbox layout primitives.Using immutable data structures provides many benefits, including making your code easier to reason about and less prone to bugs.
However, since JavaScript doesn't include support for immutable data structures out of the box, you need to use a third party library. But which one to choose?
In this self-paced workshop, Immer's creator Michel Westrate will guide you through the creation of a multi-user Gift Tracking app.
You'll learn the basics of using Immer to handle immutable state updates, then go further into change distribution and implementing an undo/redo.
After this workshop, you'll be ready to leverage immutable data structures in your own applications!
Gain efficiency in navigating and manipulating text in VSCode. If all you’re using right now is your mouse, you’re leaving a lot on the table in terms of efficiency.
VSCode gives you the ability to detect patterns in text and manipulate those patterns as you see fit. e.g. when you’re renaming a variable, you don’t want to rename just the declaration but all the uses of that variable in one file. Do so in just a few key presses.
Learn how to add optimized images to your Gatsby site with the
gatsby-imageplugin.These videos dive into:
- installing and configuring plugin options
- sourcing images to be queried via GraphQL
- displaying traced-svg or "blurred-up" images
- different image types supported by
gatsby-image - as well as alternatives for using images in Gatsby
React hooks can be used to add state to functional components, as well as replace the lifecycle methods that only class methods had available until now.
This playlist goes through several different hooks available now in React, as well as how to make your own custom hooks!
This collection of lessons will give you some practical tips and tricks to create faster and more reliable Angular applications. They are highly inspired by the content published on web.dev/angular by Minko Gechev and Stephen Fluin.
What you'll learn here is how to..
- improve an app's TTI via route-level code splitting and lazy loading
- implement a loading indicator for lazy loaded routes
- improve performance via preloading all lazy modules
- implement a custom preloading strategy
- preload lazy loaded modules with the Angular CLI
- optimize Angular's Change Detection
- implement virtual scrolling for large lists with the Angular CDK
- add client-side precaching with Angular and service workers
That said, have fun 🚀
Introduced in React 16.8, Hooks are a new way to write stateful components while avoiding the pitfalls of classes.
As a result, GraphQL developers everywhere wanted to use them for their Apollo Client components, instead of relying on render props pattern. In August of 2019 things have changed and Apollo Client now has official support for React hooks, by providing
useQuery,useLazyQuery,useMutationanduseSubscriptionhooks.If you'd like to learn how to use them, this playlist is for you!
Gatsby Themes are the next iteration of web development. They take all the good things about Gatsby and make them even more reusable and extendable. Themes are composable chunks of fully functional websites-- not just visual aspects.
Because they’re composable, you can have multiple themes on a single site. This lets you pick the right eCommerce theme, with whatever backing engine you want. You can then install whatever blog theme you want-- Wordpress, Contentful, etc. and you can customize them both. It's up to you!
For a written version of this course, check out the Gatsby docs.
Staying up to date with JavaScript’s changes saves you from being stumped by syntax.
In this course, you’ll learn about all latest language features published with ES2019 and see how they solve problems, using the example of a Nuxt.js application.
From optional catch binding to creating an object from a list of key-value pairs, you’ll learn the benefits of these new features and understand when, why, and how to use them in your legacy projects and upcoming work.
Make a command-line app open in a new window, turn it into a Mac App, add new services to Finder, navigate easily between Finder and Terminal; do it all with AppleScript and Automator.
In this playlist, I share all the accessibility tips and tricks lessons that I've created so far! Take a look, it's less than 15 minutes!
The JAMstack, short for “JavaScript, APIs, and Markup,” has been making waves in the world of web development.
Building JAMstack applications removes the hassle of building out a backend from scratch, freeing you to focus on what really matters: your content.
In this course, you’ll learn how to build and deploy your own static Gatsby site that pulls external data from Contentful and then deploys to the web with Netlify. After the course, you’ll have all the knowledge you need to build a blog, marketing site, or portfolio with Gatsby. Just add content.
Check out these community notes for this course on Github.
With the release of the React Hooks API, it is now possible to store state in functional components. In this playlist, we'll take an initial look at the
useStatehook as well as a few others. In one of the later lessons, we'll build a custom hook, a tool for easily sharing functionality with more that one component.JavaScript community has been shaken recently by a release of Svelte 3 and for a good reason - it's a completely different approach than React or Vue. To quote the docs:
"Svelte is a radical new approach to building user interfaces. Whereas traditional frameworks like React and Vue do the bulk of their work in the browser, Svelte shifts that work into a compile step that happens when you build your app."
The best part? If you have 26 spare minutes you can learn the basics of Svelte 3 and start building your own apps with it!
Enjoy!
One of the most important — but most ignored — practices for web developers is performing end-to-end testing on applications before they go live into production. You know: making sure they work like they’re supposed to. But testing can be tedious, and definitely not fun.
In this course, Brett Cassette will show you how you can test all layers of your application stack, simultaneously, with Cypress. When you use Cypress, it’s like having a robot that uses your app the way a real user would. Cypress reports if things work the way you designed them to — and if they don’t — every step of the way. And it’s fun.
After completing this course, you’ll be ready to apply the same E2E testing principles to your own applications. Stop leaning on your QA department (if it exists) to stress-test your application, and ship your app knowing it’s ready.
MDX is an authorable format that lets you seamlessly write JSX in your Markdown documents.
Gatsby is a free and open source framework based on React that helps developers build blazing fast websites and apps
Together, they combine to create a powerful platform for docs, blogs, and other rich applications.
Formik, created by Jared Palmer of The Palmer Group, is a library for creating forms without tears. Formik takes care of the repetitive aspects of form building like managing values, errors, and touched fields. Formik also orchestrates validation and submission so you don't have to.
During this playlist, you'll learn how to spend less time wiring up state and change handlers and more time focusing on your business logic. We will be covering topics like refactoring your current non-Formik forms to Formik, writing quick and easy validation rules, learning how to integrate third-party component libraries, and much more.
Stop wasting your time and tears building forms, and use Formik.
Chrome DevTools are incredibly useful for a frontend developer, sometimes we spend more time using them than our text editor of choice.
That's why it's so important to understand this tool better - those quick lessons will teach you things that will help you to become a more effective developer.
You will learn how to:
- Use (experimental) CSS Overview to learn all about CSS used on a page in a minute
- Style console.log messages with CSS - a crucial skill for any senior developer (j/k)
- Debug your code (on production and local environment) with logpoints
- Run a Lighthouse audit of your site
- Choose accessible colors for your website that have an AAA contrast ratio rating
- Force a DOM element state in Chrome DevTools
- Use Console utilities to make debugging easier
- Copy a network request as fetch or cURL with Chrome DevTools
Have fun!
Why does Gatsby use GraphQL? In this series you’ll learn how to create pages in Gatsby, how data becomes hard to manage over time, and how GraphQL helps limit the complexity of data management.
GraphQL is a query language for your API that offers a new paradigm for delivering data to clients of all varieties. In this playlist, we’ll build a small fullstack application using GraphQL, Apollo Server, Apollo Client, and React, introducing a multitude of key GraphQL concepts along the way.
We’ll start by building the GraphQL API for a ski day counter application using Apollo Server. Then we’ll immediately send client queries to the GraphQL service to get the data. Later, we’ll incorporate mutations to change data, and we’ll integrate react-apollo to send queries and mutations from React components. Along the way, we’ll introduce useful schema design features like input types, enums, and custom scalars, and we’ll talk about client-side use cases like sending variables and caching. After watching these videos, you’ll be able to work on existing GraphQL projects or start your own with a full command of the fundamentals.
Most applications rely on databases to store data. Understanding how to create a database and communicate with it unlocks a critical power in your web development career.
In this course, Tyler presents all the building blocks of creating and interacting with a PostgreSQL database. From creating a brand new table, up through organizing and aggregating data across multiple tables, you will learn the fundamental skills of SQL — and you’ll be prepared to apply them right away.
After completing this course, you’ll be ready to tackle more challenging SQL topics like proper data modeling, normalizing data, and exploring different database types.
Check out the Community Notes for this course.
Gatsby’s
Linkcomponent is a powerful way to improve the user experience and simplify the development workflow when building Gatsby sites. It makes navigating between internal links instantaneous, creating an app-like feel, and provides helpers for various common use cases.In this playlist, you’ll learn:
- Why and how to use Gatsby’s
Linkcomponent for internal link navigation - How to set styles for the currently active link
- How to apply active styles to parent pages and other partially matching URLs
- How to send state information in the props of the
Linktarget - How to replace items in the navigation history
- How to navigate programmatically using the
navigatehelper function
- Why and how to use Gatsby’s
Learn TypeScript in practical context with React examples!
When merging two objects in javascript, you can shallow merge them, or deep merge them. These videos show how to do both, and talk about the pros and cons of each approach.
If you’ve used React, you know how it can provide smart solutions to complex problems. And how exciting that can be.
React 360 brings the same ease and enjoyability to the creation of 3D and VR experiences. It’s built on top of React with an additional set of exciting, powerful tools like surfaces, events, and native modules.
In this course, Tomasz Łakomy will show you how to use React 360 to create amazing 3D and VR experiences. You’ll build on your React foundation, using the component formatting you already know, and push it to another dimension to create web apps that can be enjoyed across mobile, desktop, and VR headsets. And you won’t need to use crazy complex tools like WebGL to do it — just React!
Following the course, you’ll be ready to use React 360 to take an idea from creation to completion in a VR app — for instance, a VR image gallery, game, web browser, or interactive story.
If you’re comfortable in React and you’re ready for something new, this course is perfect for you.
Learn how you can use ramda.js to bring functional programming concepts into your JavaScript code. Ramda offers composability and immutability right out of the box, so you can leave your imperative code behind and build cleaner, more maintainable code.
Can you center an HTML element? Do you know how the box model works? CSS is a fundamental language imperative to working with websites. It controls all the visual aspects of a site, from colors to layouts.
Even the most experienced developer can learn something new when it comes to using and understanding how the browser interprets CSS. In this course, we will slowly style a website according to a mocked image. Let’s walk through specificity, fonts, the box model, margins, padding, positioning, and much more!
React 16.8.1 was just released, and hooks are finally stable! If you have literally 12 minutes to spare, you can learn how to use hooks (useState, useEffect and useMemo) as well as brand new React features such as React.lazy and React.memo.
Enjoy!
In React world, things are changing and they are changing rapidly.
If you'd like to get up to speed in what new APIs React has to offer and have literally 7 minutes to spare - this is a collection for you!
Forms are difficult in React.
Luckily, there are many solutions that allow us to create React forms more easily, such as React Final Form created by Erik Rasmussen.
React Final Form is a high performance subscription-based form state management for React which is not only extremely powerful, but also lightweight (3.0k gzipped!) and easy to use.
Dart is an object-oriented language you can use for building web applications, server-side code, and even mobile apps. It’s expressive, powerful, and has a friendly learning curve.
In this course, we will look at the syntax and semantics of the Dart programming language. We will also cover various aspects of the Dart ecosystem, including its tools and packages that help make you a productive developer. This knowledge is applicable when developing software for client, server, and especially mobile with the Flutter framework.
This course is beginner-friendly, but is well-suited for experience programmers as well.
We all make mistakes. This playlist covers tips and tricks on how to cover them up :)
At a high level Redux is just a dispatching system, sitting atop a finite state machine, driving our application state. It just so happens that the State ADT is good at modeling a finite state machine. It allows us to represent our stateful transactions in discrete, easily composed transactions. We can create complicated stateful transitions by composing many simple transitions into one state transaction. By using the State ADT, we should be able to model all of our application state transitions and provide a single reducer function to Redux that integrates with our state machine model.
We’ll put this theory to the test by building a Memory type game called “Anger The Bunny”. We start of by defining our state transitions using the State ADT, starting with simple, discrete transactions and using them to create the complex transitions typical of any game. Then once we have a majority of our game logic implemented, we will integrate those with Redux.
Progressive Web Apps (PWAs) allow a user to use your web app online or offline, and lets them install the app onto their iOS or Android device just like a native app. Sounds great, right? But it can be tricky to properly configure a PWA, and not every feature works on every browser or device.
In this course, we’ll create an online/offline note taking app. We’ll use
create-react-appto create the frontend, and node.js to create a simple backend. We’ll start by making sure the app can be displayed offline with cached resources, and learn how to persist data while the app is in offline mode. We’ll also interact with native features like the camera, and learn how to let users install the app on their phone home screen. Then we’ll customize the appearance of the app, including the app icon, splash screen, and phone status bar.Finally, we’ll deploy the production app to heroku. By the end of this course, you will have everything you need to create a Progressive Web App with React.
Figma is a collaborative prototyping tool that allows you to responsively design your applications, with resolution presets for all of the most popular devices. In this course, we will explore the fundamentals of Figma’s toolset that you can use for various design functions.
We will start from scratch, then walk through scenarios you may encounter when designing a website or application. We will cover building reusable designs — known as “components” in Figma — all the way up to prototyping your designs to show screen transitions and animations between state.
By the end of the course, you will understand the basics of Figma so you can use it to your advantage when building your next app or website.
Previously, in order to add state or side-effects in React you had to create a Class Component. However, with the introduction of the Hooks proposal (currently pre-released), you can now add state and effects to a Function Component. In addition, you can extract your hook logic and create a custom hook that can be shared across your app.
As I introduce the concepts of React hooks, I'll apply those concepts in various demos to see how they apply in different scenarios. I'll be converting Class Components to Function Components so you can see how they relate to each-other.
By the end of this course, you'll learn how to:
- Run (and Skip) side-effects with the useEffect hook
- Write a custom hook to share logic in your app
- Simplify the Context API with the useContext hook
- Update state with dispatch actions using the useReducer hook
- Optimize Components with useMemo
With the massive improvements to function components in React via hooks and suspense, you may be interested in seeing how to refactor a typical class component to a simpler function component that uses React Hooks features. In this course, Kent will take a modern React codebase that uses classes and refactor the entire thing to use function components as much as possible. We’ll look at state, side effects, async code, caching, and more!
Want a primer on hooks and suspense? Watch Kent's React Hooks and Suspense Playlist!
In many cases, teams reach for Redux as the de facto choice for state management. But sometimes, Redux is overkill. In those cases, the React Context API might suit your needs perfectly.
In this course, we’ll build a simple email client using the React Context API to pass data throughout the app. You’ll learn how to create a context, how to pass data deeply through an app without manually passing props all over the place, and how to group related data and logic using simple wrapper components. We’ll also cover practical applications like using Context to display and manage notifications, how to maximize performance with Context, and how to test the components that use it to ensure your app is working properly.
This course teaches you how to implement your first data structures and algorithms. In the process, you’ll learn some fundamental computer science concepts as well. We’ll build these from scratch using JavaScript, but what we learn can be taken and used in any other language, too.
You will learn how to build: queues, stacks, linked lists, graphs, and trees. You’ll learn to implement several different sorting algorithms: bubble, insert, merge, and quick. Each of these lessons will not only teach you their implementation, but the tradeoffs made in choosing one over another. By proxy, you’ll learn about concepts like Big O notation and recursion.
Algorithms are functions that are used to solve a class of problems. Really any piece of code can be a algorithm! There are common algorithm implementations that have proven to accomplish tasks faster than others. However, speed is not measured in seconds but in terms of growth (Big O notation).
This course is designed to teach not only some of those algorithmic approaches to everyday problems but review the pitfalls and optimizations that comes with using them at all. They can be a dynamic and powerful way to optimize calculations, processes, and performing tasks. However, if used incorrectly it can not only destroy a system but can be a nightmare to untangle. Many programming positions today test the knowledge of an individual’s ability to understand and implement algorithms. Let’s work through recursion, sorting, loops, and many more!
Building an application with React typically involves several tools. Whether you configure these on your own or use a tool meant to save you from the configuration like Create React App, the tools are still there. When you come up against a situation where you need to start from scratch or make changes to a webpack or babel configuration, it helps to understand what each tool does, how they fit together, and how they are configured.
In this course, we’ll start from an empty directory and by the end, we will have configured a slim but powerful boilerplate project. Along the way, we’ll touch on each of the major tools and build up to the final setup to gain an understanding of each tool’s purpose and how they all work together to help you build and deliver an application.
React Suspense has been released in React 16.6.0 (React.lazy support only) and React Hooks is stable in 16.8.0! Let's see how we can use these and more features of React together to write simpler React components.
Animations attract the eye and add a higher level of engagement for your users. But they’re not easy to set up, and they don’t always look the way they should on every browser.
Greensock is the best platform available for creating performant, highly-customizable animations. This course will walk you through the features of Greensock, including how to:
- animate an element
- manually control an animation
- animate between CSS classes
…and more, with cross-browser support to ensure your animations look sharp everywhere.
Full Testing
Kent C. Dodds2× completedStart testing with confidence
Knowing your everyday toolset increases your productivity as a developer. And Git is one of those tools you use on a daily basis. Mastering Git is tough; it has hundreds of different commands, often even inconsistent at how you pass in flags and configuration options. On the other side, there are a lot of good Git courses out there already, explaining all of these commands in detail.
With this course, I aim at a different goal. You will walk through a series of scenarios which you’ll most commonly encounter in your daily work life as a developer. I’m talking:
- updating your feature branch with the latest changes from master
- polishing your git history to make it ready for being peer-reviewed
- moving a set of commits to another branch
- undoing accidental commits
The goal is not to cover everything, but those tasks that will greatly improve your daily productivity with Git.
If you already know React, then React Native is a great way to build mobile apps for iOS and Android. Of course, web and mobile apps are very different to build — but this course serves as your guide.
In this course, we’ll build a mobile app from start to release with React Native for both iOS and Android. Prior React experience is required, but you don’t have to know anything about mobile development to participate.
Throughout the course, we’ll be building a “Restaurant Review” app. We’ll use all the standard mobile UI elements like text, images, form inputs, buttons, scroll views, and icons, and we’ll show several navigation techniques like push, modal, and tabs. The app will make HTTP API calls to a server and will store data on the device with AsyncStorage. Finally, we’ll specify a custom app icon and splash screen, deploy the app to a physical device, and prepare the app for release to the App Store and Play Store or for ad-hoc release.
In the last few years, the software development industry has seen a resurgence of functional programming. But what is it? And how do you get started?
“Just Enough” is an introduction to functional programming, written in JavaScript, that doesn’t get bogged down in the jargon and mathematical theory that can be so intimidating. Instead, it provides an approachable introduction to the paradigm that will give you the education and confidence you need to start using the programming style right away.
With “Just Enough” as our guide, this course will focus on the foundational knowledge needed to approach any functional language. By the end of the course, you will understand:
- higher order functions
- pure functions
- immutability
- currying
- partial application
- pointfree programming
- functional composition
In just 30 minutes, you’ll learn more than just enough.
“Setting up remote server authentication” will never be on your job description. It’s not one of those desirable responsibilities that convinces talented people to move across the country and pursue the job of their dreams.
But at that dream job, you might be asked to set up an SSH key. You’d better be ready.
In this course, we will learn the fundamentals of creating SSH keys and configuring them for connectivity to a remote server. We’ll figure out how to:
- tunnel SSH connections for easier local debugging
- set up configuration files to simplify the aspect of connecting to remote servers
- use security features like blocking incoming connections
Being prepared is key. Learn the skills now!
Bash makes automation easy. Just a few lines of code can take care of repetitive tasks for you and your teammates.
In this course, we’ll dive deep into the automation potential of bash. You’ll learn to leverage common hooks that open up interesting automation possibilities, like git hooks, adding functions and aliases in your bash_profile, and running scheduled jobs in launchd.
For example, we’ll write a git hook that checks package.json for changes, and if there are changes, the hook runs npm install for you automatically.
Along the way, you’ll also learn:
- more advanced bash commands like exec
- syntax such as redirecting stdout and stderr to the same destination
- timesaving tricks like brace expansions
Automation is all about saving you time — and at only 52 minutes, this course is well worth yours. Enjoy!
Today’s users expect great things from their search experiences — speed, relevance, and usability, to name a few. Algolia provides developers with out-of-the-box and customizable search experiences that are a joy to build.
This introductory course on the Algolia search solution focuses on the user-facing part of search. Using the Algolia InstantSearch.js front-end library, we’ll see how to build an engaging search experience in no time. (28 minutes, to be exact.)
Prerequisites: You don’t need previous experience with search to follow this course — we’ll use an example index with an e-commerce data set preconfigured. We will work mainly in JavaScript, so basic JS knowledge is expected.
If you want to play with your own index settings and data set, you can create a free Algolia account here, but this is not required to follow along with this first course.
GraphQL is gaining traction as one of the most popular ways to create an API. Regardless of which GraphQL implementation you pick, you’ll use the QL in GraphQL — the query language — to query data, change data with mutations, and listen for data changes with subscriptions.
You need to know the Query Language regardless of the server-side implementation. In this course, we will learn the GraphQL query language by sending an assortment of GraphQL operations to an existing API.
To start, we’ll learn how to write queries to obtain all the data needed for an app in one response. As the course progresses, we’ll use mutations to add and change data. To wrap up, we’ll investigate GraphQL subscriptions and realtime data.
After the course, you’ll be ready to communicate with a GraphQL API regardless of server-side implementation using the GraphQL query language.
Cascading style sheet (CSS) selectors are the glue that connects styling to HTML content. Understanding how they work enables a developer to write more semantic markup and keeps styling modular for better project maintenance.
In this course, we will start with basic selectors and work our way through more complex classification of selectors, explaining common use cases along the way. Finally, we’ll look at how selectors can be combined and how selector specificity can create some common problems.
GraphQL is a fan favorite for good reason. It lets a client make specific, complex, and/or aggregate queries for data, and it’s user-friendly to boot.
If you’ve been meaning to learn GraphQL and start harnessing its powers, this is a great place to start.
This course is for GraphQL newbies with a basic understanding of React. It focuses on the client-side implementation of GraphQL usage using the Apollo client.
We’ll start with a guide on how to add the Apollo client to an existing project, then move on using the Query and Mutation components to fetch and manipulate data using a GraphQL API.
Feels like magic.
It’s a beautiful feeling when technology works in mysterious, miraculous ways. So smooth! So effortless! So…
Wait, that’s not right. What’s it doing? I don’t get it. Help!
…until you encounter unexpected behavior. Good luck debugging magic.
To use technology to its fullest, you need to understand how it’s accomplishing the tasks set before it.
This course de-mystifies RxJS. It feels like magic, but it’s also one of the most laborious technologies to learn in front-end web development. We’ll open up the internals to take an up-close look at how RxJS handles Async programming so smoothly.
Over 12 lessons and 31 minutes, you'll get a handle on:
- how RxJS pushes values from observables to subscribers, which take care of the output.
- how operators handle all of the "in-between" operations where you can manipulate the values while they're still in-flight.
- the internals of operators and subscribers and how to customize operators to your specific needs.
Can you center an HTML element? Do you know how the box model works? CSS is a fundamental language imperative to working with websites. It controls all the visual aspects of a site, from colors to layouts.
Even the most experienced developer can learn something new when it comes to using and understanding how the browser interprets CSS. In this course, we will slowly style a website according to a mocked image. Let’s walk through:
- specificity
- fonts
- the box model
- margins
- padding
- positioning
- and much more!
Neural networks, with Keras, bring powerful machine learning to Python applications. They can answer questions like “How much traffic will hit my website tonight?” or answer classification questions like “Will this customer buy our product?” or “Will the stock price go up or down tomorrow?”
In this course, we’ll build a fully connected neural network with Keras. This is the most basic type of neural network you can create, but it’s powerful in application and can jumpstart your exploration of other frameworks.
We’ll start the course by creating the primary network. Then we’ll:
- build and configure the network, then evaluate and test the accuracy of each
- save the model and learn how to load it and use it to make predictions in the future
- expose the model as part of a tiny web application that can be used to make predictions
You don’t need to know a lot of Python for this course, but some basic Python knowledge will be helpful. Enjoy!
You can’t be everywhere at once. Neither can node packages. But with a utility called npx — included in npm v5.2 and later — you can interact and run with node modules even if they’re not downloaded locally. The same is true for gists and remote branches of GitHub. As long as npm installed, your work can be wherever you are.
This course from Elijah Manor unlocks the power of the npx utility. Over 17 minutes, we will examine the npx package runner and look through various scenarios where the tool is helpful when running node packages from the command line. You’ll learn to use npm to:
- test out various versions of a package
- run packages without globally installing
- run code directly from GitHub
- make working with packages much easier
Angular elements are one of the major innovations in Angular 6+. Elements allow us to develop Angular components like we always have through Angular’s powerful API, and then compile them into browser-native custom elements. With custom elements, we can define new HTML elements in a framework-agnostic way that adheres to web standards. We can also extend the HTML by defining a tag whose content is created and controlled by JavaScript code.
In this course, we’ll look at how to leverage Angular elements within our Angular apps to make them even more dynamic — a use case that’s commonly required in CMS-like environments. Going a step further, we’ll also see how we can compile our Angular elements into a standalone script file, which you can integrate into any other web context to pass data and register events on your custom elements.
Thanks for joining us!
Many languages work on a compilation story to WebAssembly, but Rust is already ready for primetime. Why?
- Rust is a stable language and great replacement for C and C++.
- Due to the reference and borrowing concept, Rust doesn’t need a Garbage Collector and can be used for a production-ready WebAssembly project.
- The Rust/Wasm team has built some sophisticated tooling for straightforward interoperability between Rust and JavaScript.
This course gives you the tools to compile to WebAssembly with Rust. Over 11 lessons, we’ll set up a project and explore various paths of communication and interoperability between Rust and JavaScript.
React makes it intuitive to build real-world web application. But in reality, you need to use a host of other services to get the app in front of real users.
This course walks you through setup and implementation to get your cloud-based application up and running.
You’ll learn to set up:
- a new project in AWS Amplify configured to your React app
- user authentication with Amazon Cognito
- managed GraphQL with AWS AppSync
- image storage and retrieval with Amazon S3
- text translation via Lambda functions
- and finally, deployment of your application on AWS using Amazon S3
You’ll finish the course ready to quickly and easily deploy your serverless React application, so users can start using and enjoying it right away.
This course explores some of the new advanced TypeScript features, using practical examples you might encounter in your projects.
We’ll start off by demonstrating two new features that improve readability (numeric separators) and tighten type strictness in classes (strict property initialization). We’ll then improve type guards with a practical Redux-inspired example, followed by a lesson about writing more readable mapped type modifiers. We’ll use a summary on types vs. interfaces to transition to self-referencing types examples (and how to build custom type safe iterators around them). We’ll then cover a few ways to use the new conditional types, including building a recursive generic type that transforms any other type you pass into it, regardless of how deep it is, and makes it read-only — great for your immutable states!
Finally, we’ll end with a lesson on building and chaining decorators to initialize and augment properties in classes.
Components are all about encapsulating decisions. The perfect component makes good decisions for you without making you think about it. Of course, no one knows what decisions you’re going to want. To make components reusable, we set reasonable defaults, then allow you to override them when you don’t like the decisions made for you.
This course covers three broad categories of decisions that can be encapsulated in a component: state, view, and logic. You’ll learn to move an Angular component from completely static to very configurable using a variety of techniques.
The course takes some of the most popular components in web development and applies them to Angular. You’ll learn to write components that are opinionated about their core purpose, but allow parent components to overwrite secondary concerns when pain points require a more complex pattern.
React Transition Group gives you the power to transition React components in and out of the DOM, depending on the state they’re tied to, with no weird hacks. Without React Transition Group, you may find yourself using a lot of
display: nonein your CSS, along with some pretty nastysetTimeouthacks. But with it, you can write your transition elements with a neat, declarative, all-new API — and no hacks in sight.You’ll get to explore v2 of the API in this course, as Rory Smith shows you how to use the React Transition Group library to write seamless, performant, beautiful transitions of elements in and out of the DOM. (i.e. no more jumping from state to state without warning.)
You’ll learn the features of React Transition Group in depth, so that you can turn features of your React app from dull and boring to slick and seamless.
The core of serverless architectures are auto-scaling systems and a pay-per-execution pricing. Two traits that allows developers to significantly reduce operational cost and complexity, by outsourcing infrastructure management to cloud providers and focus on building business logic.
In this course we walk through the basics on how to create a serverless API. We start off creating a simple HTTP endpoint. Then we build the first two endpoints of a REST API for a simple Todo Application backend storing the data in DynamoDB. After watching this course you will be ready to get started building you first serverless backend.
With GraphQL, you can define the shape of your data in a schema, and GraphQL will fulfill the request with the precise data you need. When you need it. This doesn't come without a cost. GraphQL adds a lot of complexity to your application by requiring you to define your schemas through types, mutations, and resolvers.
AppSync is a fully managed serverless GraphQL service that fast-tracks your API development. You can define a single type, and AppSync auto-generates a schema, queries, mutators, and subscriptions for you.
In this course, Nader Dabit will show you how to:
- build a production-ready GraphQL API through AWS AppSync
- create and modify data through the AWS AppSync console
- connect a React application to the GraphQL API
- execute queries, mutations, and subscriptions for data through the API in React
Drag and drop (dnd) experiences are often built to sort lists of content vertically and horizontally.
react-beautiful-dnd is an excellent tool for these use cases. It utilizes the render props pattern to build accessible dnd functionality into lists that look and behave as you would expect—and you’ll even get keyboard-accessible dnd, straight out of the box, with no extra work required. It’s actually easy to start using, and this course is a great place to start.
We will create a highly interactive task management application from scratch using the building blocks of react-beautiful-dnd. Over 14 lessons, you will get practice in:
- building droppable containers to sort draggable items horizontally and vertically
- moving items between columns
- and even moving the columns themselves
Following the course, you’ll be ready to build powerful dnd experiences into your own projects.
How do inherent prototypes work?
You might not think this question applies to you, especially if you come from a classical background. But if you use objects, functions, or arrays, you're probably already using prototypes, and can benefit from learning the logic behind them.
This course explores the mechanics of inheritance in JavaScript by showing how prototypes work as chained references to other objects. Learn to take full advantage of prototype shortcuts to make your work simpler and faster…and debug them if you hit a snag.
We’ll explore:
- how to manipulate prototypes to work like traditional classes
- how polymorphism and factory functions can be used within JavaScript
- how the
class,new, andthiskeyword work and how to use them - using the
instanceof,Object.create, andObject.getPrototypeOffunctions to explain why objects have the properties that they do
Develop the knowledge needed to use inheritance for faster, better, bug-free code.
Humans were never meant to repeat joyless tasks in a precise manner, over and over and over. Computers are meant precisely for these types of tasks.
Bash is a ubiquitous technology in web development that gives you the immense power of automating repetitive tasks you find yourself performing throughout the day.
The topics we cover will give you confidence in creating build scripts that run on continuous integration servers or quickly testing and debugging an API with
curl. We’ll go over: - Interacting with the file system - Creating, moving, copying, and deleting files and folders - Finding files and text patterns in files - Creating and running scripts - Language syntax like variables and conditionals.In this course we are going to work through properly setting up Enzyme with Jest to test rendered components. This includes the nitty gritty of making our testing environment work with various versions of React. After we get our environment setup ready, we’ll work through the different ways we can render a component within our test pages. With a rendered component we can now test component methods and properties to assert that they are what is intended.
No matter what type of app you’re building, you're going to need to fetch data, display it to a user, and enable the user to interact with and update that data. This interaction and updating phase is often asynchronous by nature which presents you, the developer, an opportunity to provide a range of different experiences depending on the scenario.
In some instances, you can leverage what is known as optimistic UI updates for an improved, snappier user experience compared to a traditional “loading/waiting” experience. They aren’t suited for every use case, but selectively making use of optimistic UI updates throughout your application can have a significant impact on the quality of user experience for relatively little cost and complexity!
In this course, we’ll walk through implementing optimistic UI updates in the real world example of liking and unliking a tweet. We'll use React's built-in state and make use of extracting setState updater functions to help manage and better define our setState usages.
The tools available for unit testing have come a long way. While testing may never be “easy”, the available tools have certainly moved testing closer to the simple end of the spectrum. Full end to end testing hasn’t quite kept the same pace and as a result many applications are testing manually and often by users in production. Cypress provides a testing environment that makes end-to-end testing fast and reliable with a simple API that makes creating automated unit tests for your web applications a no-brainer.
CSS uses a global namespace for CSS Selectors that can easily result in style conflicts throughout your application when building an application using modern web components. You can avoid this problem by nesting CSS selectors or use a styling convention like BEM but this becomes complicated quickly and won’t scale.
CSS-in-JS avoids these problems entirely by generating unique class names when styles are converted to CSS. This allows you to think about styles on a component level with out worrying about styles defined elsewhere.
In this course, you will learn how to express popular SCSS (Sass) language features using latest JavaScript features. We will convert simple examples from SCSS to CSS-in-JS. As a designer or (S)CSS developer, you should be able to follow without extensive JavaScript knowledge, understanding SCSS is required though. We will not be using any particular CSSinJS libraries. Instead, we will focus on a base knowledge you need later if you use any CSSinJS library.
Note: This course is still valid for Angular ^17 but the set up has changed.
Services and registering service providers are an inherent part of an Angular application. It is where you should define your application logic, they keep the state of the application and allow to share that among different components.
That said, components can ask for instances of services by specifying them as parameters of their constructor functions which will then provided at runtime by Angular’s dependency injection mechanism. While services themselves are mostly just plain ES2015 classes, there are some interesting things to discover, especially when it comes to dependency injection.
We can define services at various levels within our application, which allows us to control the scope and visibility of a given service. We can furthermore alias old service definitions to new, existing services which is handy for refactoring scenarios and we also have the possibility to define so-called factory functions for fully taking control of how a given service is being constructed.
In this course we will take a closer look and walk step by step through all of these scenarios.
ES2015 brought a native Promise to the JavaScript standard library. In this course, we’re going to take an in-depth look at how to use promises to model various kinds of asynchronous operations.
First, we’re going to explore how to create promises using the Promise constructor or the Promise.resolve() or Promise.reject() methods. Then, we’re going to see how to chain promises together using .then(), .catch(), and .finally(). We’re going to compare various error handling strategies along the way. We’re going to wrap up this course by taking a look at how to deal with multiple promises using Promise.all() and Promise.race() and how to await a promise using the await operator.
Developing logic-rich applications is a key skill to have.
The TypeScript–React combination helps you unlock that skill, and it’s a great developer experience in terms of writing understandable and refactorable HTML. But the default state management for React has a long way to go to feel simple and maintainable — and that’s where MobX makes your life so much easier. MobX keeps things simple without using complicated setups like
providerandconnectthat provide way too little value for all the mental overhead.In this course, you’ll see how to model your React application logic using simple JavaScript classes — and with the help of MobX, make those classes the beating heart of your React applications. You’ll learn:
- that you don't need advanced annotations and TypeScript features to use MobX
- how to easily refactor code through TypeScript
- how to use TypeScript to track the flow of state as properties change
Building your web app with a fully customized design is a daunting task. If you aren't a CSS expert, applying a design style to your markup can consume hours and hours as you try to tweak pixels, align elements, and bang your head on the desk in frustration.
Tailwind provides us with highly composable utility classes but leaves the design specification entirely up to the user to maintain that custom look and feel to your app.
In this course, you'll learn how to handle responsive breakpoints, how to trigger specific element states, how to handle specificity, how to keep your bundle file size in check, and how to seamlessly extend Tailwind with your own custom utility classes.
By the end of the course, you should have a firm understanding of how Tailwind works and be able to create your own tailor-made design system and utility class CSS toolkit for your next project!
Dealing with stateful computations can be a challenge when writing purely functional JavaScript. They can result in undesired variable declaration at best and boilerplate state management code in every function dependent on the state at its worst.
In this course we will explore a well know Algebraic Data Type named State, that is built from the ground up to address these 🌽cerns. While this course will be focused around a State implementation provided by a library named
crocks, a majority of the techniques we learn here can be used with most of the State implementations in the wild.JavaScript’s dynamic typing makes it incredibly flexible. That flexibility can lead to trouble though. When values have the potential to change types or to end up as
nullorundefined, that can lead to runtime errors in our code or bizarre bugs that take forever to track down because of type coercion. To battle this, we end up with code that is littered will conditionals fornullorundefinedvalues and type checks, making the core logic harder to read and refactor later.The Maybe encapsulates the type checking and guards against missing values for us. With Maybe in our toolbelt, we can keep our functions free of all the guardrails, outsource that work to the Maybe and keep our business logic free of all the clutter.
In this course we will create an Angular application that will serve as a public website. Normally there are quite a few trade-offs by using a Single Page Application for a public website. For instance, they are hard to index by search engines and if you link to them on social media you get a generic preview. Also, the initial rendering can take a while (especially on mobile devices) as the browser has to pull in all the JavaScript in order to render a working app.
By adding and configuring Angular Universal we add Server Side Rendering capabilities to our application. This helps prevent the issues mentioned above by pre-rendering the application on the server and serving this out to the user when she requests the app. Once the JavaScript has been loaded the app will seamlessly switch over to a ‘normal’ web application.
For good measures and to modernize our application we will add and configure a Service Worker that will allow for a native-like experience in the browser (splash screen, desktop icon, fast load, cached data, etc).
Dynamic data gives us the opportunity to build dynamic components. Dynamic components are reusable and make building large-scale applications so much easier. In this course, Juri Stumpflohner will take us through the specific use case of of creating a tabbed component which allows us to dynamically define new tabs.
On our journey of implementing this component we will learn about how we can dynamically instantiate components, leveraging the
ComponentFactoryResolverandViewContainerRef.Furthermore we will explore how to define view templates, how to pass them to our dynamically instantiated components as well as how to pass data into those templates. All of this will be powered by
ngTemplateOutletandngTemplateOutletContext.MobX State Tree (MST) is a library that helps you organize your application states in a very structured manner. It allows you to create a component model, but for your data!
Course instructor Michel Weststrate—creator of Mobx—will teach you to model application state after your problem domain with MST. You will get hands-on practice and see how MST lets you solve problems with its out-of-the-box support for asynchronous actions, patches, snapshots, and middleware.
Over the 17 lessons, you’ll build a little bookshop application using React, MST, and create-react-app, while learning how to manage the lifecycle of your data by describing data models.
Join Michel in one of the most popular courses on egghead!
JavaScript’s
thiskeyword is a source of confusion for new and experienced developers alike. It can be frustrating if, for some reason,thisdoesn’t point to the context that was intended.This course will help you understand JavaScript’s
thismechanism in-depth. Marius will take us through all of the waysthiswill change its values, from why many libraries use "use strict" to how arrow functions take its outer execution context’sthis.Over 8 lessons, you’ll learn:
- how JavaScript implicitly sets the
thiscontext, and how we can set it ourselves - that the call-site of a function determines the
thisvalue of that function invocation - how to call a function with a specific
thisvalue - how to create functions that always remain tied to a specific this context
- how
thisis treated within arrow functions and classes
Following the course,
thiswill feel less frustrating, more intuitive, and far more useful in your day-to-day.- how JavaScript implicitly sets the
Once you’ve nailed the fundamentals of React, that’s when things get really fun.
This course teaches you advanced patterns in React that you can use to make components that are simple, flexible, and enjoyable to work with.
You'll start with a simple
<Toggle />component that you'll progressively refactor to each of the patterns. Throughout the course, you’ll see the benefits of each pattern and how they can be mixed-and-matched to make your components more useful (and simple for everyone who comes across them).Kent C. Dodds has built and shipped components using each of these patterns. Along the way, he will help you understand and weigh the trade-offs of each pattern so you’ll intuitively know where to apply each of them in your own components.
You’ll finish the course with a list of actionable things you can do, right away, to rework the components that you're building. You’ll complete the course more knowledgeable about React components and equipped to make your components more simple.
Note: This course covers class component patterns and is still interesting and valuable for the serious React developer, but for most current apps you'll probably want to use React Hooks.
In this course, you will be learn how to get your react app to load as quickly as possible to maximize user engagement—we need faster rendering speed and smaller network requests!
You’ll learn how to both split code into lazily loaded bundles AND server-side render your page.
This has not been possible until very recently—you had to choose either code-splitting or SSR. Sure you have Next.js which is awesome, but it’s a framework that you need to buy into. With react-universal-component you are getting a framework-less Next.js that is in your control!
The react-universal-component library does a great job making it as simple as can be, but there are still various specific configurations and practices that must be followed to get it working. So watch the videos to learn how it’s done!
This course foremost will teach you about the syntax and semantics of the programming language Reason or also referred to as ReasonML. In addition, the course touches on best practices recommended by the official documentation. Each lesson is focusing on a specific feature, concept or best practice and can be watched independently. Still, the whole course is carefully crafted, and each lesson builds up on the previous ones.
When we build forms, we know there’s a good chance that the data we want to collect may change. Dynamic Forms in Angular give us the ability to define the underlying object model before binding the form to the template. This lets our forms programmatically adjust to the underlying model so we don’t have to update each form manually as our data will eventually change.
In this course Google Developer Expert-led we will use Angular’s Reactive Forms and learn about the basics for dynamically rendering
FormControls. We will also explore how more advanced input controls such as select boxes and radio button lists can be dynamically bound to our template.If you’re coming from AngularJS (v1.x) you may also be familiar with dynamic forms in the context of
Formly, a library for automating dynamic forms. We will also quickly touch onng-formly, which is the Angular (2+) equivalent.React got that name for a reason. It’s a component-based JavaScript library that renders smartly and can seriously simplify your work.
This course is for React newbies and anyone looking to build a solid foundation. It’s designed to teach you everything you need to start building web applications in React right away.
Each lesson in this 28-part course is a single
index.htmlfile. This keeps your focus on learning React, with no distractions. We’ll start with a blank file and add more complexity as we go along, wrapping the course with a lesson on how to move into a more production-ready development environment—and even deploy your app to a great service like Netlify.You’ll build a solid understanding so when you come across JavaScript challenges down the road, you’ll know how to…react.
Note: Active maintenance for Recompose has been discontinued since the announcement for React hooks. Your existing code using Recompose will still work. Recompose is not compatible with RxJS version 6 and beyond. You can read more about the decision here.
Loading data and handling events almost always introduces layers of complexity into React apps. Recompose and RxJS solve your async problems by using Streams to output components. This course walks you through combining the powers of React and RxJS to stream data into JSX with streaming patterns and pure React components.
When setting up a modern JavaScript app, we find ourselves trudging through the land of infinite configuration. Poi offers us an option of zero-configuration by providing sane defaults and hiding them away until you need to tweak a change to suit your needs.
React 16 comes with some powerful new features, in this course we'll be exploring each of them. Each lesson is going to go over every individual new feature, one at a time. From the new error boundaries that will save us many a headache to handling whether to update our state within our
setStateWe won't just be learning the technical capabilities of the new features however, we'll also be going into best practices.
Once you watch this course you'll be more than ready to leverage everything React 16 has to offer!
In this course, we will go through the concept of transducers and build them up from basic principles. We will go over the problems with regular composed transformations, and show how we end up with unnecessary data and intermediate collections. We go on to learn how we can use transducers for performance gains when operating on large data sets, as well as how they’re an excellent fit for processing other iterable data, like generators. Not just arrays.
Client-server communication is at the heart of any modern web application. In this course we will take a look at how to communicate with your backend API in Angular, specifically with the new Http module(
@angular/common/http) introduced and used in Angular4.3.1and later.We will learn how to configure the
HttpClientModule, how to fetch and send data, customize HTTP headers that are being sent and how to properly handle error responses.We will also take a look at some more advanced use cases such as listening to progress events and intercepting HTTP calls. Finally we will also learn how to isolate and mock HTTP calls in automated unit tests.
Supercharge your HTML with a powerful templating language. Variables, loops, conditionals.. Twig brings programming concepts to your HTML workflow!
Learn the basics of Docker.
This course explores the capabilities of TypeScript’s type system and shows how to use advanced static types in practice. For example, you’ll learn how to write safer code by using non-nullable types and being explicit about
nullandundefinedin the type system.You’ll also see how the compiler analyzes control flow to determine the most specific type for a variable at any given location.
In addition to that, you’ll learn about the
readonlymodifier and the specialobjectandnevertypes. This course also inspects string enums, literal types, discriminated unions, and static types for the rest and spread operators.Finally, you’ll see how to type dynamic property access using the
keyofoperator and how to create new types by applying transformation functions to existing ones.Managing state in modern web applications is hard. As applications grows in complexity, keeping track of state changes and mapping those changes back to your UI becomes increasingly difficult.
One way data flow makes managing state more approachable and lightens the cognitive load required to follow the flow of data through your application. Using Redux takes this idea to the next level and moves the state and the state changes and centralizes them in a global store, managed with pure reducer functions.
In this course you will learn how to build a production quality React application using Redux. We will build up from using redux by itself, so we can understand the core API and how that interacts with a React application, then we’ll move on to introduce
react-reduxto abstract away some of the underlying details and clean up our code. We’ll use middleware and a mocked API server to understand how asynchronous code fits into the Redux model and we’ll even deploy our finished work so we can see it running live in the cloud.If you are brand new to React, you’ll want to read the documentation and watch our free React Fundamentals course and our Build Your First Production Quality React App course. To get up to speed on Redux, you should check out Dan Abramov’s Getting Started With Redux course.
React Native Video is a community supported video element for React Native. It allows for remote loading of videos and also works with the React Native asset management system to load videos. Having a flexible video component is essential to developing and enhancing your application. Like many React Native elements, the video element is very basic and doesn't ship with anything besides a flexible API. This allows you to develop the exact layout, controls, and custom overlays to match your application.
In this course we'll take a look at a basic setup. Then explore the different ways we can load and show videos. We'll show how to use a few of the custom callbacks to overlay errors and buffering elements. Because there are no controls shipped with
react-native-videowe'll show how to write custom video controls and animate them when the video has not been interacted with.Finally we'll cover a few common paradigms found in the wild. Including repeating background cover videos, auto-playing videos when they scroll onto the screen and auto-stopping them when they are scrolled away from.
Developers usually have a love-hate relationship with CSS and styling user interfaces. But it is a fundamental part of creating nice-looking, adorable and successful user interfaces. In this course we will take a deep dive into the various possibilities Angular offers for styling components. We learn about the different APIs, how they allow us to conditionally apply one or multiple styles in the form of style attributes and CSS classes. We also explore the concept of style encapsulation and how it helps prevent our styles from leaking into other components.
The underpinnings of tools like Babel and ESLint, Abstract Syntax Trees (or ASTs) are not nearly as scary as you might think. This is a collection of all the egghead.io lessons I (Kent) have put out there.
This course begins with some small steps for working with WebAssembly straight away using online tools wasm Explorer and wasm Fiddle to try out the examples in the browser. We start by calling a WebAssembly function from JS, then a JS function from WebAssembly, then go on to reading and writing WebAssembly memory from JS. To move beyond these online sandboxes, we show the exact steps for setting up and running a complete local WebAssembly build workflow using the experimental LLVM WebAssembly build target. We then take a demo WebGL application written in JS and show how we can optimize this with WebAssembly to get a real world example of a WebAssembly performance improvement, although it isn’t as obvious a process as we might have hoped.
In Introduction to Python, we will start at the beginning: Installing python 3 and using virtual environments. With a working environment, we will learn how to manipulate strings and numbers, and gain working knowledge of data structures and flow control. We will build on that by introducing modules and classes and learn how to interact with our python applications using command line switches, console input and files.
At the end of this course, you’ll have a great working knowledge of Python, fully capable of creating your own Python projects from scratch or jumping into an existing application with the capability to read, understand, and contribute to the application.
Check out these community notes for this course on Github.
Algorithms are the basic construction of the computer programs that you are writing every day. They take language syntax and the machine uses that information to carry out our commands. While "everything is an algorithm!" is basically a true statement, we also have quite a bit of thought and effort put into defining formal algorithms. Understanding these formal algorithms helps you as a developer so that you won't need to re-invent the wheel every time you sit down to solve a problem.
They also come up quite a bit as "whiteboard problems" in programming job interviews, so understanding algorithms is a big win for you as a coder.
You will review many common algorithms using TypeScript as the language. Even if you don't prefer TypeScript, they will easily translate into JavaScript or practically any other language
In this course we will explore the possibilities to bring VR to the Web using React VR. Each lesson focuses on one specific concept or component that comes with React VR. This guide covers a large surface area of experiences like teleporting a user to a recorded 360° experience as well as placing them in virtual worlds. Even a combination of both is possible. Each lesson is independent, but some require knowledge explained in a previous lesson.
In this course the developer will learn how to create a LoopBack API and build it out to an API that can be used as a backend for apps. We will start by creating a basic LoopBack API project and gradually enhance it to a production ready API. The API we create defines a few models to persist the data and has custom functionality, validation and hooks added to those models.
After our data structure is defined we will learn how to extend the functionality of LoopBack by using mixins and components. We will also lock our API down using ACL’s and create a mechanism to automatically define the admin and user roles and create our admin user.
The last part of the course will show how how to filter the data stored in the API. We will make the API production-ready by adding unit tests, connecting it to MongoDB and we will show how to deploy the app to now.sh.
In this course we will take a simple Node.js app that connects to a MongoDB database and uses an Express web server, and learn how to setup a full software development deployment process as well as how to properly “Dockerize” the app.
We’ll step through setting up proper version control techniques, managing configuring within the environment, setting up proper build/deploy/run processes, and all with abiding by Docker best practices. We’ll also make sure our deployment is setup for scale, and have consistent development practices in place for reliable app deployments.
In this course we will learn how to use the ES2017 async and await keywords to write asynchronous code that is more readable and easier to follow than equivalent code based on long promise chains or deeply nested callbacks.
The await operator takes a promise and then pauses the function execution until that promise is settled which allows for an async function to read like sequential synchronous code.
This course will start by showing us how to convert a function doing a simple HTTP request into an async function using async/await. By the end of the course we will be able to loop over asynchronous data sources using a
for-await-ofasync generator function.In this course we will begin with nothing more than an empty directory & a text editor. Through small, focussed lessons we’ll learn how to setup our app with Webpack & Babel and how to configure these tools for use with Preact. Then we’ll move on to learning how to create components and how the Preact API mirrors that of React - highlighting the differences/additions along the way. Finally we’ll look at the interoperability with existing popular libraries in the React community such as Redux & React Router and with the popular development tools such as Redux Dev Tools & React Dev-Tools
Having your CSS co-located with your UI code provides the same sort of advantages in refactor ability and maintainability that React provides for the DOM using JSX. TypeStyle allows you to do that with the additional safety of TypeScript.
In this course we will cover core CSS concepts like CSS Properties, media queries, keyframes, pseduo-states and show how they can be represented in your JavaScript code using TypeStyle.
In this course, you will learn to use many of the most powerful and convenient higher-order components within Recompose by coding several real-world examples. Using recompose looks very different from “vanilla” React; so you will also get comfortable with the look and feel of a “recomposed” component. The best part is no more need for class components! You’ll learn how to use Recompose to both modify components and also create your own higher-order components.
It’s really fun to work with graphics when building apps and websites, but how do you get started? HTML5 has a technology called Canvas that lets us draw graphics to our screens. We can do everything from making basic shapes to creating complex interactive games and animations!
In this course, we will learn the basics of using Canvas. We’ll start by learning how to create a canvas on an HTML page. Next we will learn how to draw and style with fills and strokes. Finally, we will add interactivity to canvas elements.
Note: RxJS imports have changed since the publication of this course. Operators now must be passed into
.pipeto be applied to an observable.In this course we will learn to identify common mistakes with RxJS that usually make code harder to read and even introduce bugs. Most of these mistakes are related to Subject, subscribe, and subscriptions. We are going to see how to use only Observables and convenient operators made for solving those mistakes, such as fromEvent, takeUntil and switchMap. By the end of this course, you will have a more immediate intuition on what patterns are simple and safe in RxJS.
Generators are a useful tool for handling asynchrony in your JavaScript applications. They were added to JavaScript with ES2015. When applied correctly they allow us to write asynchronous code that looks synchronous.
They also turn one of JavaScripts core paradigms on its head. Contrary to normal functions, generator functions can be paused and resumed at any arbitrary point in time with the yield keyword.
This course will walk you through the basics of generators so you’ll be able to use them in your applications without ripping your hair out!
You know the basics of Postgres, but most meaningful queries will require you to combine tables in novel ways to ask questions you couldn't ask with a single table alone. Joins and unions come up over and over again in interview questions -- because of how fundamental they are. This course will make you a master of your tables, and give you the power to answer questions you couldn't before.
In this course, we are going to learn about the CSS Grid Layout. The Grid Layout is a feature in CSS available in modern browsers.
CSS Grid layout is a two-dimensional layout method that gives you control over items in rows as well as columns. In this course we will look at multiple ways to divide the page into major regions with control of the size, position, and layer.
We’ll discuss all the features CSS Grid has to offer us, and how we can apply these features to real world layout-based obstacles. We’ll start with placing items on a grid by using grid-column and grid-row and progress to more complex topics such as nesting grids within grids.
In this course we will show you how to wield the power behind the elusive window function. Which five movies were the highest grossing each year? Who are the highest performers in each department relative to their peers? These questions ask us to partition records into subgroups and answer questions about those groups -- that’s the power of a window function.
Many programmers will reach for their favorite scripting language to solve problems like these, but window functions allow you to answer them with the speed and efficiency of the Postgres query planner.
Plus, with the power to further slice and dice this derivative information, there’s no limit to the questions you can answer with raw SQL.
If you’re interested in the Postgres client that is used in this course you can download it here to check it out and follow along.
It’s amazing how much you can accomplish with a basic knowledge of SQL. In this course we’ll learn how to store lots of information (many millions of things!) and answer nearly any question we might have about that information (on the order of milliseconds!)
We’ll learn enough to make you say you “know SQL” -- table creation, inserts, selects, updates, deletes, aggregations, indexes, joins, and constraints. Along the way we’ll model real world problems so that you can see just how powerful SQL will make you!
If you’re interested in the Postgres client that is used in this course you can download it here to check it out and follow along.
In this course we will introduce the topic of using npm scripts as a build tool. We will start simple and then continue to build a small website as we introduce new topics. By the end of the course, you'll know how to get started and what tools and techniques are needed for you to create your own set of build scripts.
Learn to manage your terminal sessions and work more effectively from the command line using tmux. If you use the command line at all, tmux can make your life easier.
tmux bills itself as a terminal multiplexer. It allows you to wrangle multiple terminal sessions from one window. Instead of keeping track of many terminal windows yourself, you can use tmux to create, organize, and navigate between them. Even more importantly, tmux lets you detach from and re-attach sessions, so that you can leave your terminal sessions running in the background and resume them later. This is especially useful if you're working on a remote server: you can set up a persistent session that will continue running when you close your laptop. You can even share a tmux session to facilitate pair programming.
In this course we'll explore how to create many popular animated concepts in applications across web and mobile applications. We'll look at both simple, complex, and subtle interactions that you can use to enhance your React Native application.
This course should empower you to look at an animation in an application, break down the effect, and rebuild it in your own application.
The ultimate goal is to show how using the basic Animated calls we can build out effective and complex animations that take your application to the next level.
With the variety of choice we have in building modern web applications using JavaScript, it can make it difficult to understand where to even begin. We live in a wondrous era, where every problem we have seems to have a corresponding javascript module on npm that we can install with just a few keystrokes. It’s easy!
Often, “easy” can mean the opposite of simple. Easy is “quick to do”, where simple is “quick to understand”.
KISS.
In this course you will learn how to build production quality React applications. We will strive to keep things as simple as possible, with minimal dependencies. Instead of typing
npm install, we will build our own simple solutions first, to get a solid understanding of the problems that we are solving through libraries. We will build our tools in a functional style, and write appropriate unit tests to verify that they work as expected.If you are brand new to React, you’ll want to read the documentation and watch our free React Fundamentals course.
Angular Directives allow you to add custom behavior to elements and components. Rather than creating a hierarchy of components to try to "extend" behavior, Angular Directives enable you to compose behaviors on to your components. This includes adding event listeners that hook into services, manipulating templates, and adding more configuration to basic elements. This course helps you understand the concepts around building our Angular directives and provides examples from basic directives that inspect elements to advanced structural directives that completely re-write templates. If Angular is new and the syntax foreign, you will want to check out Get Started with Angular and Building Angular Components.
In this course we’ll explore getting started with a basic React Native application on both iOS and Android. We’ll learn about using React Native components, how to build custom components, how to layout an application using Flexbox, and how to style components.
We’ll also focus on how to use state to control components, how to persist information across application reloads with AsyncStorage, and how to inline edit in a ListView.
The ultimate goal is to gain an understanding of how to get started building simple React Native applications.
In this course we’ll work through Natural’s API for natural language processing in JavaScript. We’ll look at how to process text: learning how to break up language strings, find the word roots, work with inflectors, find sequences of words, and tag parts of speech. We’ll learn how to find important stats about a body of text: how to compare strings, how to classify text with machine learning, how to use the tf-idf tool to find relevant words. We’ll look at some of the extra tools Natural gives us, including the dictionary/thesaurus of WordNet, a phonetics comparer that lets us see if two words sound the same, and a spellcheck feature. We’ll also look at tries and digraphs, two data structures that help us better analyze bodies of text.
CMD+F in your text editor can only get you so far! In this course, we will learn to use grep and find, two powerful command-line utilities, to search through and explore our codebase. Learn to search specific files and folders, using regular expressions to look for -- or ignore! -- particular phrases. We'll cover how to search recursively, get more context on your results, and some simple tricks to make your searches faster and more targeted.
Once you're familiar with grep and find, you'll be able to quickly answer questions such as: Do I use this function anywhere other than my tests? Where does this file get imported? Whether you're working on a new feature, reading a codebase for the first time, or refactoring existing code, grep and find can help you work faster and more effectively.
Have you ever wished for access to conditionals or iteration when writing styles? How cool would it be to use functions to write styles? SCSS has that and more! SCSS is a superset of CSS. Any valid CSS is SCSS, they even have the same syntax. SCSS borrows features from other languages to write smarter, reusable and more readable styles. This course will focus on how to use SCSS’s more useful features, compare them against each other and assess when their usage is appropriate.
In this course we will learn and demonstrate the basic concepts of the React Native Animated API. We'll use Animated calls like
timingandspringto animate style properties, and learn how to combine animations to create more complex effects. We'll learn about more advanced interactions like animations with touch events, interpolation, and flip animations. The ultimate goal is to gain an understanding of how to animate React Native Views, how you can apply them to many different types of styles, and how to enhance the experience in your application.This is the video companion to the egghead.io Instructor Guide.
Screencasting is hard! There are virtually infinite ways to produce one. For an egghead.io lesson we expect several key aspects to be met. We want to make sure that our lessons have depth and clarity. Clarity is important and starts with the technical aspects of recording your screen and voice. Once we have achieved this objective level of clarity, we dip into the stylistic aspects of recording a lesson. The style is subjective, and the goal of an egghead.io lesson is not to have an army of uniform drone producing flavorless video content for the masses.
Our mission is to make you a badass screencaster. We want to push you to another level. We've found that a small set of standard practices will create an awesome experience for the student, and eliminate frustration as we teach by providing a repeatable pattern for success. It’s not complicated. In fact, it is simple, but it isn’t easy.
This course will show you how to produce an egghead.io lesson. We strive for consistency in style, and these lessons will demonstrate the core elements that create our brand screencasts. Let’s learn how together.
In this course we will learn and demonstrate the fundamental concepts and APIs of D3, on our way to building several common chart types. We’ll start with the building blocks upon which all D3 visualizations are built; things like scales, interpolators, and selections. We’ll see how to load data with D3, and how to put its full name, Data Driven Documents, into action. We’ll build column and bar charts, scatter plots, and area charts. Most importantly, we’ll gain an understanding of the conventions and patterns that underlie all D3 projects and examples, enabling you to dissect, understand, and build virtually any D3 visualization on the internet.
We’ll cover per-vertex coloring, advanced use of vertex arrays, more drawing modes for building 3D models, perspective, textures, and lighting. This course assumes prior knowledge in WebGL. Note: Check out Create 3D Graphics in JavaScript Using WebGL for an in depth introduction to WebGL if some of these concepts are feeling unfamiliar.
This course teaches the ubiquitous abstractions for modeling pure functional programs. Functional languages have adopted these algebraic constructs across the board as a way to compose applications in a principled way.
We can do the same in JavaScript. While the subject matter will move beyond the functional programming basics, no previous knowledge of functional programming is required. You'll start composing functionality before you know it.
In this course, we will build a ToDo API that stores notes using the OpenAPI Specification (Swagger). We will start with a blank API definition using the Swagger Online Editor. The Swagger definition file will be used to create a Node.js API. Along the way, we will discover how to implement additional details required for a fully functional API requests and responses. We will also learn about the powerful capabilities of Swagger to generate server side code and client libraries.
One of the hardest things about writing non-trivial applications is managing state. In our attempt to effectively manage state, we introduce additional complexity by trying to control application flow and the amount of code volume that comes from all of this. Redux gives us the ability to address state management and communication in astonishingly simple semantics that can be explained in just a couple minutes. The beauty of Redux is that it is not only a library but a pattern that works very will within Angular 1.x applications. In this series, we are going to learn how to integrate redux (the pattern) into Eggly from scratch and then introduce ng-redux and add in Redux DevTools at the end for fun.
This course will examine the Network panel in Chrome DevTools. We’ll step through the request log, examining the various properties exposed. We’ll talk about timing, filtering, throttling and generally using the network panel to better understand the ways in which our applications exist within a connected context.
This course examines the Sources panel in the Chrome DevTools, which allows you to see what files are responsible for the various things on the screen. Bundled into this panel, though, is the single most useful tool for any JavaScript developer - the JavaScript Debugger. We’ll use the Debugger to inspect JavaScript as it runs, allowing you to watch (and even interact with) the state of your application as it runs in ways that’ll blow your mind if you’ve mostly used console.log to debug your applications to this point.
Implementing modern component-based architecture in your new or existing Angular 1.x web application is a breath of fresh air.
In this course, you are going to take a close look at Eggly, an Angular 1.x application for organizing bookmarks, and build it using modern patterns and practices, inspired by Angular 2's recommended architecture.
You will learn how to leverage ES6 in your Angular 1 applications through Babel, and fully understand the core patterns that are used in a composed modular web application.
This course will teach you how to leverage your existing knowledge of Angular, while preparing your mind (and applications!) for the future.
If you are interested, there is a companion guide that digs deeper into the patterns found in this course and Angular 2.
In this course, we’ll get started creating content with WebGL without any frameworks. You’ll write raw JavaScript code and shaders in GLSL. This intro course covers setting up WebGL in an HTML application and learning the basics of 3d vertices, shaders, drawing modes, animation, interaction and transformations.
In this course we’ll take a deep look at the Elements panel in the chrome devtools. We’ll step through each button and tab on this panel and discuss how to use them to interact with your web application as it runs.
MobX is designed to enable building web applications with a complex data model in an intuitive and very performant manner. Using React and MobX is currently the simplest way to build component based web applications.
"Half the code, twice the fun" is how people describe MobX, or "So simple, I cannot believe it just works".
Looking at snippets of CSS is a great way to learn how to use it, but some details can fall through the cracks. This course demonstrates the process of styling an application from start to finish.
We will take a basic un-styled todo-list application written in React and use CSS to get the application to look like how we want. The first steps will be to apply static styles to the app based on a mock up, then we will incrementally add user interactivity as well as make the app responsive.
Accessibility (or a11y) is an important but often neglected in the world of web development. Many developers find themselves coding user interfaces without any knowledge of keyboard or screen reader requirements.
The fact is that accessibility doesn't happen by accident. Often it is seen as too hard or time consuming. This doesn't have to be the case. By following a handful of high-value patterns and practices, we can open our web apps to humans that otherwise wouldn't be able to interact with them at all.
This course will introduce you to accessibility through hands-on, technical examples that are way more effective than reading 10-year-old static web content.
This course will pick up where we left off with the Redux Fundamentals course. If you haven't watched that yet, you are highly encouraged to do so!
You are about to learn practical production ready techniques for building your React and Redux applications. You will explore advanced state management, middleware, React Router integration, and other common problems you are likely to encounter while building applications for your clients and customers.
Even if you have already spent time studying Redux, this course will show you better practices straight from the library's creator Dan Abramov.
The first question you ask after installing TypeScript is "What do I do now?" In this course you'll learn about using the TypeScript compiler, configuring your project, definition files, and all the ins-and-outs of understanding how to use TypeScript in your project.
This course takes a look at some of the new features that JavaScript has available with ES6 (ECMAScript 2015). It is a "montage" from several instructors.
TypeScripts purpose, the reason it exists, is to add a solid type system on top of ECMAScript 6+. JavaScript is a dynamically typed language. TypeScript applies a fundamental change to the language and applies static typing to the code in our applications.
This course will dive into the type system that TypeScript provides. You will gain a deeper understanding of what types can do for your applications.
*Note: RxJS imports have changed since the publication of this course. The concepts being taught on RxJS are still applicable.
Angular has many built-in features for working closely with RxJS to help you build entirely reactive applications. This course will teach you how to use Angular with RxJS. We will learn how to use the ngrx/store library to manage state in a clean, reactive "Redux style."
This course assumes you've got a working knowledge of Angular and reactive programming with RxJS. If you don't, you might want to watch the following courses to get you up to speed!
- Get Started with Angular
- Introduction to Reactive Programming with RxJS.
- Step by Step Async Programming with RxJS
- Getting Started With Redux, a course by Redux's, Dan Abramov.
We also have Intermediary Angular courses if you'd like to acquire more in-depth knowledge.
- [Dependency Injection](https://egghead.io/courses/angular-2-dependency-injection-di-explained
- Components, Directives
- Forms
- Router
- Animating Web Apps
Vim is a classic text editor that saw its first incarnation in 1976. Used around the world across most platforms, the ability to drop into a computer, open a command prompt and type
vimis a simple yet powerful concept.In this course we will take a tour of Vim, and learn the essentials you need to know to start being productive with this powerful text editor. We will learn about basic movement through a file in Vim without a mouse, loading and saving files, commanding the Vim editor, and get started customizing Vim to suit your needs.
GIF Loop Coder is a desktop tool for creating looping animations using JavaScript code. It is hours of fun to be had, and the results are always interesting.
With this course, you will learn how to create animations with GLC. GLC is an open source application, built on top of Electron. You can find it on Github!
If you have used RxJS Observables, it is likely you have seen the flatMap or switchMap operators. They are very powerful operators that can be used in various situations, while being common for dealing with HTTP requests. These operators may look mysterious at first, but turn out to be simple flattening operations on higher order Observables.
In this course you will learn what is a higher order Observable, when does it occur in real applications, and how to handle them with operators like switchMap. Throughout this course we will see real applications of these operations.
Start following this course if you have some understanding of RxJS, but want to gain advanced skills in the art of using operators.
If you're new to RxJS, we highly recommend the Introduction to Reactive Programming using RxJS to begin with, and then RxJS Beyond the Basics: Operators in Depth to understand operators.
If you're an absolute beginner to the concept of Observable and async streams, we highly recommend starting with Jafar Husain's excellent introduction.
Note: RxJS imports have changed since the publication of this course. The concepts being taught on RxJS are still applicable.
RxJS Subjects are a source of confusion for many people using RxJS. For many, the Subject is the obvious and only answer to every problem. Subjects are incredibly useful and necessary, but the key is to know when to use them for solving specific problems that you encounter.
In this course, we are going deep into RxJS Subjects and multicasting operators. You'll gain a solid understanding of when, where, and how to use these powerful tools.
If you are new to RxJS, or want a refresher please check out this course Introduction to Reactive Programming.
There are plenty of introductions to RxJS, but few resources that take you deep into the library, providing an accurate understand of what each piece performs.
In this course we will gain intermediate knowledge of RxJS, focusing on one aspect: how to create Observables. We will see how Observables compare to functions, how they compare to ES6 generators, what are the empty(), throw() and never() Observables, and other static factories that help in making Observable sequences.
Start following this course if you have a superficial understanding of RxJS, but want to gain confidence in using it.
If you're new to RxJS, we highly recommend this Async JS course from Jafar Husain to get a solid intro to the concepts. From there, you can watch this Introduction to Reactive Programming using RxJS, and you will be prepared for this course!
If you are developing JavaScript applications you are likely using logging as an integral part of your development process. Did you know that you aren't limited to simple
console.logstatements? Modern browsers give you a lot more logging options to work with!This course will explore those options and give you some new logging tools for your professional toolbox.
hapi is a battle-tested, full-featured, framework for building web applications and services with Node.js. With integrated support for essentials like authentication, caching and validation, and a powerful plugin system, hapi is ideal for projects and teams of any size.
This course will introduce hapi, some of it’s plugins, and guide you through many of hapi’s core features.
Flexbox is a wonderful tool built into the CSS specification. Using flexbox doesn't require any special framework or library, just a browser with CSS3 support. It is so awesome, and makes the arranging elements on a page almost fun!
RxJS is tremendously helpful in working with asynchronous code, but you’ve probably been stuck trying to use concepts you already know from Promises or Callbacks and applying them directly to RxJS. These lessons walk you through the step-by-step of building a simple game application with many asynchronous pieces. Each lesson focuses on a single operator or idea of how RxJS helps simplify your code as well as making you code flexible enough to easily add more asynchronous pieces as your codebase grows.
Operators are the core building blocks for reacting to data in your JavaScript applications.
In this course you will learn what operators are, and then take a tour of the most useful operators that RxJS has to offer.
Angular Material is an Angular-native, UI component framework from Google. It is a reference implementation of Google's Material Design and provides >30 UI components and services essential for mobile and desktop AngularJS applications.
In this course, we will quickly build a real-work application Angular UI application, take a tour of Angular Material, and learn how ngMaterial can be used in your projects.
presented by Thomas Burleson and Aaron Frost
“Feel free to submit a PR!” - words often found in GitHub issues, but met with confusion and fear by many. Getting started with contributing open source is not always straightforward and can be tricky. With this series, you’ll be equipped with the the tools, knowledge, and understanding you need to be productive and contribute to the wonderful world of open source projects. Much of this series speaks about GitHub, but most of the concepts are generally applicable to contributing to any open source project, regardless of where it’s hosted.
So enjoy the course and start contributing to the projects you use and love today!
Cycle.js is a framework where your app is described as a simple function taking an event stream as input and outputting an event stream.
Cycle.js builds on functional and reactive streams and is a JavaScript framework. What does that mean? In the course, André Staltz, the creator of Cycle.js, will explain it to us.
We'll start this course with an empty project and build out our own toy version of Cycle.js to understand exactly what's going on under the hood. When we have a solid base of how Cycle.js works we will move on to use the Cycle.js API and build an app using the Model-View-Intent pattern.
Regular expressions are a useful tool for dealing with text data. They allow us to slice and dice strings, and useful extract information in our applications.
Regex is also complex, and many developers will spend their entire career looking up even the most trivial of regex operations.
This course will help improve your regex skills, and teach a solid core of useful tools that you can use every day with confidence!
Most examples for reduce show you how to take an array of numbers and reduce them to a simple sum. Reduce is a great tool for this, but it can do so much more. It is a powerful tool, and essential to functional programming techniques.
This course will dig deep into the Array#reduce in JavaScript and give you a solid understanding to start using it today.
In this comprehensive tutorial, Dan Abramov - the creator of Redux - will teach you how to manage state in your React application with Redux.
State management is absolutely critical in providing users with a well-crafted experience with minimal bugs.
It's also one of the hardest aspects of a modern front-end application to get right.
Redux provides a solid, stable, and mature solution to managing state in your React application. Through a handful of small, useful patterns, Redux can transform your application from a total mess of confusing and scattered state, into a delightfully organized, easy to understand modern JavaScript powerhouse.
The principles of Redux aren't new, but they are packaged and presented for you in an easy to use a library that not only elevates your applications but also improves your general understanding of building JavaScript UIs.
In this course, Dan Abramov will show you the fundamentals of Redux, so that you can start using it to simplify your applications.
There are some amazing community notes on this course here on Github.
Arrays of data is one of the first things we learn about as programmers. Collections of information are a fundamental building block of most programming languages.
JavaScript is no exception. In this series, we will explore JavaScript (es6) array methods. We will slice, join, map, and reduce our way to better understanding of the powerful array methods that modern JavaScript delivers.
⚠️⚠️⚠️ This course uses an old version of RxJS and loads data using the jQuery library which is no longer fashionable. If you can look past that and understand that the principles André is demonstrating are timeless and useful, this course is a true gem. Otherwise, this is probably not for you! ⚠️⚠️⚠️
Reactive
You've probably been hearing this word recently, and it's referring to the Reactive Programming paradigm. One of the biggest challenges people face when learning Reactive Programming is changing their way of thinking, and in this course, you are going to exercise your mind and learn to let go of that imperative and stateful mindset.
You will also learn how can practically apply these Reactive concepts using the RxJS library!
If you are brand new to reactive programming, the course Asynchronous Programming: The End of The Loop, will get you up to speed. 📚
Publishing a JavaScript library for public use requires some extra steps. You need to think about how people will use the library. From end users, to contributors your library now has a variety of people outside of yourself potentially making use of the code that you've released into the wild.
From Github and npm, to releasing beta versions, semantic versioning, code coverage, continuous integration, and providing your library with a solid set of unit tests, there are a ton of things to learn.
This series will guide you through a set of steps to publish a JavaScript open source library.
You might also enjoy this article about contributing to open source.
Express is a minimal web server built on Node.js that provides essential functionality for delivering web applications to the browser and mobile devices. This series will guide you through the first steps of using Express for building your own applications.
Understanding Node.js can have a significant positive impact on your career as a Javascript developer. Knowing how it works, how it scales, and how to interact with it can save you time, headaches and delays going to production which can put you well ahead of your competition. Understanding node.js can help you architect applications that are built to work with node's features and capabilities.
Key Goals:
- Understand the built-in features of node and how they operate
- Learn to architect applications in such a way that allows your app to scale
- Leverage tools and packages created by others to rapidly grow your applications features and capabilities
- Comprehend nodes’ built-in modules for communication and how to use those to extend your application interface
- Use debugging tools to identify and resolve errors in your code Implement best-practice TDD and BDD principles to ensure your code is scalable, maintainable, and reproducible
How much work would it take for you to move all of your directives and their templates to several different new directories? You'd have to update the templateUrl, script tags, etc., etc. With webpack, this can be trivial. For example, you don't need to worry about loading your templates in the $templateCache ever again. Webpack will help you modularize your css and tests. All of these things and more in this series so you can start using webpack with Angular today.
Note: Some of the RxJS syntax used in this course is outdated, but the concepts taught on arrays, async, and observables are still reliable and applicable.
Async programming may seem daunting. How can we write programs that accept user input, run animations, and send server requests over the same period? How do we keep the code clear and concise? How do we gracefully propagate and handle asynchronous errors? How can we avoid memory leaks caused by dangling event handlers? JavaScript's loops and try/catch keywords are no help - they only work on synchronous functions.
Here's the good news: Asynchronous programming is much easier than it seems. The key is to think differently about events. It is possible to build most asynchronous programs using a handful of simple functions. We will learn why most JavaScript developers approach asynchronous programming the wrong way, and how to avoid these common mistakes.
HTML5 includes powerful drawing APIs that allow you to use the
canvaselement and JavaScript to draw whatever you want, directly on the page.This course covers D3 v3. If you'd like to learn about v4 of D3 (the latest version) click here for the course on that.
This series will gently guide you through the first steps in getting to know D3. The curve can be steep, but with a few simple tools, you'll be charting your buns off in no time flat.